background image

5

IMPORTANT SAFETY INSTRUCTIONS

SAVE THESE INSTRUCTIONS

Do not place hot cookware on cold cooktop glass.  

This

could cause glass to break.

• Avoid scratching the cooktop glass with sharp objects.

IMPORTANT INSTRUCTIONS FOR USING YOUR
OVEN

• Use care when opening oven door

—Stand to the side of

the range when opening the door of a hot oven. Let hot air
or steam escape before you remove or replace food in the
oven.

• Keep ovens vents unobstructed.

 Each vent has its own

vent located on the top, near each side and towards the back
of the cooktop. Touching the surfaces in this area when the
oven is operating may cause severe burns. Also, do not place
plastic or heat-sensitive items on or near an oven vent. These
items could melt or ignite.

• Placement of ovens racks.

 Always place oven racks in

desired location while ovens are cool. If rack must be moved
while oven is hot use extreme caution. Use potholders and
grasp the rack with both hands to reposition. Do not let
potholders contact the hot heating elements in the ovens.
Remove all utensils from the rack before moving.

• Do not use the broiler pan without its grid.

 The broiler

pan and its grid allow dripping fat to drain and be kept away
from the high heat of the broiler.

• Do not cover the broiler grid with aluminum foil.

Exposed fat and grease could ignite.

• Do not touch a hot light bulb with a damp cloth.

 Doing

so could cause the bulb to break. Disconnect the appliance
or turn off the power to the appliance before removing and
replacing light bulb.

IMPORTANT INSTRUCTIONS FOR CLEANING
YOUR RANGE

• Clean the range regularly to keep all parts free of

grease that could catch fire. 

Exhaust fan ventilation hoods

and grease filters should be kept clean. Do not allow grease
to accumulate on hood or filter. Greasy deposits in the fan
could catch fire. When you are flaming food under the hood,
turn the fan on. Refer to the hood manufacturer’s instructions
for cleaning.

• Kitchen cleaners and aerosols—

Always follow the

manufacturer’s recommended directions for use. Be aware
that excess residue from cleaners and aerosols may ignite
causing damage and injury.

SELF CLEANING OVENS

• In the self-Cleaning cycle only clean the parts listed in

this Use and Care Guide.

 Before self cleaning the oven,

remove the broiler pan and any utensils or foods from the
oven.

• Do not use oven cleaners

—No commercial oven cleaner

or ovens liner protective coating of any kind should be used
in or around any part of the oven.

• Do not clean door gasket

—The door gasket is essential for

a good seal. Care should be taken not to rub, damage or
move the gasket.

• Remove oven racks. 

 Oven racks color will change if left in

the oven during a self-cleaning cycle.

 The health of some birds is extremely sensitive

to the fumes given off during the self-cleaning cycle of any
range. Move birds to another well ventilated room.

IMPORTANT SAFETY NOTICE

The California Safe Drinking Water and Toxic Enforcement Act requires the Governor of California to publish a list of substances known
to the state to cause cancer, birth defects or other reproductive harm, and requires businesses to warn customers of potential exposure
to such substances.

Содержание PLEF489ACD

Страница 1: ...ent s and Racks 10 Air Circulation in the Oven 10 Oven Baking Informations 11 Broiling Informations 12 Convection Cooking and Baking 13 Convection Roasting 13 Setting Side Oven Control 14 Self Clean Oven Cycle 15 Porcelain Enamel Oven Cleaning Side Oven If equipped 16 To Clean the Oven Bottom 16 To Clean the Cooktop Glass 17 18 Cleaning Various Parts of your Range 19 To Remove and Replace Right OV...

Страница 2: ..._______________________________________________ Serial Number _____________________________________________________ Date of Purchase __________________________________________________ ThisOwner sGuidecontainsgeneraloperatinginstructionsforyourrangeandfeature information for several models Your appliance may not have all the described features Note The instructions appearing in this Owner s Guide a...

Страница 3: ...nlessspecificallyrecommendedinthemanuals Allotherservicingshouldbedoneonlybyaqualifiedtechnician this may reduce the risk of personal injury and damage to the range Never modify or alter the construction of a range by removing leveling legs panels wire covers anti tip brackets screws or any other part of the product Stepping leaning or sitting on the doors or drawer of this range can result in ser...

Страница 4: ...rs before connecting it to the power supply IMPORTANT INSTRUCTIONS FOR USING YOUR COOKTOP Know which knob controls each surface heating unit Use proper pan size This appliance is equipped with one ormoresurfaceunitsofdifferentsizes Selectutensilshaving flatbottomslargeenoughtocoverthesurfaceunit Theuse of undersized utensils will expose a portion of the surface heating to direct contact and may re...

Страница 5: ... removing and replacing light bulb IMPORTANT INSTRUCTIONS FOR CLEANING YOUR RANGE Clean the range regularly to keep all parts free of greasethatcouldcatchfire Exhaustfanventilationhoods and grease filters should be kept clean Do not allow grease to accumulate on hood or filter Greasy deposits in the fan couldcatchfire Whenyouareflamingfoodunderthehood turnthefanon Refertothehoodmanufacturer sinstr...

Страница 6: ... glass smoothtop models only flat bottomed woks without support rings may be used Pans should have flat bottoms Check for flatness by rotating a ruler across the bottom There should be no gap between the pan and ruler Note Always use a utensil for its intended purpose Follow manufacturer s instructions Some utensils were not made to be used in the oven or on the cooktop Do not use griddle over mor...

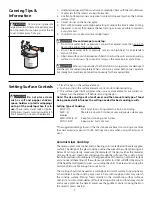
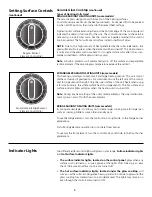
Страница 7: ...cooked will influence the setting needed for best cooking results Setting Type of Cooking MAX HI Start most foods bring water to a boil pan broiling MED 5 Maintain a slow boil thicken sauces and gravies steam veg etables MED LOW 2 4 Keep food cooking poach stew MIN 1 SIM Keep warm melt simmer The suggested settings found in the chart above are based on cooking in medium thickness aluminum pans wit...

Страница 8: ...ce of the unit heats when using it for small utensils the whole surface heats for large utensils The hot surface and surface indicator lights will glow when the heating unit is turned ON Note During any heat setting of the outer radiant element the inner radiant ele ment cycles on and off with the outer element BRIDGE RADIANT HEATING UNITS some models Its principal advantage is to allow you to cre...

Страница 9: ...ting 2 When done turn the control to OFF The warmer zone will remain warm until the hot surface indicator light goes off Temperature Selection Refer to the chart for recommended heating levels If a particular food is not listed start with the medium level and adjust as needed Most foods can be kept at serving temperatures by using the medium level Indicator Lights The surface indicator light is lo...

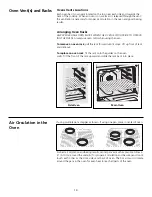
Страница 10: ...until it stops Lift up front of rack and slide out To replace an oven rack fit the rack onto the guides on the oven walls Tilt the front of the rack upward and slide the rack back into place Oven Vent s and Racks Main Oven Side Oven Air Circulation in the Oven If using multiple pans stagger as shown If using one pan place in center of oven For best air circulation and baking results center pans as...

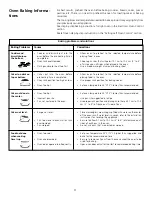
Страница 11: ...en door opened too frequently Corrections Allow oven to preheat to the selected temperature before placing food in oven Choose pan sizes that will permit 5 1 cm to 10 2 cm 2 to 4 of air space on all sides when placed in the oven Use a medium weight aluminum baking sheet Allow oven to preheat to the selected temperature before placing food in the oven Use proper rack position for baking needs Set o...

Страница 12: ...lement but on the thickness and age of meat fat content and doneness preferred Thefirstsideusuallyrequiresafewminuteslongerthanthesecond Frozen meats also require additional time Broiling Tips The broiler pan and its grid allow dripping grease to drain and be kept away from the high heat of the broiler DO NOT use the pan without its grid DO NOT cover the grid with foil The exposed grease could ign...

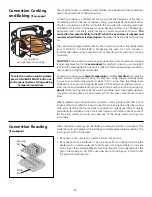
Страница 13: ...rature displayed on the oven control panel Because of this automatic adjustment you can enter the cooking temperature from your existing conventional cooking recipe but do not set the cooking time to be the same Even at the lower cooking temperature convection cooking times will be as much as 30 less than conventional cooking times When programming cooking times for convection cooking enter a time...

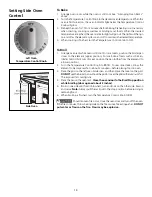
Страница 14: ... of meat position the pan further from the element to a lower position 2 Turn the Temperature Control Knob to BROIL To sear rare steaks allow the element to become red hot about 2 minutes before placing food in oven 3 Place the grid on the left oven broiler pan and then place the meat on the grid DONOTusethebroilerpanwithoutthegridorcoverthegridwithaluminumfoil The exposed fat could ignite 4 Place...

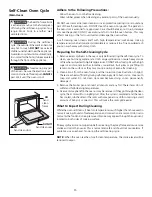
Страница 15: ...sert all utensils and any foil These items do not withstand high cleaning temperatures 4 Ovenracksmaybeleftintheovenormayberemoved Iftheygothroughtheclean cycle their color will turn slightly dull After the cycle is completed and the oven has cooled rub the sides or the racks with wax paper or a cloth containing a small amount of baby oil or salad oil This will make the racks glide easier What to ...

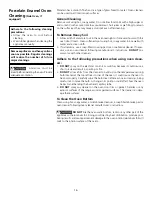
Страница 16: ... rear corner of the oven it could cause the oven to heat improperly Carefully wipe the bulb clean after each oven cleaning being careful not to move the bulb A change in its position could affect how the oven bakes Avoid bending the bulb and capillary tube 3 DO NOT spray any cleaner on the oven door trim or gasket handles or any exterior surfaces of the range wood or painted surfaces The cleaner c...

Страница 17: ...almark the cooktop 5 If cooktop should break do not use cooktop or attempt to clean it Call your authorized service technician immediately 6 Never use a trivet or metal stand between the cooking utensil and the ceramic cooktop The ceramic surface may be scratched metal marked or etched by such items 7 Sugary spills can cause pitting of your cooktop surface Therefore you must begin cleaning the spi...

Страница 18: ...s cooktop 1 Baking soda 2 Non impregnated plastic and nylon pads 3 For burned on material scrape with single edged razor blade held at a 30 angle 4 Ceramic glass cleaning cream Do not use on ceramic glass cooktop 1 Avoid pads that can leave marks and scratches 2 Avoid heavy duty cleaning powders these can scratch depending on their abrasiveness and cleaning pressure applied 3 Avoid chemical oven c...

Страница 19: ...ing Oven Controls Use a mild abrasive cleaner following manufacturer s instructions Rinse with clean water and dry After cleaning the racks rub the sides of the racks with wax paper or a cloth containing a small amount of baby oil or salad oil this will make the racks glide easier into the rack positions Gentle scouring with a soapy scouring pad will remove most spots Rinse with a 1 1 solution of ...

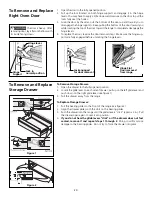
Страница 20: ...port Hook To Remove Storage Drawer 1 Open the drawer to the fully opened position 2 Locate the glide lever on each side of drawer pull up on the left glide lever and push down on the right glide lever see figure 1 3 Pull the drawer away from the range To Replace Storage Drawer 1 Pull the bearing glides to the front of the range see figure 2 2 Align the drawer glides with the slots on the bearing g...

Страница 21: ...re holder to one side to release the glass shield 4 Replace bulb with a new 40 watt appliance bulb 5 Replace glass shield in socket and snap wire holder into place 6 Turn power back on at the main source or plug the appliance back in 7 Theclockwillthenneedtobereset Toreset seeSettingtheClockandMinute Timer in the ELECTRONIC OVEN CONTROL manual BesuretheovenisunpluggedandallpartsareCOOLbeforereplac...

Страница 22: ...liance Check steps under Entire Range or Oven Does Not Operate in this Avoid Service Checklist Incorrect control setting Make sure the correct control is on for the surface unit to be used Coarse particules such as salt and sand between cooktop and utensils can cause scratches Be sure cooktop surface and bottoms of utensils are clean before usage Small scratches do not affect cooking and will beco...

Страница 23: ... bottom Wipe up excessive spillovers before starting the self clean cycle If flames or excessive smoke are present stop the self clean cycle and follow the steps under Stopping or Interrupting the Self Cleaning Cycle in the ELECTRONIC OVEN CONTROL section Control s not set properly Follow instructions under Setting Oven Controls in the ELECTRONIC OVEN CONTROL section Make sure oven door is opened ...

Страница 24: ...penses for making the appliance accessible for servicing such as removal of trim cupboards shelves etc which are not a part of the appliance when it was shipped from the factory 5 Damages to finish after installation 6 Replacement of light bulbs and or fluorescent tubes on models with these features This warranty does not cover the following 1 CONSEQUENTIAL OR INCIDENTAL DAMAGES SUCH AS PROPERTY D...

Отзывы: