


Seite
1.
Hinweise zur Dokumentation
4
1.1
CE-Kennzeichnung 4
1.2
Aufbewahrung der Unterlagen
4
1.3
Verwendete Symbole
4
1.4
Mitgeltende Unterlagen
4
1.5
Normative Verweise
4
2.
Sicherheitshinweise
5 – 15
3.
Gerätebeschreibung
16 – 18
3.1
Funktionsbeschreibung
und Bestandteile
16
3.2 Kennzeichnung
16
3.3
Lieferumfang
17 – 18
4.
Montage und
Aufstellung 19 – 34
4.1
Anforderungen an den Aufstellort
19
4.2
KX Klemmenkasten
20 – 23
4.2.1
Verschluss montieren
20
4.2.2 Verschluss
demontieren
21
4.2.3 Abdichtstopfen
anbringen
21
4.2.4 Montage
Flanschplatte
22
4.2.5 Erdung
22
4.2.6 Innenausbau
23
4.3
KX Bus-Gehäuse
24 – 27
4.3.1
Verschluss montieren
24
4.3.2 Verschluss demontieren
25
4.3.3 Tür
montieren
25
4.3.4 Abdichtstopfen
anbringen
26
4.3.5 Erdung
26
4.3.6 Innenausbau
27
4.4
KX E-Box
28 – 34
4.4.1
Vorreiberverschluss montieren
28
4.4.2 Tür
montieren
29
4.4.3 Vorreiberverschluss
demontieren
29
4.4.4
Vorreiberverschluss umbauen
für Türanschlag links
30
4.4.5
Vorreiberverschluss montieren –
Türanschlag links
31
4.4.6 Tür montieren – Türanschlag links
32
4.4.7 Abdichtstopfen
anbringen
33
4.4.8 Einbau
Montageplatte
33
4.4.9 Erdung
34
4.4.10 Innenausbau
34
5. Transport
35
6.
Installation 36
7.
Erdung und
Potenzialausgleich 36
8.
Bedienung 36
9.
Inspektion und Wartung
37
10.
Lagerung 38
11.
Technische Daten/
Schutzgrade/
Verlustleistung
39 – 44
12.
Ersatzteile 45
13.
Garantie 45
14.
Kundendienstadressen 45
Page
1.
Notes on documentation
4
1.1
CE labelling
4
1.2
Storing the documents
4
1.3 Symbols
used
4
1.4
Other applicable documents
4
1.5
Normative references
4
2.
Safety instructions
5 – 15
3.
Device description
16 – 18
3.1
Function description
and components
16
3.2 Labelling
16
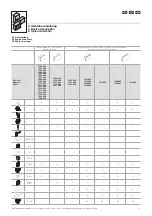
3.3
Scope of delivery
17 – 18
4.
Assembly and siting
19 – 34
4.1
Site requirements
19
4.2
KX terminal boxes
20 – 23
4.2.1
Mounting the lock
20
4.2.2 Dismantling the lock
21
4.2.3 Inserting the sealing bungs
21
4.2.4 Mounting the gland plates
22
4.2.5 Earthing
22
4.2.6 Interior
installation
23
4.3
KX bus enclosures
24 – 27
4.3.1
Mounting the lock
24
4.3.2 Dismantling the lock
25
4.3.3 Mounting the door
25
4.3.4 Inserting the sealing bungs
26
4.3.5 Earthing
26
4.3.6 Interior
installation
27
4.4
KX E-Box
28 – 34
4.4.1
Mounting the cam lock
28
4.4.2 Mounting the door
29
4.4.3 Dismantling the cam lock
29
4.4.4
Changing the cam lock
to a l/h door hinge
30
4.4.5
Fitting the cam lock –
l/h door hinge
31
4.4.6
Mounting the door –
l/h door hinge
32
4.4.7 Inserting the sealing bungs
33
4.4.8 Installing the mounting plate
33
4.4.9 Earthing
34
4.4.10 Interior installation
34
5. Transport
35
6.
Installation 36
7.
Earthing and potential
equalisation 36
8. Operation
36
9.
Inspection and maintenance
37
10. Storage
38
11.
Technical specifications/
Degrees of protection/
Heat loss
39 – 44
12. Spare
parts
45
13. Warranty
45
14.
Customer services addresses
45
2
KX Kleingehäuse, Stahlblech / KX small enclosures, sheet steel / Obudowy małogabarytowe KX, blacha stalowa
Inhaltsverzeichnis
Contents
Spis treści
Strona
1.
Wskazówki dotyczące
dokumentacji 4
1.1
Oznaczenie CE
4
1.2
Przechowywanie dokumentacji
4
1.3
Zastosowane symbole
4
1.4
Dodatkowa dokumentacja
4
1.5
Odsyłacze do norm
4
2.
Wskazówki dotyczące
bezpieczeństwa
5 – 15
3.
Opis urządzenia
16 – 18
3.1
Elementy składowe i opis działania 16
3.2 Oznakowanie
16
3.3
Zakres dostawy
17 – 18
4.
Montaż i ustawienie
19 – 34
4.1
Wymagania odnośnie miejsca
ustawienia
19
4.2
KX Skrzynka zaciskowa
20 – 23
4.2.1
Montaż zamka
20
4.2.2 Demontaż
zamka
21
4.2.3 Zakładanie zatyczek
uszczelniających
21
4.2.4 Montaż płyty kołnierzowej
22
4.2.5 Uziemienie
22
4.2.6 Zabudowa
wewnętrzna
23
4.3
KX Obudowa typu Bus
24 – 27
4.3.1
Montaż zamka
24
4.3.2 Demontaż
zamka
25
4.3.3 Montaż
drzwi
25
4.3.4 Zakładanie zatyczek
uszczelniających
26
4.3.5 Uziemienie
26
4.3.6 Zabudowa
wewnętrzna
27
4.4
KX E-Box
28 – 34
4.4.1
Montaż zamka dźwigienkowego
28
4.4.2 Montaż
drzwi
29
4.4.3 Demontaż zamka dźwigienkowego
29
4.4.4
Przebudowa zamka dźwigienkowego
dla zawiasów z lewej strony
30
4.4.5
Montaż zamka dźwigienkowego –
zawiasy z lewej strony
31
4.4.6 Montaż drzwi – zawiasy
z lewej strony
32
4.4.7 Zakładanie zatyczek
uszczelniających
33
4.4.8 Instalacja płyty montażowej
33
4.4.9 Uziemienie
34
4.4.10 Zabudowa wewnętrzna
34
5. Transport
35
6.
Instalacja 36
7.
Uziemienie i wyrównanie
potencjałów 36
8.
Obsługa 36
9.
Przegląd i konserwacja
37
10.
Magazynowanie 38
11.
Dane techniczne/
Stopnie ochrony/
Moc tracona
39 – 44
12.
Części zamienne
45
13.
Gwarancja 45
14.
Adresy Biur Obsługi Klienta
45


