background image

10

HOW TO ACTIVATE THE CONSOLE

The included AC power adapter must be used to oper-

ate the elliptical strider. See HOW TO PLUG IN THE

AC POWER ADAPTER on page 6. When the AC

power adapter is plugged in, the displays will light and

the console will be ready for use.

IMPORTANT: If the console has been exposed to

cold temperatures, allow it to warm to room tem-

perature before activating the console. Otherwise,

you may damage the console displays or other

electronic components.

HOW TO TURN OFF THE CONSOLE

If the pedals are not moved for a short period of time,

the console will enter an idle mode and a screen

saver will appear in the center display. Unplug the AC

power adapter when the elliptical strider is not in use.

HOW TO USE THE QUICK START MODE

The quick start mode allows you to start exercising,

adjust the resistance of the pedals manually, and set a

target stride length manually.

1. Press the QUICK START button or begin strid-

ing to activate the console.

See HOW TO ACTIVATE THE CONSOLE above.

2. Select the quick start mode.

When you activate the con-

sole, the quick start mode

will be selected. If you have

selected a workout, rese-

lect the quick start mode by

pressing any of the workout

buttons repeatedly until

zeros appear in the right

display.

3. Change the resistance of the pedals as

desired.

As you stride, change the

resistance of the pedals by

pressing the RESISTANCE

increase and decrease but-

tons. Note: After you press

a RESISTANCE button, it

will take a moment for the pedals to reach the

selected resistance level.

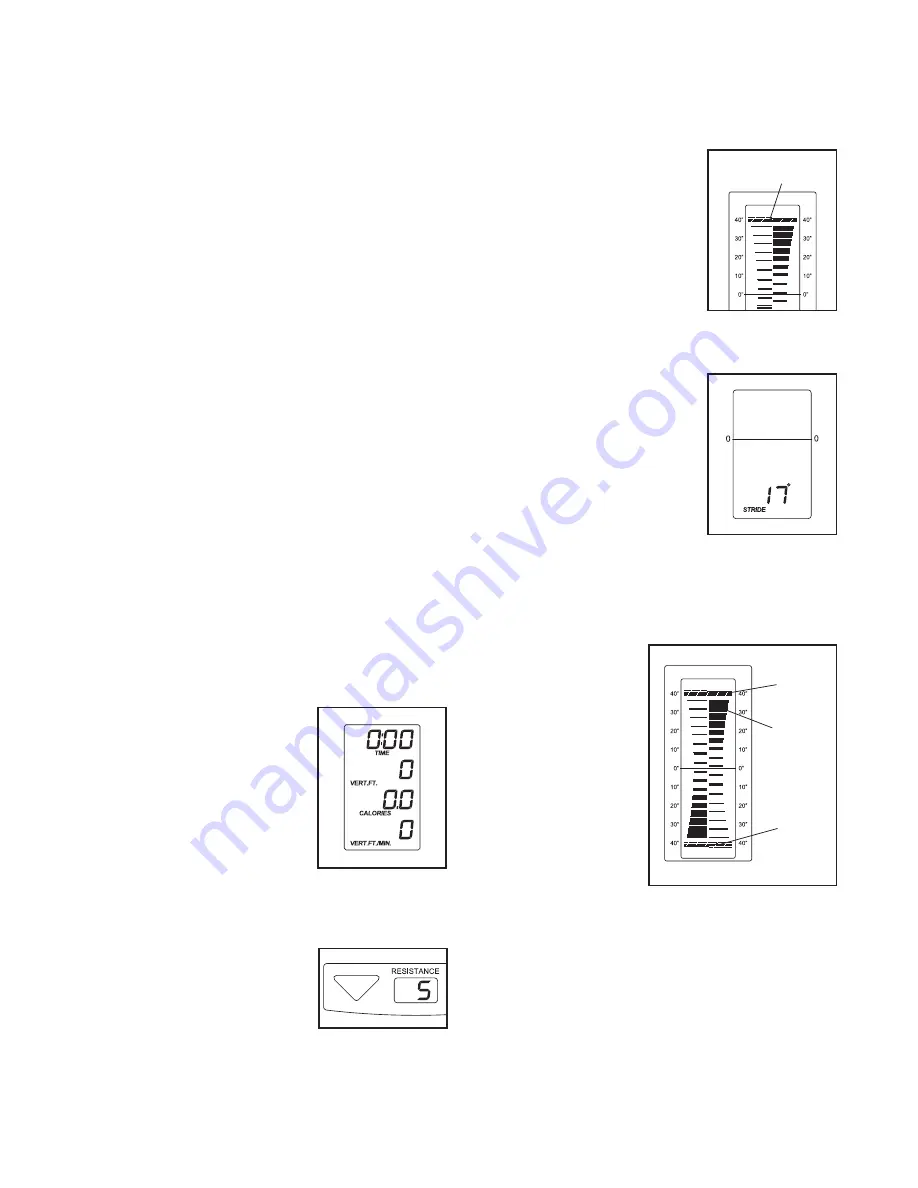
4. Set a target stride length as desired.

The stride length meter in the center display

allows you to set a target stride length.

To set a target stride length,

press the STRIDE LENGTH

increase and decrease but-

tons below the stride length

meter repeatedly until the

target bars appear next to

the desired stride length.

Note: Stride length is mea-

sured in inches.

5. Follow your progress with the displays.

Left display

–This display

shows the length of your

stride in inches. Note: When

you select a workout, this

display will also show the

workout profile and the

elapsed time for each seg-

ment of the workout.

Center display

–This display shows the stride

length meter. The stride length meter compares

your actual stride length to the target stride length.

The target bars in

the stride length

meter indicate the

target stride length.

The pedal blocks

track the actual

movement of the

pedals while you

exercise.

As you exercise, keep your stride length near the

target stride length by striding so that the pedal

blocks move back and forth between the target

bars.

Target Bar

Target

Bar

Target

Bar

Pedal

Block

Содержание F7.8

Страница 1: ...e reference www freemotionfitness com QUESTIONS If you have questions or if parts are damaged or missing CONTACT THE STORE WHERE YOU PUR CHASED THIS PRODUCT If you are unable to contact the store see...

Страница 2: ...ACT CUSTOMER CARE Back Cover LIMITED WARRANTY Back Cover FREEMOTION is a registered trademark of ICON IP Inc iPod is a trademark of Apple Computer Inc registered in the U S and other countries WARNING...

Страница 3: ...oor or carpet Make sure that there is enough clearance around the ellipti cal strider to mount dismount and use it 5 Inspect and properly tighten all parts regu larly Replace any worn parts immediatel...

Страница 4: ...me more effective and enjoyable For your benefit read this manual carefully before you use the elliptical strider If you have questions after reading this manual please see the back cover of this manu...

Страница 5: ...Right Handlebar Hub 30 and align the five holes in the Right Handlebar with the five holes in the Right Handlebar Hub Attach the Right Handlebar 20 with five 5 16 x 1 2 Patch Screws 105 Next attach a...

Страница 6: ...er Whenever the adapter is used it must be held in place by a metal screw Some 2 pole receptacle outlet box covers are not grounded Contact a qualified electrician to deter mine if the outlet box cove...

Страница 7: ...mount the elliptical strider wait until the pedals come to a complete stop When the pedals are sta tionary hold the handlebars or the handrails and step off the pedals HOW TO LEVEL THE ELLIPTICAL STRI...

Страница 8: ...about the features of the Basic console see page 9 To learn about the features of the Workout TV console see the user s manual included with the Workout TV console To upgrade your console and expand...

Страница 9: ...and prompts you to maintain a target stride length as it guides you through an effective workout The console also features the iFit Interactive Workout System which enables the console to accept iFit...

Страница 10: ...til zeros appear in the right display 3 Change the resistance of the pedals as desired As you stride change the resistance of the pedals by pressing the RESISTANCE increase and decrease but tons Note...

Страница 11: ...ld the handgrip pulse sensor and wear the chest pulse sensor at the same time the console will not display your heart rate accurately If there are sheets of clear plastic on the metal contacts on the...

Страница 12: ...begin to flash If a different resistance level is programmed for the next seg ment the resistance level of the pedals will then change As you exercise keep your stride length near the target stride le...

Страница 13: ...P3 player personal audio player or CD player Make sure that the audio cable is fully plugged in To use the Integrated Universal Dock for iPod you need an iFit Universal iPod Connector not included To...

Страница 14: ...he pedals have been moved To reset the usage information to zero press and hold down the Resistance increase and decrease buttons simultaneously for several seconds 4 View and change the input setting...

Страница 15: ...e elliptical strider use a damp cloth and a small amount of mild soap Make sure to regularly clean the track rollers and the track frame on which the track rollers ride IMPORTANT To avoid damage to th...

Страница 16: ...ur goal is to strengthen your cardiovascular system you must perform aerobic exercise which is activity that requires large amounts of oxygen for prolonged periods of time For aerobic exercise adjust...

Страница 17: ...les Stretch With one leg in front of the other reach forward and place your hands against a wall Keep your back leg straight and your back foot flat on the floor Bend your front leg lean forward and m...

Страница 18: ...18 NOTES...

Страница 19: ...Flange 45 2 Handlebar Cap 46 1 Tension Bracket 47 1 Tension Spring 48 1 Tension Pulley 49 1 Tension Bushing 50 1 Idler Pulley 51 1 Idler Axle 52 8 Small Pulley 53 1 Belt Pulley 54 2 Cable Spool 55 2 S...

Страница 20: ...x 3 4 Screw 117 30 8 x 1 Tek Screw 118 40 Plastic Insert 119 2 Pedal Spacer 120 8 Track Washer 121 4 8 x 1 1 4 Screw 122 8 1 4 x 1 2 Screw 123 1 Tension Bolt 124 1 Tension Nut 125 10 Hub Screw 126 10...

Страница 21: ...21 EXPLODED DRAWING A SFSR84407 0 R1209A 6 8 7 9 10 11 12 13 14 17 15 16 18 117 117 117 117 117 121 129 117 130 130 129 121 117 121 117 117 129 117 117 117 117 104 129 121 104 130 130...

Страница 22: ...7 78 79 80 81 82 83 83 83 83 90 97 110 110 110 111 102 102 102 100 100 101 101 104 104 104 100 113 98 120 114 115 118 129 129 118 129 118 115 114 98 120 114 120 98 115 118 129 129 118 118 129 115 120...

Страница 23: ...7 59 60 60 61 84 84 85 85 86 86 87 87 87 87 87 87 87 87 87 87 87 87 88 88 88 88 89 89 112 92 92 92 114 114 94 115 98 93 93 93 93 96 105 106 105 94 94 94 94 94 91 99 93 93 99 94 101 101 122 103 103 95...

Страница 24: ...rising out of or in con nection with the use or performance of the product damages with respect to any economic loss loss of property loss of revenues or profits loss of enjoyment or use or costs of r...

Отзывы: