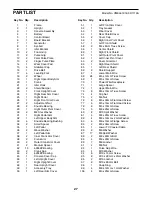
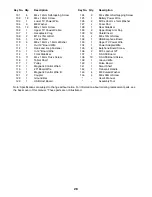
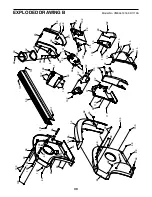
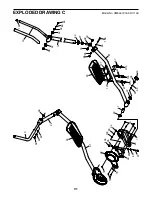
Freemotion e8.9b Скачать руководство пользователя страница 27

27

PART LIST

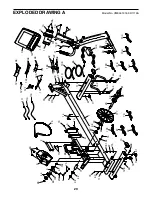
Model No. VMEL81918.0 R1119A

 1  1  Frame

 2  1  Upright

  3 

Console Assembly

 4  1  Battery

  5 

Control Board

  6 

Board Bracket

 7  1  Generator

 8  1  Eyebolt

  9 

Idler Bracket

  10 

Foam Grip

  11 

Pulse Grip

  12 

Palm Pulse Plate

  13 

Finger Pulse Plate

  14 

Wear Cover Pad

  15 

Stabilizer Cap

  16 

Drive Belt

  17 

Leveling Foot

 18  2  Wheel

  19 

Right Upper Body Arm

 20  1  Crank

  21 

Idler Hook

  22 

Shield Bumper

  23 

Front Upright Cover

  24 

Right Rear Arm Cover

  25 

Right Pedal

  26 

Right Front Arm Cover

  27 

Adjustment Nut

  28 

Knuckle Bearing

  29 

Right Outer Pivot Cover 

  30 

M4 Star Washer

  31 

Right Pedal Arm

  32 

Left Upper Body Arm

  33 

Knuckle Bearing Bushing

  34 

Small Spacer

  35 

Left Pedal

  36 

Wave Washer

  37 

Left Pedal Arm

  38 

Inner Crank Arm Cover

  39 

Crank Arm

  40 

Outer Crank Arm Cover

  41 

Medium Spacer

  42 

10 

6005ZZ Bearing

  43 

Crank Cap

  44 

6204ZZ Bearing

  45 

Console Cover Cap

  46 

Left Upright Cover

  47 

Right Upright Cover

  48 

Rear Upright Cover

  49 

Accessory Tray

  50 

Left Rear Arm Cover

  51 

Left Front Arm Cover

  52 

Tray Gasket

  53 

Wear Cover

  54 

Rear Shield Cover

  55 

Cover Cap

  56 

Right Inner Pivot Cover

  57 

Left Front Shield

  58 

M4 x 8mm Truss Screw

  59 

Center Shield

  60 

Right Front Shield

  61 

Left Outer Pivot Cover

  62 

Left Inner Pivot Cover

  63 

Cover Grommet

  64 

Right Rear Shield

  65 

Left Rear Shield

  66 

Shield Support

  67 

Lower Main Wire

  68 

28 

M5 x 12mm Truss Screw

  69 

M5 x 15mm Screw

  70 

Power Wire/Receptacle

  71 

Large Spacer

  72 

Upper Main Wire

  73 

M5 x 10mm Truss Screw

  74 

Clip Nut

  75 

M6 Nut

  76 

M5 x 30mm Flat Head Screw

  77 

M5 x 15mm Flat Head Screw

  78 

M5 x 10mm Screw

  79 

M8 x 25mm Screw

  80 

M10 Split Washer

  81 

M8 x 20mm Truss Screw

  82 

M8 x 16mm x 2mm Washer

  83 

M6 x 15mm Flange Screw

  84 

M6 x 35mm Screw

  85 

Lower TV Coaxial Cable

  86 

M6 Washer

  87 

17 

M8 Split Washer

  88 

M8 x 40mm Bolt

  89 

M8 x 20mm Screw

  90 

M8 Locknut

  91 

M8 Nut

  92 

Pulse Grip Wire

  93 

M10 Washer

  94 

M10 x 15mm Screw

  95 

M10 x 20mm x 2mm Washer

  96 

M10 Locknut

  97 

M10 x 80mm Bolt

  98 

Snap Ring

  99 

M8 x 12mm x 1mm Washer

  100 

M3 x 25mm Screw

 Key No.  Qty. 

Description

 Key No.  Qty. 

Description

Содержание e8.9b

Страница 1: ...ing this equipment Keep this manual for future reference Model No VMEL81918 0 Serial No Write the serial number in the space above for reference freemotionfitness com QUESTIONS If you have questions or if parts are damaged or missing please see HOW TO CONTACT CUSTOMER CARE on the back cover of this manual ...

Страница 2: ...ecal is missing or illegible see the back cover of this manual and request a free replacement decal Apply the decal in the location shown Note The decal s may not be shown at actual size FREEMOTION and IFIT are registered trademarks of ICON Health Fitness Inc App Store is a trademark of Apple Inc registered in the U S and other countries Android and Google Play are trademarks of Google LLC The Blu...

Страница 3: ...the elliptical 6 Inspect and properly tighten all parts each time the elliptical is used Replace any worn parts immediately 7 Keep children under age 16 and pets away from the elliptical at all times 8 The elliptical should not be used by persons weighing more than 350 lbs 159 kg 9 Wear appropriate clothes while exercising do not wear loose clothes that could become caught on the elliptical Always...

Страница 4: ...signed to make your workouts more effective and enjoyable For your benefit read this manual carefully before you use the elliptical If you have questions after reading this manual please see the back cover of this manual To help us assist you note the product model number and serial number before contacting us The model number and the location of the serial number decal are shown on the front cove...

Страница 5: ...2mm x 1mm Washer 99 4 M8 Split Washer 87 2 M8 x 16mm x 1 5mm Washer 110 2 M6 Curved Washer 143 4 PART IDENTIFICATION CHART Use the drawings below to identify the small parts needed for assembly The number in parentheses below each drawing is the key number of the part from the PART LIST near the end of this manual The number following the key number is the quantity needed for assembly Note If a pa...

Страница 6: ...ools not included are required for assembly one adjustable wrench one Phillips screwdriver a set of metric hex keys Assembly may be easier if you have a set of wrenches To avoid damaging parts do not use power tools 1 Attach the Rear Stabilizer 128 to the Frame 1 with two M8 x 25mm Screws 79 two M8 Split Washers 87 and two M8 x 16mm x 1 5mm Washers 110 87 87 110 110 79 79 128 1 2 2 Attach the Tran...

Страница 7: ...33 to the Lower TV Power Wire 103 and connect the Upper TV Coaxial Cable 106 to the Lower TV Coaxial Cable 85 See the lower drawing Locate the covers A B on the Lower TV Coaxial Cable 85 and on the Upper TV Coaxial Cable 106 Slide the covers together and push the small cover A into the large cover B Then insert the excess wire into the Upright 2 2 1 B A 72 67 106 85 133 103 ...

Страница 8: ...ent them as shown Hold the Left and Right Front Shields 57 60 together around the Frame 1 and the Upright 2 Attach the Left and Right Front Shields 57 60 with four M5 x 12mm Truss Screws 68 and six M4 x 16mm Truss Screws 115 start all the Truss Screws and then tighten them Then press the Center Shield 59 onto the Left and Right Front Shields 57 60 make sure that the tabs on the underside of the Ce...

Страница 9: ...Attach the Right Upper Body Arm 19 with an M10 x 15mm Screw 94 an M10 Split Washer 80 and an M10 Washer 93 Attach the Left Upper Body Arm 32 in the same way 7 Attach the Knuckle Bearing 28 on the lower end of the Right Upper Body Arm 19 to the Right Pedal Arm 31 with an M10 x 75mm Bolt 108 two M10 x 20mm x 2mm Washers 95 and an M10 Locknut 96 Repeat this step on the left side of the elliptical 7 1...

Страница 10: ...ten them Repeat this step on the left side of the elliptical 9 Identify the Right Outer and Inner Pivot Covers 29 56 and orient them as shown Press the Right Outer and Inner Pivot Covers 29 56 together around the Right Upper Body Arm 19 and attach them with two M4 x 12mm Screws 102 and two M4 x 16mm Truss Screws 115 start all the Screws and then tighten them Repeat this step on the left side of th...

Страница 11: ... If you did not purchase the optional MYE receiver go to step 11 To order the optional MYE receiver see the back cover of this manual 10 Using a standard screwdriver remove the Console Cover Cap 45 from the Left and Right Upright Covers 46 47 on the back of the Console 3 Locate the coupler C that has a wire labeled In D and a wire labeled Out E See the inset drawing Unplug the wire labeled In D an...

Страница 12: ... you do not do this you may damage the console displays or other electronic components Plug the power adapter for the optional digital TV into the upper digital TV power receptacle B on the frame of the elliptical Then plug the power adapter into an appropriate outlet that is properly installed in accordance with all local codes and ordinances HOW TO CONNECT A COAXIAL CABLE TO THE ELLIPTICAL If th...

Страница 13: ...tighten the nut HOW TO EXERCISE ON THE ELLIPTICAL To mount the elliptical hold the upper body arms E or the handlebars F and step onto the pedal G that is in the lower position Then step onto the other pedal Push the pedals until they begin to move with a continuous motion Note The crank arms H can turn in either direction It is recommended that you turn the crank arms in the direction shown by th...

Страница 14: ...allation debris resulting from any destruction activi ties in the product s environment rust or corrosion as a result of the product s location alterations or modifica tions without written authorization or failure on your part to use operate and maintain the product as set forth in this manual will void the warranty All terms of the warranty are void if this prod uct is moved beyond the continent...

Страница 15: ... monitor You can even connect your tablet to the console and use the iFit Smart Cardio Equipment app to record and track your workout information You can also use the charging port on the console to charge your USB compatible device while you exercise To activate the console see page 16 To turn off the console see page 16 To use the charging port see page 16 To use the quick start mode see page 17...

Страница 16: ...RKOUT OR PRESS START TO BEGIN will scroll across the message banner HOW TO TURN OFF THE CONSOLE If the pedals are not moved and no buttons are pressed for a short while the console will turn off automatically If the elliptical is being used with the power adapter unplug the power adapter when you are finished exercising IMPORTANT If you do not do this the electrical components on the elliptical ma...

Страница 17: ... light appears next to the displays in a repeating cycle When the quick start mode is selected the time display will show the elapsed time When a pro gram is selected the time display will show the time remaining in the program Note The console can display distance in either miles or kilometers To find which unit of mea surement is selected see HOW TO CHANGE CONSOLE SETTINGS on page 21 Cals Watts ...

Страница 18: ...ld the contacts for at least 15 seconds If the display does not show your heart rate make sure that your hands are positioned as described Be careful not to move your hands excessively or to squeeze the contacts tightly For optimal perfor mance clean the contacts using a soft cloth never use alcohol abrasives or chemicals to clean the contacts 6 Pause the workout if desired To pause the workout pr...

Страница 19: ...rate Your maximum heart rate is estimated by subtracting your age from 220 For example if you are 30 years old your estimated maximum heart rate is 190 beats per minute 220 30 190 Therefore if you are 30 years old a target heart rate setting of 60 percent is equal to 114 beats per minute 60 percent of 190 is 114 To determine a target heart rate that is suitable for you consult your physician or a ...

Страница 20: ...r IMPORTANT The watts target is intended only to provide motivation Make sure to exercise at an intensity level that is comfortable for you If the resistance level is too high or too low you can manually override the resistance level by pressing the Resistance increase and decrease buttons IMPORTANT The resistance level will automatically adjust at the end of each segment The program will continue...

Страница 21: ...e during the 30 second pairing mode or if you are not able to press the Start button within 60 seconds of connecting your tablet to the console press the iFit Sync button and repeat this step 3 Record and track your workout information Follow the instructions in the iFit Smart Cardio Equipment app to record and track your workout information 4 Disconnect your tablet from the console if desired To ...

Страница 22: ...the digital TV setup menu Chan increase and decrease buttons Press these buttons to navigate up and down in the digital TV menus Vol increase and decrease buttons Press these buttons to navigate right and left in the digital TV menus Enter button right Mode button Press these buttons to make a selection Left Mode button Press this button to select a TV source Start button Press this button to sele...

Страница 23: ...nd on try to correct the interference by one or more of the following measures Reorient or relocate the receiving antenna Increase the separation between the equipment and the receiver Connect the equipment into an outlet on a circuit different from that to which the receiver is connected Consult the dealer or an experienced radio TV technician for help FCC CAUTION To assure continued compliance u...

Страница 24: ...e console use only a manufacturer supplied regulated power adapter CHARGING THE GENERATOR See EXPLODED DRAWING A on page 29 For the best results charge the internal Battery 4 that powers the Generator 7 once per week To charge the Battery plug the Power Adapter 134 into the receptacle on the frame of the elliptical ADJUSTING THE DRIVE BELT If the pedals slip while you are pedaling even while the r...

Страница 25: ...bic Exercise If your goal is to strengthen your cardiovascular system you must perform aerobic exercise which is activity that requires large amounts of oxygen for prolonged periods of time For aerobic exercise adjust the intensity of your exercise until your heart rate is near the highest number in your training zone WORKOUT GUIDELINES Warming Up Start with 5 to 10 minutes of stretch ing and ligh...

Страница 26: ...26 NOTES ...

Страница 27: ... Accessory Tray 50 1 Left Rear Arm Cover 51 1 Left Front Arm Cover 52 1 Tray Gasket 53 1 Wear Cover 54 1 Rear Shield Cover 55 2 Cover Cap 56 1 Right Inner Pivot Cover 57 1 Left Front Shield 58 2 M4 x 8mm Truss Screw 59 1 Center Shield 60 1 Right Front Shield 61 1 Left Outer Pivot Cover 62 1 Left Inner Pivot Cover 63 2 Cover Grommet 64 1 Right Rear Shield 65 1 Left Rear Shield 66 2 Shield Support 6...

Страница 28: ...oard 124 2 M4 x 20mm Self tapping Screw 125 1 Battery Power Wire 126 2 M10 x 30mm x 1mm Washer 127 4 Foam Pad 128 1 Rear Stabilizer 129 2 Upper Body Arm Cap 130 12 Shield Insert 131 4 M6 x 12mm Screw 132 1 USB Earphone Board 133 1 Upper TV Power Wire 134 1 Power Adapter Wire 135 2 Earphone Board Screw 136 2 M10 Locknut 12T 137 1 C SAFE Board 138 10 C SAFE Board Screw 139 1 Ground Wire 140 1 Pulse ...

Страница 29: ... 70 133 125 3 137 132 122 141 116 119 113 111 138 138 138 135 140 123 121 106 1 6 8 12 5 2 4 7 9 11 11 107 14 16 18 13 15 15 17 17 20 21 34 34 42 42 44 71 79 79 79 79 79 73 73 73 73 75 81 144 144 83 86 88 82 82 84 87 87 87 87 87 89 89 90 90 90 90 91 91 98 99 99 104 104 104 110 110 110 110 112 114 117 128 100 ...

Страница 30: ... 50 52 45 47 49 51 54 56 58 58 59 53 55 55 57 60 61 66 66 68 68 68 68 68 68 68 68 68 68 68 68 68 68 68 68 68 68 68 68 68 68 65 62 64 69 74 74 101 101 102 102 102 102 102 102 102 102 102 115 115 115 115 115 115 102 102 115 115 130 130 130 130 130 130 130 130 124 124 131 131 131 131 ...

Страница 31: ...NG C Model No VMEL81918 0 R1119A 10 10 19 28 32 25 27 31 36 36 38 39 33 33 35 37 40 41 43 42 42 42 42 63 76 78 78 78 77 80 80 80 80 80 94 87 87 87 94 94 94 96 93 93 93 95 95 95 95 97 105 105 105 108 127 127 129 126 136 ...

Страница 32: ...y to the original owner and is non transferable 2 The labor warranty applies only to products sold in the US and Canada Contact your authorized Freemotion Fitness dealer for details on labor coverage in your country 3 Any misuse abuse or improper service 4 Users who weight more than the maximum user weight listed in this manual 5 Damage caused by moving the product or improper stor age including m...

Отзывы: