8
9
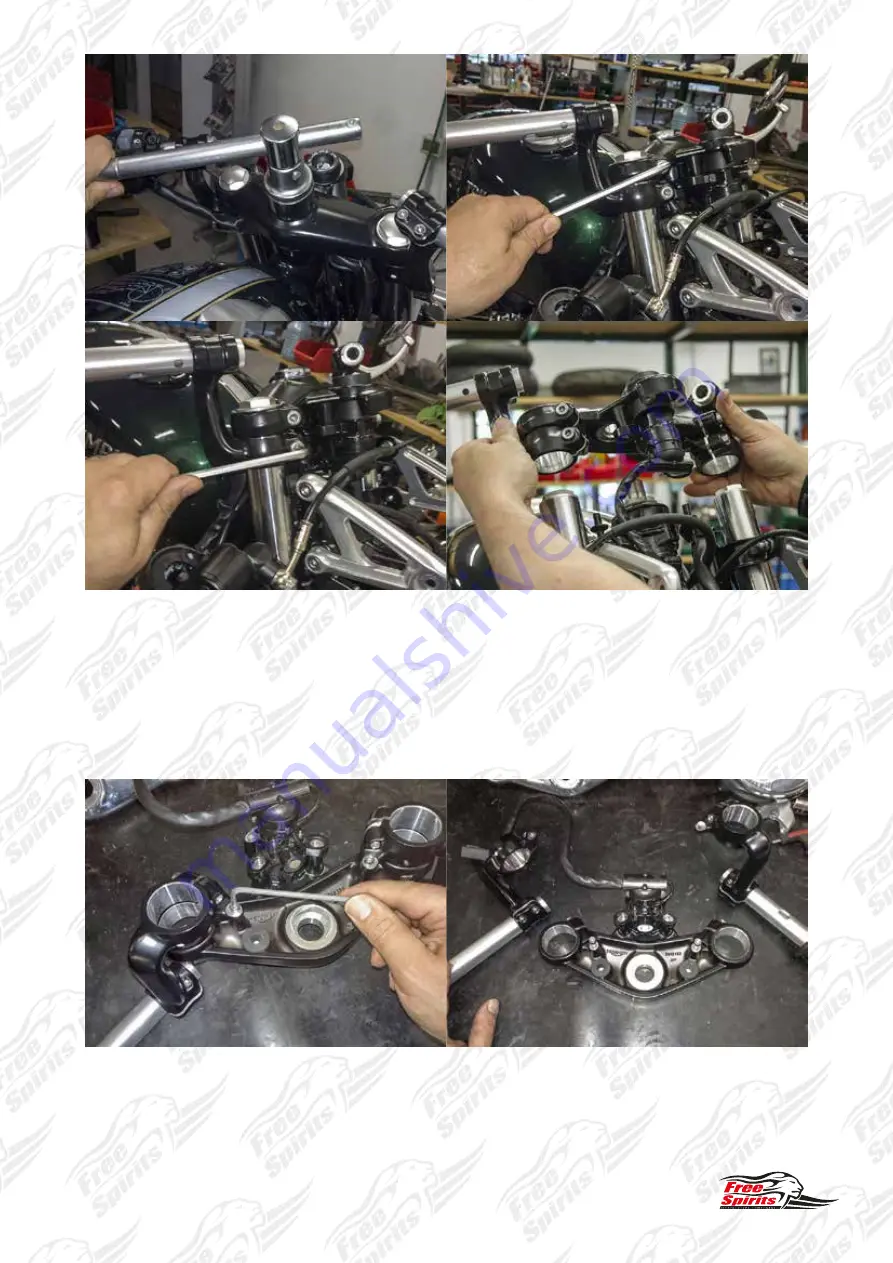
IT) Rimuovere la piastra superiore.
EN) Remove OEM top yoke.
S) Remover la placa superior.
F) Enlever le té supérieur.
10
IT) Rimuovere i semimanubri.
EN) Remove OEM clip-ons.
S) Remover los semi-manubrios.
F) Démonter les demi-guidons.
Страница 1: ...iumph Thruxton Std Tracker bar conversion kit for Triumph Thruxton Std Tracker bar Umbaukit f r Triumph Thruxton Std Kit de conversi n Tracker bar para Triumph Thruxton Std Kit de conversion Tracker b...
Страница 2: ...es d origine suivre attentivement le manuel d atelier IT Issare stabilmente il motociclo Prima di iniziare l installazione scollegare il polo negativo dalla batteria Smontare la parabola del faro e sc...
Страница 3: ...3 2 IT Scollegare i connettori come da foto EN Disconnect connectors as on photo S Desconectar los conectores como en la foto F D brancher les connecteurs comme sur les photos...
Страница 4: ...larli dalla calotta come da foto EN Disconnect connectors and slide off from the shell as on photo S Desconectar los conectores y deshilarlos de la tapa como en la foto F D gager les connecteurs du cu...
Страница 5: ...he cover and disconnect the plug as on photo S Remover la caja y desconectar el enchufe como en la foto F Retirer la coque et d brancher la fiche comme sur les photos 5 IT Rimuovete il cruscotto EN Re...
Страница 6: ...6 IT Rimuovere i comandi dal manubrio destro EN Remove the controls on right handlebar S Quitar los controles en el manillar derecho F Retirer les commandes sur le guidon droit 6...
Страница 7: ...ndlebar S Quitar los controles en el manillar izquierdo F Retirer les commandes sur le guidon gauche 8 IT Liberare il cavo frizione come da foto EN Release clutch cable as on photo S Liberar el cable...
Страница 8: ...vere la piastra superiore EN Remove OEM top yoke S Remover la placa superior F Enlever le t sup rieur 10 IT Rimuovere i semimanubri EN Remove OEM clip ons S Remover los semi manubrios F D monter les d...
Страница 9: ...EN Create a notch on the bolt as on photo Rotate the bolt counterclockwise as on photo S Crear un diente en el tornillo como en la foto Hacer girar el tornillo en sentido antihorario como en la foto F...
Страница 10: ...Repetir la operaci n hasta remover los tornillos como en la foto F Enlever tous les crous comme sur la photo IT Rimuovere il blocchetto accensione e le boccole in gomma EN Remove ignition switch and...
Страница 11: ...11 14 IT Fissare il blocchetto accensione come da foto EN Secure the ignition switch as on photo S Fijar el interruptor de encendido como en la foto F Monter le neiman comme sur les photos...
Страница 12: ...os cojinetes de goma F Lubrifier et ins rer les douilles en caoutchouc 16 IT Inserire la piastra superiore e avvitare il dado come da foto EN Insert top yoke and screw nut as on photo S Insertar la pl...
Страница 13: ...s tornillos a 25 Nm como en la foto F Serrer les crous 25 Nm comme sur les photos 18 IT Rimuovere il coperchio riser e fissare il dado a 50 Nm EN Remove top riser and fasten nut to 50 Nm S Remover la...
Страница 14: ...ubrio a 187mm dalla parte terminale del manubrio per consentire l inserimento del pin di sicurezza EN Drill the handlebar to 187mm from the end of the handlebar to allow the insertion of the safety pi...
Страница 15: ...throttle control and secure the cover at 20 Nm S Instalar el manubrio y fijar la tapadera a 20 Nm F Installer le guidon et serrer le couvercle 20 Nm 21 22 IT Fissare il comando al manubrio EN Secure h...
Страница 16: ...lar F Monter les commandes au guidon 24 IT Inserire la manopola e mantenerla a 17 18mm dall estremit del manubrio EN Insert the knob and keep it 17 18mm from the end of the handlebar S Insertar la emp...
Страница 17: ...ar control S Fijar los controles del manillar F Serrer les vis de commandes 26 IT Posizionare il tubo freno come da foto EN Position the brake hose as on photo S Posicionar el tubo de freno como en la...
Страница 18: ...18 27 IT Sostituire il cavo frizione EN Replace clutch cable S Sustituir el cable de fricci n F Remplacer le c ble d embrayage...
Страница 19: ...s cables a la zona delantera F Ramener les c bles dans la partie sup rieure IT Fissare il cruscotto con frenafiletti medio EN Secure instrument panel with medium strength Loctite S Fijar el salpicader...
Страница 20: ...nectar el tablero de instrumento y fijar la cubierta F Connecter le tableau de bord et serrer le cuvelage 31 IT Inserire gli spinotti e fissare la calotta faro EN Insert plugs and secure headlamp shel...
Страница 21: ...21 32 IT Collegare gli spinotti come da foto EN Connect the plugs as on photo S Conectar los enchufes como en la foto F Connecter les prises comme sur les photos...
Страница 22: ...M mirrors as on photo S Insertar el adaptador en los espejos originales como en la foto F Ins rez l adaptateur dans les r troviseurs d origine comme sur les photos 33 IT Rimontare la parabola del faro...
Страница 23: ...23 35 IT Fissare i retrovisori come da foto EN Fasten mirrors as on photo S Fijar los espejos como en la foto F Serrer les r troviseurs comme sur les photos...
Страница 24: ...24...
Страница 25: ...pese al VENDITORE franco magazzino i PRODOTTI ritenuti difettosi onde consentire la verifica dell effettiva inefficienza o presenza di vizi da parte del controllo qualit 6 In nessun caso la responsabi...
Страница 26: ...warehouse any defective products in order to allow the verification of the presence of defects or inefficiency by the seller s quality control 6 In no event shall the SELLER s liability of any kind in...
Страница 27: ...aci n al VENDEDOR ser n a cargo del COMPRADOR franco almac n de los PRODUCTOS que se consideren defectuosos con el fin de permitir la verificaci n de la presencia de defectos o ineficiencia por parte...
Страница 28: ...abilit du VENDEUR ne sera engag e concernant tout dommage des personnes ou des biens ou quelques dommages collat raux caus s par l ACQU REUR ou une tierce partie en relation avec quelques d fauts ou n...