FREE MOTION GZFI8176.1 Скачать руководство пользователя страница 4

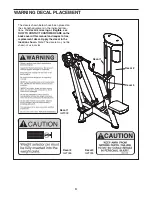
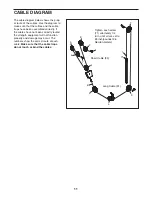
WARNING DECAL PLACEMENT

4

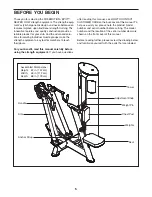
The decals shown below have been placed on
the strength equipment in the indicated loca-
tions.

If a decal is missing or illegible, see

HOW TO CONTACT CUSTOMER CARE on the
back cover of this manual and request a free
replacement decal. Apply the decal in the
location shown. 

Note: The decals may not be

shown at actual size.

Decal 1

GZ7003

Decal 3

GZ7005

Decal 2

GZ7026

Decal 2

Decal 3

Decal 1

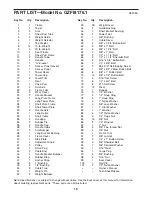
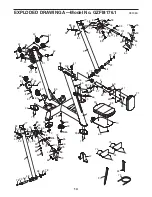
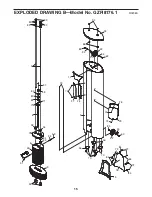
Содержание GZFI8176.1

Страница 1: ...on Fitness we are committed to providing com plete customer satisfaction If you have questions see HOW TO CONTACT CUSTOMER CARE on the back cover of this manual Visit our website at www weslo com new...

Страница 2: ...PLACEMENT 4 BEFORE YOU BEGIN 5 ADJUSTMENT 6 MAINTENANCE AND TROUBLESHOOTING 7 CABLE DIAGRAM 11 PART LIST 13 EXPLODED DRAWING 14 HOW TO CONTACT CUSTOMER CARE Back Cover TABLE OF CONTENTS FREEMOTION is...

Страница 3: ...that all users of the strength equipment are adequately informed of all precautions have read and understood all warning and caution labels and are informed of how to use the strength equipment proper...

Страница 4: ...ed loca tions If a decal is missing or illegible see HOW TO CONTACT CUSTOMER CARE on the back cover of this manual and request a free replacement decal Apply the decal in the location shown Note The d...

Страница 5: ...or your club And the advanced solu tions to isolating individual muscle groups make the strength equipment a key tool for members to reach their goals For your benefit read this manual carefully befor...

Страница 6: ...T To raise the seat lift the end of the seat and move the seat to the desired position To lower the seat lift the end of the seat and press down on the back of the seat until the seat is at the desire...

Страница 7: ...no damage to the material Follow the directions and the safety precautions of the manufacturer of each clean ing product used FreeMotion Fitness and its vendors cannot be held liable for damage or in...

Страница 8: ...d it may be difficult to insert the weight pin into the weights If there is not enough tension on the cables the top weight will not be lifted immediately when the repeti tion is begun Ideally the cab...

Страница 9: ...ools required 5 32 hex key 1 If the cable needs to be shortened 3 4 in 2 cm or more follow the instructions in steps 1 and 2 at the left then go to step 2 below 2 Lift the coupler cover from the top w...

Страница 10: ...readed holes Tighten the set screws equally until they contact the cable Then tighten each screw alter nately 1 4 turn until all are set to 85 inch pounds 9 6 Newton meters 10 Clean and lubricate the...

Страница 11: ...he cables have not been correctly routed the strength equipment will not function properly and damage may occur The numbers show the correct route of each cable Make sure that the cable traps do not t...

Страница 12: ...12 NOTES...

Страница 13: ...Bracket Bumper 46 2 Rubber Stop 47 1 Anchor Strap 48 4 1 Bushing 49 8 1 2 Bushing 50 3 Cable Trap 51 1 Weight Pin 52 2 Weight Bumper 53 39 Weight Insert 54 2 Guide Bushing 55 1 Short Bracket Bushing 5...

Страница 14: ...47 24 11 21 48 55 48 22 32 44 45 49 49 46 30 12 49 59 93 65 93 64 33 35 73 73 70 70 61 61 62 61 61 62 63 67 67 68 69 69 69 69 70 74 74 74 74 59 65 93 93 94 94 94 77 77 65 78 78 79 79 78 79 78 79 77 77...

Страница 15: ...RAWING B Model No GZFI8176 1 R0208A 74 74 29 28 2 5 6 7 53 53 54 54 8 51 9 52 56 56 42 50 15 16 19 18 42 50 17 26 27 31 58 71 71 74 60 70 70 72 72 72 60 92 80 80 81 82 94 94 84 84 84 84 85 85 86 87 89...

Страница 16: ...mation the MODEL NUMBER of the product GZFI8176 1 the NAME of the product FREEMOTION EPIC SEATED ROW strength equipment the SERIAL NUMBER of the product see the front cover of this manual When orderin...

Отзывы: