FRAME IT ALL 300001228 Скачать руководство пользователя страница 3

Customer Service: 1800-914-9835 | [email protected]

ASSEMBLY INSTRUCTIONS –

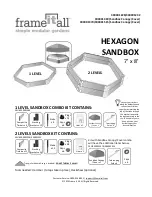
For Product with Second Level only

STEP 3

: Once 1

st

level is secured, assemble 2

nd

level using 6 (

A

) timbers and the 

stacking stakes. Insert one stake through the brackets into the hole on top of the stake 

beneath it to lock the second level in place.

Use plugs (included) 

to cover the holes on 

both side of timbers

Use plugs to cover 

the holes – two 

plugs are required 

per bracket (1 on 

each side)

Use a Finishing  

Cap to complete  

the top level.

Use an Anchor  

or Stacking Joint  

for ground level

frames or borders.

Use only Stacking  

Joints when  

creating additional  

levels.

When creating a  

multi-level frame  

use a Stacking  

Joint.

Stacking Joints fit into  

the tops of Anchor  

Joints and other  

Stacking

Joints

How the Joints Work

STEP 4

: Add the caps to each of the top corner joints and plugs to cover the holes on 

both side of timbers to finish off the sandbox.

NOTE

: Before flipping the stake around and hammering into the ground to 

permanently pin the 1

st

level, line up the 2

nd

level to make sure the bottom level is 

positioned properly.

Содержание 300001228

Страница 1: ...onal items below SKU 300001370 300001515 Liner x 1 SKU 300001228 300001232 Sandbox Canopy Cover x 1 Telescoping Pole x 6 1 LEVEL SANDBOX COMBO KIT CONTAINS Composite Timbers x 6 Stacking Brackets x 12 Stake x 6 Plugs x 24 Caps x 6 Liner x 1 SKU 300001369 Sandbox Canopy Cover x 1 Telescoping Pole x 6 2 LEVELS Layout your timbers along the borderline and connect each timber together by inserting the...

Страница 2: ... interior angle of 120 degree refer to diagram below Once the 1st level is lined up hammer stakes through brackets to secure the level X 6 X 12 Use plugs included to cover the holes on both side of timbers STEP 2a For one level add caps to each of the top corner joints to finish off the sandbox and plugs to cover the holes on both side of timbers IMPORTANT The plugs caps ARE NOT CHILD BABY PROOF S...

Страница 3: ...ket 1 on each side Use a Finishing Cap to complete the top level Use an Anchor or Stacking Joint for ground level frames or borders Use only Stacking Joints when creatingadditional levels When creating a multi level frame use a Stacking Joint Stacking Joints fitinto the tops of Anchor Joints and other Stacking Joints How the Joints Work STEP 4 Add the caps to each of the top corner joints and plug...

Страница 4: ...to hold it in place extend STEP 2 Remove existing caps from stakes and replace it with caps that have holes to receive the poles STEP 3 Insert widest end of the pole into recess of staking joint stakes repeat with remaining poles STEP 2 Manually expands the canopy spokes evenly in each direction as much as possible STEP 3 Using your foot step on the center hub of the canopy to invert and lock the ...

Страница 5: ...Release the highest clamp on each pole Canopy will now slide down to the next set of levels Lock 1st lever then repeat with each additional level of clamps until the poles have fully telescoped into each other TO CONVERT BACK TO CANOPY Release each bottom set of levers then extend and lock 1st level of telescoping poles Repeat with each additional level STORING THE CANOPY STEP 1 Remove canopy from...

Отзывы: