Foxconn QBOX N270 Скачать руководство пользователя страница 7

1

2

The QBOX is a compact and easy to use desktop. It is equipped with an intuitive graphical interface 

and full wireless connectivity so you can use the QBOX and access the Internet at any time. Provided 

below is an introduction to each part function.
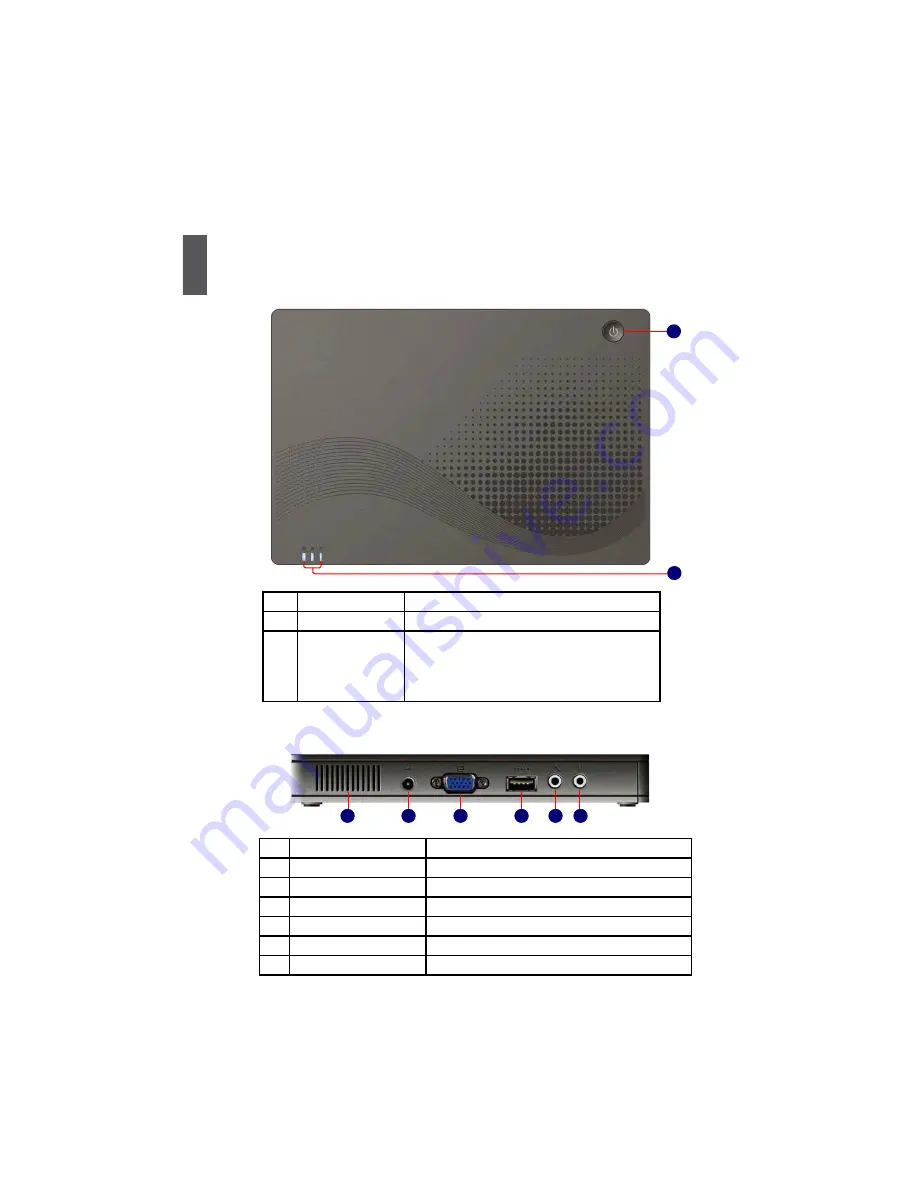
1-1 Top View

1-2 Left View

1

2

No.

Purpose

Description

1

Power Button

Turning the QBOX's power on/off

2

Computer Status 

Indicator LED

From left to right:

Num Lock Indicator

Caps Lock Indicator

Wireless Network Indicator

2

1

3

4

5

6

No.

Purpose

Description

1

Vent

QBOX's cooling vent

2

Power Port

Connects to the power supply transformer

3

Display Port

Connects to display

4

USB Port

Connects to USB 2.0 device

5

Microphone

Connects to microphone

6

Headphone

Connects to headphone or sound box

Содержание QBOX N270

Страница 1: ...QBOX User s Manual...

Страница 2: ...is disposed of correctly you will help prevent potential negative consequences for the environment and human health which could other wise be caused by inappropriate waste handling of this product For...

Страница 3: ...ion of QBOX Connect the Monitor 7 Connect the USB Devices 7 Connect the Network Cable 7 Connect the Power Cable 8 Chapter 3 Using the QBOX First Boot 10 Desktop 12 Chinese Input Method 12 Computer 13...

Страница 4: ...19 Mtpaint 19 Multimedia Applications gThumb Picture Manager 20 CD Recording 20 Rhythmbox Music Player 21 Video Player 21 Other Applications Smart Helper 22 Package Updater 22 Basic Parameter Setting...

Страница 5: ...DNH VXUH DOO WKH SHULSKHUDO LV FRQQHFWHG YDOLGO 7KLV SURGXFW VKRXOG RQO EH XVHG LQ HQYLURQPHQWV ZLWK DPELHQW WHPSHUD tures between 5 C and 40 C 7R UHGXFH WKH ULVN RI UH XVH RQO 1R RU ODUJHU 8 LVWHG RU...

Страница 6: ...esktop It is equipped with an intuitive graphical interface and full wireless connectivity so you can use the QBOX and access the Internet at any time This chapter includes the following information 7...

Страница 7: ...t View 1 2 No Purpose Description 1 Power Button Turning the QBOX s power on off 2 Computer Status Indicator LED From left to right Num Lock Indicator Caps Lock Indicator Wireless Network Indicator 2...

Страница 8: ...BOX s cooling vent 1 2 2 1 4 5 3 No Purpose Description 1 Multi Function Card Reader Supports MMC SD MS memory card 2 USB Port Connects to USB 2 0 device 3 Modem Port Connects to telephone line Used f...

Страница 9: ...In this chapter the placement and the connection of some neces sary peripheral will be introduced This chapter includes the following information 3ODFHPHQW RI 4 2 RQQHFWLRQ RI 4 2...

Страница 10: ...put your QBOX on the tabletop as shown below the top side is upturned 2 Under the display If you want to save the space of your desk this way can be used 1 As shown below put the QBOX into the bracke...

Страница 11: ...the bracket carefully To install the bracket your display must accord with VESA75 VESA100 standard C A U T I O N 3 On the Backside of Display This is a perfect way for good looking and space saving 1...

Страница 12: ...ect USB devices to the USB port on the QBOX for example Mouse and Keyboard 3 Connect the Network Cable If you want to obtain network access by using the built in Ethernet controller there are two ways...

Страница 13: ...J 11 port on the QBOX and the other end to the modem 4 Connect the Power Cable RQQHFW WKH DGDSWRU DQG SRZHU FDEOH WKDW FRPH ZLWK WKH SDFNDJH UVW WKHQ FRQQHFW WKH SOXJ DQG WKHQ FRQQHFW WKH DGDSWHU WR W...

Страница 14: ...automatically launch First Boot This chapter will guide you through the setup and registration process and introduces the QBOX Windows desktop to you This chapter includes the following information Fi...

Страница 15: ...ll guide you through the setup and registration process Please follow the steps below to complete the initial setup process 1 Set the appropriate Language then click on Forward to continue 2 Scan the...

Страница 16: ...ccount then click on Forward when done 5 Set the Date and Time then click on Reboot to complete setup and reboot the system 6 The system will go to the login screen as below select the user and input...

Страница 17: ...n you log into QBOX s pre loaded Celavie system the following screen will appear Puzzle Icon Start Button Open program menu Screen Icon Display the desktop recover the minimized windows Earth Icon Ope...

Страница 18: ...FOLFNLQJ WKHP RQ 3 5 My Documents The documents is by default used for storing the user s personal documents videos or music Dou ble click the XXX shortcut on the desktop brings up the screen shown b...

Страница 19: ...lications are pre loaded in the sys tem this chapter describes some kinds of them to you This chapter includes the following information QWHUQHW 2I FH SSOLFDWLRQV GXFDWLRQ DQG HDUQLQJ 0XOWLPHGLD SSOLF...

Страница 20: ...toolbar to open the gFTP client as VKRZQ EHORZ J 73 LV XVHG IRU OHV WUDQVIHU RX FDQ XSORDG RU GRZQORDG OHV WKURXJK PXOWLSOH LOH 7UDQVIHU 3URWRFRO 73 736 773 HWF E XVLQJ LW 3 Instant Messaging Please c...

Страница 21: ...LFN RQ 6WDUW 2I FH 2 2I FH DVH IURP WKH GHVNWRS WRROEDU WR UXQ WKH DSSOLFDWLRQ 7KH SURJUDP LV DV shown below 2 2I FH DOF R 2I FH DOF LV WKH RI FH DSSOLFDWLRQ XVHG IRU VSUHDGVKHHW FDOFXODWLRQV 3OHDVH F...

Страница 22: ...SUHVV R 2I FH PSUHVV LV WKH RI FH DSSOLFDWLRQ XVHG IRU FUHDWLQJ SUHVHQWDWLRQV 3OHDVH FOLFN RQ 6WDUW 2I FH 2 2I FH PSUHVV IURP WKH GHVNWRS WRROEDU WR UXQ WKH DSSOLFDWLRQ 7KH SURJUDP LV as shown below 2...

Страница 23: ...GHVNWRS WRROEDU WR UXQ WKH DSSOLFDWLRQ 7KH SURJUDP LV DV VKRZQ below 7 FreeMind FreeMind is a visualization software that uses a tree diagram to record notes The tree structure DOORZV WKH XVHU WR TXL...

Страница 24: ...from the desktop toolbar to run this application The program is as shown below 2 Mtpaint Mtpaint is graphics painting software similar to Windows Paint and is used for drawing or editing simple graphi...

Страница 25: ...h several functions To use please click on Start Graphics gThumb Image Viewer from the desktop toolbar The program is as shown below 2 CD Recording Celavie has full support for CD recorders To use ple...

Страница 26: ...use please click on Start Sound Video Rhythmbox Music Player from the desktop toolbar The program is as shown below 4 Video Player W LV TXLWH VLPSOH WR XVH 4 2 IRU SOD LQJ YLGHRV 6LPSO ORDG WKH GLVF...

Страница 27: ...ewer version is available it will be automatically downloaded and installed by Package Updater To use please click Start System Tools Software Updater from the desktop toolbar The program is as shown...

Страница 28: ...t BIOS 3 Insert the Windows XP Install CD into the USB CD ROM drive Boot Settings 6SHFL HV WKH ERRW sequence from the Quick Boot Enabled available devices Quiet Boot Disabled A device enclosed in Onbo...

Страница 29: ...process is completed Windows XP Professional Setup Welcome to Setup 7KLV SRUWLRQ RI WKH 6HWXS SURJUDP SUHSDUHV 0LFURVRIW 5 LQGRZV 5 3 WR UXQ RQ RXU FRPSXWHU 7R VHW XS LQGRZV 3 QRZ SUHVV 17 5 7R UHSDL...

Страница 30: ...dividual driver to install it manually 4 After all the drivers are installed you need to restart your QBOX then you can use it Windows XP Professional Setup The following list shows the existing parti...

Страница 31: ...y one or more of the following measures 5HRULHQW RU UHORFDWH WKH UHFHLYLQJ DQWHQQD QFUHDVH WKH VHSDUDWLRQ EHWZHHQ WKH HTXLSPHQW DQG UHFHLYHU RQQHFW WKH HTXLSPHQW LQWR DQ RXWOHW RQ D FLUFXLW GLIIHUHQW...

Отзывы: