Foxconn NETBOX nT-435H Скачать руководство пользователя страница 25

3

21

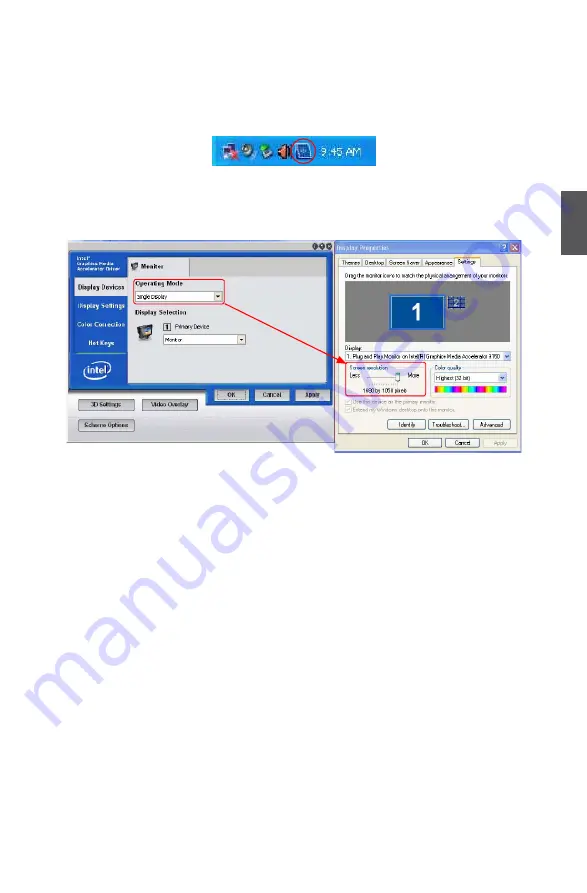
2.3. For the VGA user, after installing VGA Driver, and rebooting into system, the VGA default 


Operating Mode is "Intel(R) Dual Display Clone", and the "Screen resolution" is held to “1280  


x 720”. If you want to adjust the screen resolution, please follow the steps below to select the  


“Single Display” in "Operating Mode”. 


Step 1.  Double click the Intel® Graphics Media Accelerator Driver icon in the system tray.


Step 2.  In the “Display Devices” tab, select “Single Display” from the “Operation Mode”  


drop-down list. Then you can adjust the “Screen resolution” as you want.


3. HD Video Play Notice


If you want to play HD videos, the .WMV, .MOV and .VOB formats are recommended.


Содержание NETBOX nT-435H

Страница 1: ...NETBOX User s Manual...

Страница 2: ...u will help prevent potential negative consequences for the environment and human health which could other wise be caused by inappropriate waste handling of this product For more detailed information...

Страница 3: ...our device Make sure all the peripherals are properly connected before using NET BOX This product should only be used in an environment with ambient tem peratures between 0 C and 40 C Always shut down...

Страница 4: ...nection of NETBOX Placement of NETBOX On the Desk 6 On the Display Back 6 Connection of NETBOX Connect the Antenna 8 Connect the Monitor 8 Connect the USB Devices 8 Connect the Network Cable 9 Connect...

Страница 5: ...top It features all the desktop capabilities but with a slim body design which enables your to browse the internet in a relaxable and comfortable way This chapter introduces the following information...

Страница 6: ...h optical connectors 3 5mm jack 3 Multi Function Card Reader Supports SD SDHC MS MS Pro MMC memory cards 4 USB Ports Connect to USB devices 5 WLAN_LED Indicates Wireless connection states 6 LLS_LED In...

Страница 7: ...eat and protect NETBOX when it is placed on the tabletop C A U T I O N No Name Description 1 RF Radio Frequency Port Connects to antenna 2 USB Ports Connect to USB devices 3 Display Output Port VGA Co...

Страница 8: ...g Mode Green Off Off Off Off Off Off S3 Standby Mode Press Suspend Button Red Blink Off Off Off Off Off Off S4 Hibernation Mode S5 System Power Off Mode Off Off Off Off Off Off Off CPU Initialization...

Страница 9: ...In this chapter the placement and the connection of some neces sary peripherals will be introduced This chapter includes the following information Placement of NETBOX Connection of NETBOX...

Страница 10: ...etal Feet on the tabletop 2 On the Display Back This is the best space saving way 2 1 Use four screws M4X10mm to fasten the bracket onto the display back To install this bracket your display must foll...

Страница 11: ...X into the bracket with power button locating at the top for easy touch 2 3 After that you can connect the antenna to your NETBOX Remove the antenna before lifting up the NETBOX straight to take it ou...

Страница 12: ...the NETBOX You can fold the antenna and rotate it in different angle as you want 2 Connect the Monitor Connect a monitor to the NETBOX through VGA connector or HDMI connector 3 Connect the USB Devices...

Страница 13: ...Power Cord Connect the power adapter to the power input port of the NETBOX and push the power button to start it The power adapter is dissipating heat during normal use please make sure not to cover...

Страница 14: ...This chapter introduces the following information Install Windows XP Install Windows 7 Appendix Display Features Notice...

Страница 15: ...o to the Boot menu enter Boot Device Priority set the 1st Boot Device to USB Optical DVD RW press F10 key to save change and exit BIOS Boot Device Priority Specifies the boot sequence from the availab...

Страница 16: ...to run on your computer To set up Windows XP now press ENTER To repair a Windows XP installation using Recovery Console press R To quit Setup without installing Windows XP press F3 ENTER Continue R Re...

Страница 17: ...press C To delete the selected partitions press D 152626 MB Disk 0 at id 0 on bus 0 on atapi MBR D Partition2 Unknown 64464 MB 64463 MB free Unpartitioned space 38163 MB Unknown Disk There is no disk...

Страница 18: ...a few seconds the main menu will be displayed click Driver to enter the Driver menu shown as below 2 3 Use these options to install all the drivers for your system You must click Intel Chipset Driver...

Страница 19: ...guage to install Time and current format and Keyboard or input method Click Next to continue and click Install now button to start the setup 1 6 When the license terms appear select to accept and cli...

Страница 20: ...y you need select them and click Drive options advanced to delete them When all partitions are clean setup will display the biggest size of your hard drive 1 9 In this biggest hard disk size screen yo...

Страница 21: ...system files so you will see a system reserved partition Select the 70GB partition and click Next to continue 1 10 From this step we start to install windows 7 into your hard disk including copying W...

Страница 22: ...using the NETBOX Take out the Windows 7 Install CD from the USB DVD ROM drive and put the driver CD inside 2 2 Waiting for a few seconds the main menu will be displayed click Driver to enter the Driv...

Страница 23: ...hich appears after installing Chrontel Control Driver otherwise it can also be used for the display resolution settings 1 1 The resolution can be chosen from the drop down list 1 2 You can adjust the...

Страница 24: ...dows XP Vista 7 2 1 In the Intel Graphics Media Accelerator Driver the VGA D sub port is defined as Monitor and the HDMI port is defined as Notebook 2 2 In Windows 7 system the output sequence in the...

Страница 25: ...resolution please follow the steps below to select the Single Display in Operating Mode Step 1 Double click the Intel Graphics Media Accelerator Driver icon in the system tray Step 2 In the Display De...

Страница 26: ...interference to radio or television reception which can be determined by turning the equipment off and on the user is encouraged to try to correct the interference by one or more of the following mea...

Отзывы: