Section J
Page 7
Vista 248/268 Owner’s Manual
03/00
To pump out the holding tank:
1.
Be sure the head has some water in the bowl.
2.
Connect the dockside pump out connection to the
WASTE plate located on the deck. Usually the
dockside pump out connection will screw into the
waste deck plate or has a rubber sleeve that inserts
into the plate and must be held in position during the
pump out operation.
3.
Have the pumping station operator activate the
pumping equipment. The waste will be drawn from
the holding tank and into the pumping station’s dis-
posal tank.
4.
Remove the pump out connection from the deck
plate. Add at least 5 gallons of clean water to the
holding tank through the waste deck fitting using a
dockside water hose.
5.
Repeat steps 2 & 3 above to pump out the water
used in 4 to flush the holding tank.
6.
Add waste holding tank treatment chemical to the
head bowl. It is available from the dockside pump-
ing station or can be obtained from your dealer. Flush
at least twice.
Be careful when handling and storing treatment
chemicals. Not only are they toxic, but they will
also stain and damage surrounding surfaces.
J - 7
SYSTEM MAINTENANCE
Information supplied with water and waste system
components by the equipment manufacturers is included
with this manual. Refer to this literature for additional
operation and service information.
Be sure the batteries in the boat are properly charged.
Operating the pressure pump from a battery with a low
charge will result in pump cycling. This could lead to
premature pump failure.
NOTICE
The macerator pump must be used to discharge
waste overboard. However, DO NOT use the
macerator pump to discharge waste at a pump-
ing station. If the hose is not air tight or connect-
ed properly, waste could spurt out or leak around
the deck fitting and into the boat.
To operate the overboard discharge system:
1.
The discharge valve is located in the engine com-
partment. To open, turn the valve so that the handle
is parallel to the flow of the valve. The waste deck
plate cover must be tightened securely for the over-
board discharge system to operate.
2.
Turn ON the macerator pump switch which is locat-
ed in the head on the switch panel. Allow the pump
to run until the storage tank is empty. The sound of
the pump’s motor load and speed will change when
the tank becomes empty.
3.
Turn the switch off.
4.
Turn the discharge valve handle to the closed posi-
tion, and secure it. The thru-hull valve must be closed
to prevent water from being forced back into the sys-
tem.
NOTICE
Discharging waste overboard is illegal in most
U.S. waters today. Discharge is limited to cer-
tain coastal waters, a designated distance off-
shore. Check with your local boating regula-
tions before proceeding with any discharge ac-
tivities.
Some local regulations require overboard dis-
charge systems be physically secured in a
closed position during use of the boat in waters
designated as “no discharge” areas. Check with
local boating regulations. Refer to the
manufacturer’s literature for additional informa-
tion.
D. Dockside Pump-Out
Waste can be removed from the holding tank by taking
the boat to a dockside waste pumping station. Most
marina fueling facilities provide such services.
Содержание 248 Vista
Страница 1: ......
Страница 35: ......
Страница 36: ......
Страница 37: ......
Страница 38: ......
Страница 39: ......
Страница 40: ......
Страница 43: ......
Страница 44: ......
Страница 45: ......
Страница 46: ......
Страница 47: ......
Страница 48: ......
Страница 49: ......
Страница 50: ......
Страница 51: ......
Страница 52: ......
Страница 53: ......
Страница 54: ......
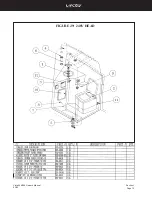
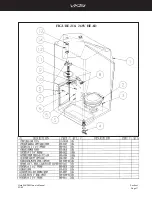
Страница 81: ...Section J Page 10 Vista 248 268 Owner s Manual 03 00 FIGURE J9 248V HEAD...
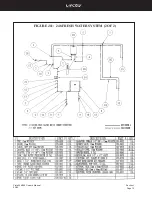
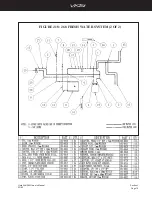
Страница 82: ...Section J Page 11 Vista 248 268 Owner s Manual 03 00 FIGURE J10 248 FRESH WATER SYSTEM 1 OF 2...
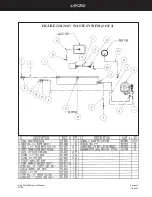
Страница 83: ...Section J Page 12 Vista 248 268 Owner s Manual 03 00 FIGURE J11 248 FRESH WATER SYSTEM 2 OF 2...
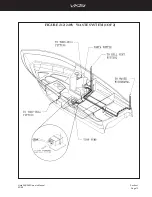
Страница 84: ...Section J Page 13 Vista 248 268 Owner s Manual 03 00 FIGURE J12 248V WASTE SYSTEM 1OF 2...
Страница 85: ...Section J Page 14 Vista 248 268 Owner s Manual 03 00 FIGURE J13 248V WASTE SYSTEM 2 OF 2 HEAD SINK GALLEY SINK...
Страница 86: ...Section J Page 15 Vista 248 268 Owner s Manual 03 00 FIGURE J14 248V PORCELAIN TOILET W HOLDING TANK 1 OF 2...
Страница 87: ...Section J Page 16 Vista 248 268 Owner s Manual 03 00 FIGURE J15 248V PORCELAIN TOILET W HOLDING TANK 2 OF 2...
Страница 88: ...Section J Page 17 Vista 248 268 Owner s Manual 03 00 FIGURE J16 268V HEAD...
Страница 89: ...Section J Page 18 Vista 248 268 Owner s Manual 03 00 FIGURE J17 268 FRESH WATER SYSTEM 1 OF 2...
Страница 90: ...Section J Page 19 Vista 248 268 Owner s Manual 03 00 FIGURE J18 268 FRESH WATER SYSTEM 2 OF 2...
Страница 91: ...Section J Page 20 Vista 248 268 Owner s Manual 03 00 FIGURE J19 268V WASTE SYSTEM 1 OF 2...
Страница 92: ...Section J Page 21 Vista 248 268 Owner s Manual 03 00 FIGURE J20 268V WASTE SYSTEM 2 OF 2...
Страница 93: ...Section J Page 22 Vista 248 268 Owner s Manual 03 00 FIGURE J21 268V OVERBOARD WASTE DISCHARGE SYSTEM...
Страница 99: ...Section L Page 4 Vista 248 268 Owner s Manual 03 00 Figure L7 248 268V Air Conditioning System...
Страница 112: ......
Страница 113: ......
Страница 114: ......
Страница 115: ......
Страница 116: ......
Страница 117: ......
Страница 118: ......
Страница 119: ......
Страница 127: ......
Страница 128: ......
Страница 129: ......
Страница 130: ......
Страница 131: ......
Страница 152: ......
Страница 153: ......
Страница 154: ......
Страница 155: ......
Страница 156: ......
Страница 157: ......
Страница 158: ......
Страница 167: ......


