1
SOFTWARE
UPDATE
PROCEDURES
1) Connect the AC power cable to the AC IN connector. The MR-
8HD/CD power switch starts
fl
ashing in red.
2) Press the MR-8HD/CD power switch. MR-8HD/CD starts booting
up and the power switch is lit solid in red. After a short while, the
normal display appears on the LCD.
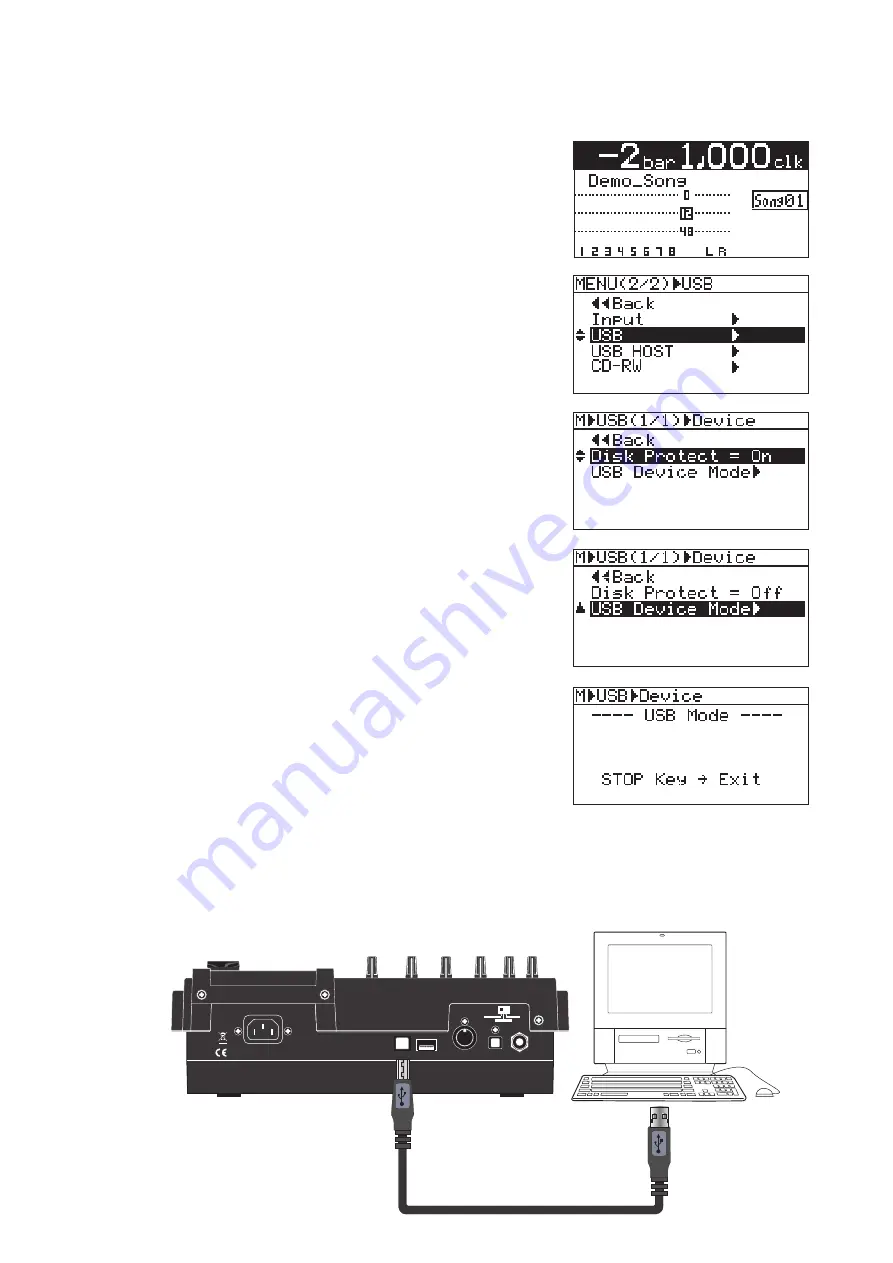
3) Press the [MENU/ENTER] dial to enter the MENU mode.
4) Rotate the [MENU/ENTER] dial and select the “USB” menu.
5) Press the [MENU/ENTER] dial.
6) Rotate the [MENU/ENTER] dial and select the “Disk Protect”
menu.
7) Press the [MENU/ENTER] dial and set “Disk Protect” to “Off” by
rotating the [MENU/ENTER] dial. Then, press the [MENU/EN-
TER] dial. With this setting, the Disk Protect mode is turned off
indicating the condition that the software update
fi
le can be copied
to the MR-8HD/CD internal HDD.
8) Rotate the [MENU/ENTER] dial to select the “< < Back” menu
and press the [MENU/ENTER] dial.
9) Rotate the [MENU/ENTER] dial and select the “USB Device
Mode” menu.
10) Press the [MENU/ENTER] dial. If MR-8HD/CD is correctly put
into the USB mode, the display on the right will appear on the
LCD. Now MR-8HD/CD is ready to connect to PC or Macintosh.
11) Connect the USB cable from the MR-8HD/CD USB port to PC on
which Windows XP/2000 is running or Macintosh on which OS X
is running.
INPUT A SEL
USB
USB HOST
AC-IN
DIGITAL
OUT
FOOT SW
MIDI OUT
GTR CLEAN
MIC/LINE
GTR DIST
USB port
USB port
CAUTION:
MR-8HD/CD can be connected to PC on which Windows XP/2000 is running or Macintosh
on which OS X is running for software update as well as audio data transfer. Of course PC/
Macintosh has to be equipped with a USB port.


