background image

51

CD-R/RW MASTER RECORDER  CR500 (Recording)

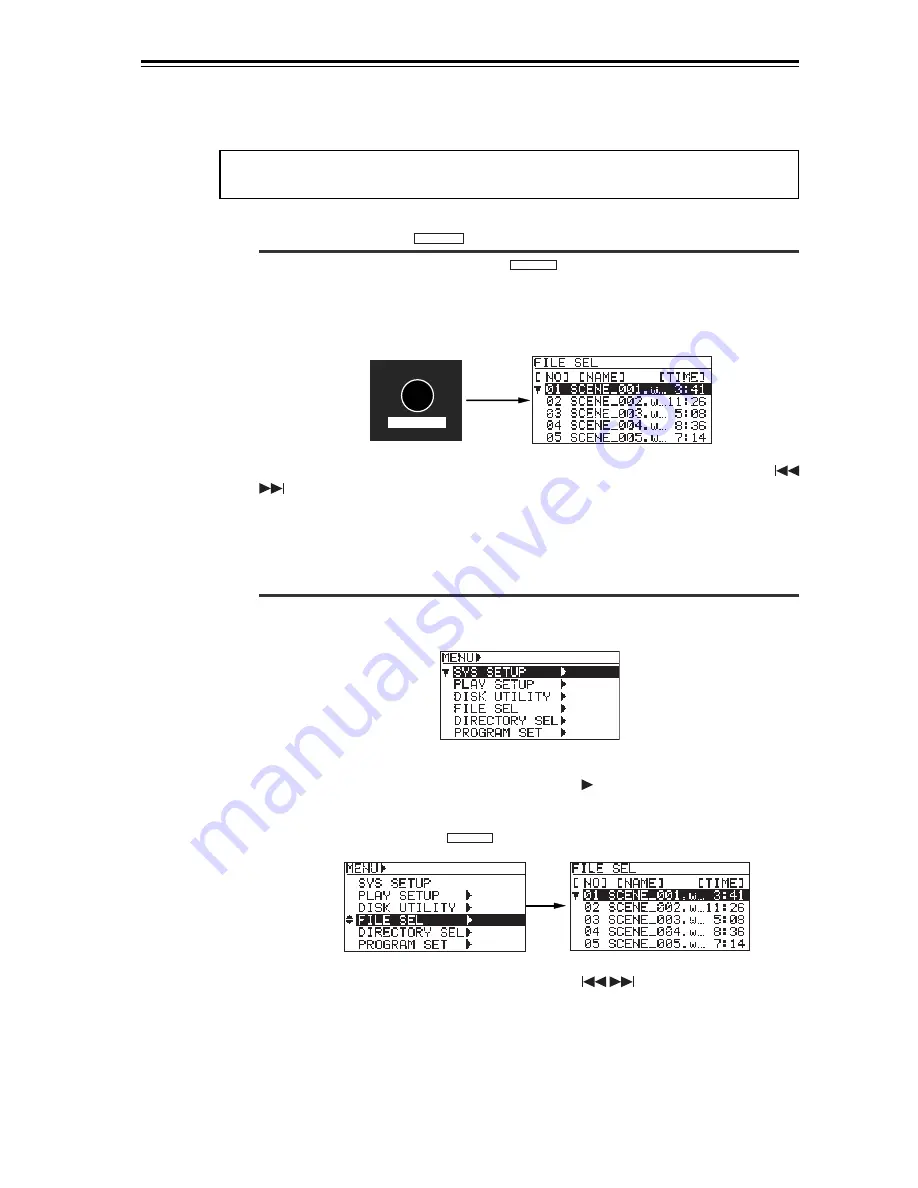
FILE SEL

DIR SEL

While the "FILE SEL" screen is shown, use the [MENU] dial (or the [SKIP/CURSOR 

] keys) to select a desired song and press the [ENTER/YES] key. The display changes

to show the Home screen of the selected song and you can now play back the song.

• Go down the menu to the  "FILE SEL" menu.

(1)

While stopped, press the [ENTER/YES] key.

The unit enters the menu mode. The display shows the MENU list screen.

<MENU list screen>

(2)

Use the [MENU] dial to highlight "FILE SEL  " and press the [ENTER/YES]
key.

The display shows the "FILE SEL" screen, the same one which appears by
pressing the [FILE SEL/

DIR SEL

] key as described above.

(3)

Use the [MENU] dial (or the [SKIP/CURSOR 


] keys) to select a desired

song and press the [ENTER/YES] key.

The display changes to show the Home screen of the selected song and you can
now play back the song.

<Method 3>: Using the "FILE SEL" screen

You can bring up the "FILE SEL" screen by the following two methods.

• Press the [FILE SEL/

DIR SEL

] key to bring up the "FILE SEL" screen directly.

While stopped, pressing the [FILE SEL/

DIR SEL

] key brings up the "FILE SEL" screen,

on which the songs on the current disc are listed. The currently selected song is
highlighted.
(The screen example below shows the "FILE SEL" screen of a BWF formatted disc.
When a CD-DA disc is set, the "FILE SEL" screen shows the track number and record-
ing time.)

<Note>: 

When you select a file from the "FILE SEL" screen, the recorder does not start

playback automatically.

Содержание CR500

Страница 1: ...HOME RECORD PLAY REWIND F FWD PQRS REC END ABS 0 0 symbol TUV WXYZ 8 2 5 CONTRAST FILE SEL space ABC DEF EDIT TIME CLEAR 1 4 7 MEMORY SET MEMORY GHI JKL MNO 9 3 6 DISPLAY LOCATE 10 DIR SEL REC RDY ACCESS PLAY MODE PROGRAM SET REPEAT OPEN CLOSE R L MAX MIN MAX MIN MAX MIN PHONES INPUT LEVEL KYBD ONLY USB POWER ...

Страница 2: ...y The lightning flash with arrowhead symbol within an equilateral triangle is intended to alert the user to the presence of uninsulated dangerous voltage within the product s enclosure that may be of sufficient magnitude to constitute a risk of electric shock to persons The exclamation point within an equilateral triangle is intended to alert the user to the presence of important operating and mai...

Страница 3: ...e provided plug does not fit into your outlet consult an electrician for replacement of the obsolete outlet 10 Protect the power cord from being walked on or pinched particularly at plugs convenience receptacles and the point where they exit from the apparatus 11 Only use attachments accessories specified by the manufacturer 12 Use only with the cart stand tripod bracket or table specified by the ...

Страница 4: ...al format of a disc 18 Adjusting display contrast 22 Chapter 3 Names and functions 23 Front panel section 24 Rear panel section 29 Screendetails 30 Home screen available in stop or playback mode 30 Input monitor screen available while in record ready or recording 32 MENU mode screen 34 Chapter 4 Connection 35 Connecting to other devices 36 Analog audio connection balanced unbalanced 36 Digital aud...

Страница 5: ...Method 1 Using the SKIP CURSOR keys 50 Method 2 Using the MEMORY MEMORY SET key group 50 Method 3 Using the FILE SEL screen 51 Chapter 6 Playback Locate 53 About play mode 54 Playback in the ALL PLAY mode 55 Playback in the SINGLE PLAY mode 55 Cueing digital scrub 56 Cueing 56 Digital scrub 56 Playback in the PROGRAM PLAY mode 57 Creating the play list 58 Deleting a song from the play list 60 Dele...

Страница 6: ... setting Ref Level 78 USB keyboard type setting Keyboard Sel 78 Saving SYS SETUP data Sys User Save 79 Loading SYS SETUP data Sys User Load 79 Initializing system memory data Sys Default Set 80 Initializing flash memory Sys Initial Memory 80 ROM version checking Version 81 PLAY SETUP menu 82 Basic procedure for using the PLAY SETUP menu 82 Play mode selection Play Mode 83 Repeat mode on off Repeat...

Страница 7: ... not match your power cable ask your local Fostex dealer or service station for purchasing an appropriate power cable Note that the unit can be used both in 50 Hz and 60 Hz areas Make sure that the voltage of your AC power outlet matches the voltage requirements of the unit When disconnecting the power cable make sure that the unit POWER switch is set to OFF Disconnecting the power cable while the...

Страница 8: ...thium battery The CR500 uses a lithium battery internally To replace the battery ask your dealer or the nearest FOSTEX service station If the battery is not cor rectly replaced there may be a risk of explosion etc Precautions on installation Do not install the unit in the following conditions In a extremely hot or cold place In a moist place In a shaky or unstable place In a dusty place In a stron...

Страница 9: ...9 CD R RW MASTER RECORDER CR500 Overview Chapter 1 Overview This chapter describes the main features of the CR500 ...

Страница 10: ... MIN MAX MIN PHONES INPUT LEVEL KYBD ONLY USB POWER PC CD DA BWF Computer CD player Note In this manual each audio data file recorded on a BWF formatted disc is called an audio file while each audio data file recorded on a CD DA formatted disc is called an audio track The CR500 is a two track digital master recorder which uses a CD R or CD RW disc as a recording medium The CR500 supports both the ...

Страница 11: ...6 bit tracks 1 44 1kHz 16 bit 2 44 1kHz 24 bit 3 48kHz 16 bit 4 48kHz 24 bit 5 88 2kHz 24 bit 6 96kHz 24 bit Easy to see large display and level meters From a 132 x 64 dot matrix LCD display you can see the time information as well as the status of the unit setting The dot LED level meters L and R allow you to check recording or playback levels precisely The meter peak hold time is set to three se...

Страница 12: ...NPUT L R R L ANALOG INPUT ANALOG OUTPUT GPI ANALOG INPUT connector ANALOG OUTPUT connector DIGITAL INPUT connector DIGITAL OUTPUT connector For worldwide use The CR500 has the AC IN connector to which a separate power cable is connected You can use the CR500 anywhere in the world by using an appropriate power cord AC IN connector GPI connector Fader start function The CR500 provides the fader star...

Страница 13: ...nection internal clock setting and initial formatting of a CD R RW disc You must do these things correctly in order to use the CR500 Read this chapter before using the CR500 Table of contents Power connection 14 Realtime clock setting 14 Initial format of a CD R RW disc 16 Usable discs 16 Format types 16 Handling of CD R RW disc 16 Setting a disc 17 Initial format of a disc 18 Adjusting display co...

Страница 14: ... of creation of an audio file which is made when you make a recording to a BWF formatted CD R RW disc By default the realtime clock is set according to local date time of the factory There fore set the clock correctly according to your local date time before using 1 Press the POWER switch to turn on the CR500 Soon after turning on the power of the unit the display shows the screen below The time d...

Страница 15: ...approximately five years The battery replacement is done by local Fostex distributor s service department or their authorized service agent Note The file creation date of the CR500 is recorded according to the internal realtime clock However because GMT of UDF is set to offset zero there may be an error when reading the creation date by a PC UDF Universal Disk Format GMT Greenwich Mean Time Using ...

Страница 16: ...d disc can be read by a Windows or Mac OS computer as well as can be played back by a normal CD player see page 20 for details Handling of CD R RW discs Handle a disc with care by holding them by the rim or by a finger through the center hole rather than touching the surface Do not get fingerprints dust scratch etc on the signal side Do not affix any labels or stickers to the label side of the dis...

Страница 17: ...corded CD R RW disc If you set a BWF formatted or CD DA formatted CD R RW disc on which any audio file or audio track is recorded the earliest recorded audio file or audio track on the disc is loaded If the Power On Play item of the PLAY SETUP menu in the MENU mode is set to On the CR500 automatically starts playback immediately after it starts up when you turn on the power see page 81 CD DA forma...

Страница 18: ... REC END ABS 0 0 symbol TUV WXYZ 8 2 5 CONTRAST FILE SEL space ABC DEF EDIT TIME CLEAR 1 4 7 MEMORY SET MEMORY GHI JKL MNO 9 3 6 DISPLAY LOCATE 10 DIR SEL REC RDY ACCESS PLAY MODE PROGRAM SET REPEAT OPEN CLOSE R L MAX MIN MAX MIN MAX MIN PHONES INPUT LEVEL KYBD ONLY USB POWER 1 2 3 4 5 6 7 8 4 4 2 4 The table on the right shows the approximate recordable time and the maximum number of tracks after...

Страница 19: ...the formatting status The screen below shows an example when the disc is formatted by BWF 48 24 When formatting completes Completed is shown and the unit exits the MENU mode The display shows the Home screen You can select a desired format type from among CD DA and various BWF types see the table below To make an audio CD select CD DA To record WAV files select any one of BWF types shown be low CD...

Страница 20: ...fter Com pleted is shown the following Home screen appears Note If you eject a CD DA formatted disc without making recording or if you turn off the power and then on the display shows Blank Disc again followed by the Format screen With a CD DA formatted CD R RW disc you can make additional recordings until you finalize the disc ...

Страница 21: ...rs File export to a PC Possible with a closed or finalized disc Possible with a closed or finalized disc Possible with a finalized disc Possible with a finalized disc Playback by a normal CD player Possible with a finalized disc Impossible Impossible Impossible Possible until finalized After editing the file system must be stored Note Impossible when there is no remaining re cordable space on the ...

Страница 22: ...ator followed by the DISPLAY CONTRAST key The popup message as shown below appears on the display and you can now adjust the display contrast MENU dial ENTER YES key 2 While the popup message above is shown rotate the MENU dial to adjust the display contrast Rotating the dial clockwise weakens the contrast while rotating it counterclockwise strengthens the contrast Weak contrast Strong contrast 3 ...

Страница 23: ...EL KYBD ONLY USB POWER AC IN CAUTION AVIS RISQUE DE CHOC ELECTRIQUE NE PAS OUVRIR WARNING TO REDUCE THE RISK OF FIRE OR ELECTRIC SHOCK DO NOT EXPOSE THIS EQUIPMENT TO RAIN OR MOISTURE UNBALANCED 10dBV BALANCED 4dBu 1 GND 2 HOT 3 COLD R L R L BALANCED 4dBu DIGITAL OUTPUT INPUT L R R L ANALOG INPUT ANALOG OUTPUT AC IN GPI Chapter 3 Names and functions Front panel Rear panel Table of contents Front p...

Страница 24: ... the condition of the CD R RW drive Depending on the drive condition the indicator status changes as below About Non shift mode and Shift mode Some keys have the secondary function which is available when the SHIFT indicator is lit i e in the Shift mode while the primary function is available when the SHIFT indicator is unlit i e in the Non shift mode In this manual we sometimes say when SHIFTed a...

Страница 25: ...is key brings up the screen for adjust the display contrast Adjust the display contrast using the MENU dial and press the ENTER YES key to confirm see page 22 While stopped or playing pressing this key switches the time display mode in the following order see page 30 Total time Track time Total remaining time Track remaining time Total time When SHIFTed When unSHIFTed 6 DISPLAY CONTRAST key This k...

Страница 26: ...page 70 After editing the time pressing this key locates he edited time position Pressing the STOP HOME key or the EXIT NO key dismisses the time edit screen and returns to the Home screen Pressing this key locates the position previously lo cated see page 70 9 LOCATE EDIT TIME key This key has primary unSHIFTed and secondary SHIFTed functions 10 CLEAR 10 key This key is used when you select an au...

Страница 27: ...ayback or recording pressing this key stops the drive Pressing the PLAY key while holding down this key enters the digital scrub mode see page 56 Pressing this key exits any editing or setting mode and re turns to show the Home screen Pressing the F FWD or REWIND key while holding down this key locates a specific position as below Locates the record end position REC END of the currently loaded dis...

Страница 28: ...e recorder repeats playback according to the current play mode until the STOP HOME key is pressed Note When the play mode is set to MEMORY PLAY the repeat playback function is disabled 19 OPEN CLOSE key Pressing this key opens or closes the disc tray Note You can also close the tray by pushing the front of the tray lightly 20 INPUT LEVEL control This control adjusts the input level L and R when re...

Страница 29: ...alog audio signals at 10dBV see page 36 4 ANALOG OUTPUT connectors XLR 3 32 type balanced These connectors send analog audio signals at 4dBu see page 36 5 AC IN connector This connector is used to connect the supplied AC power cable page 14 6 GPI jack This jack is used to connect to a mixing console providing the fader start stop facility which enables start stop control of the CR500 from a consol...

Страница 30: ...shown here by pressing the DISPLAY CONTRAST key from among the disc elapsed time track elapsed time total remaining time and track re maining time Note that during recording you cannot select the total remaining time and track remaining time When selecting the remaining time negative time value is shown see the screen ex amples below Also the appropriate icon or which shows transport status is lit...

Страница 31: ...s 0m00s000ms 1m00s000ms 2m00s000ms 3m00s000ms Total time indication example Track time indication example SINGLE PLAY mode SINGLE PLAY is shown PROGRAM PLAY mode PROGRAM PLAY is shown MEMORY PLAY mode Play mode The currently selected play mode is shown When the MEMORY PLAY mode is selected the screen looks differently You can select the desired play mode by pressing the PLAY MODE PROGRAM SET key f...

Страница 32: ... recordable tracks Audio file or audio track information Numbers of recorded audio files or audio tracks are shown The file or track which can be played back currently is highlighted If no audio file or audio track is re corded to the disc all boxes are blank When the ALL PLAY or SINGLE PLAY mode is selected file track numbers are ar ranged from left top to right bottom in the order of recordings ...

Страница 33: ...ing in min utes seconds as well as the remaining number of recordable tracks Record mode Shows the record mode including recording Fs bit and format of the disc currently loaded as below The record mode is conformed to the format type you select when formatting a disc CD DA disc BWF disc FS and BIT information is shown as well as WAV as below Shown when Analog is selected default The recorder can ...

Страница 34: ... item from among those related to playback see page 82 DISK UTILITY menu screen On this menu screen you can select a desired menu item from among those related to disc management see page 85 FILE SEL screen On this screen you can select a desired file to be played back see page 51 You can access to this screen by pressing the FILE SEL DIR SEL key while the Home screen is shown DIRECTORY SEL screen...

Страница 35: ...35 CD R RW MASTER RECORDER CR500 Connection Chapter 4 Connection This chapter describes details about connection of analog and digital audio devices as well as USB keyboard connection and functions ...

Страница 36: ...ut Sel menu item of the SYS SETUP in the MENU mode to Analog see page 76 By default the Input Sel menu item is set to Ana log If it is set to Digital however you need to change the setting The CR500 is also equipped with both the balanced XLR 3 32 and unbalanced RCA ANALOG OUTPUT connectors which feed 4dBu and 10dBV analog audio signals respectively The CR500 is equipped with the DIGITAL INPUT XLR...

Страница 37: ...k Print Screen SysReq F12 F11 F10 F9 F8 F7 F6 F5 F4 F3 F2 F1 Help TAB Caps Lock SHIFT Ctrl Alt Note Before using the USB keyboard for controlling the CR500 set the keyboard type US or JAPAN correctly to match your keyboard using the Keyboard Sel menu item of the SYS SETUP menu in the MENU mode see page 78 By default the Keyboard Sel menu item is set to US 0 through 9 keys Duplicates the function o...

Страница 38: ... Acts the same as the ENTER YES key on the CR500 panel Enter key HOME key Acts the same as the STOP HOME key on the CR500 panel F5 key SHIFT F5 keys F6 key Switches the play mode to ALL PLAY Switches the play mode to SINGLE PLAY Switches the play mode to MEMORY PLAY SHIFT F6 keys F7 key SHIFT F7 keys Switches the play mode to PROGRAM PLAY Turns on the record ready mode Turns off the record ready m...

Страница 39: ...ts the maximum number of recordable audio files With a CD DA formatted disc each time you make recording an audio track is created You can make up to 99 audio tracks on a disc as long as there is disc remaining space Table of contents Before starting recording 40 Closing and finalizing 40 Preparation for recording 41 Connecting a sound source 41 Selecting the input 42 Adjusting recording levels 42...

Страница 40: ...decreases Therefore we recommend closing a disc only when it is necessary Note You can also finalize a BWF formatted disc using the Finalize item of the DISK UTILITY menu in the MENU mode see page 92 With a finalized formatted disc you cannot make additional recordings file name editing file deletion and file restoring Note Note that you cannot make additional recordings to a finalized disc Closin...

Страница 41: ...DA formatted disc BWF formatted CD R RW disc CD DA formatted CD R RW disc The following description is assumed that the Home screen as shown below appears on the display The Home screen looks slightly different depending on the format type The screen examples below show the Home screens for a BWF 48 24 formatted and CD DA formatted discs To record an analog audio signal connect a sound source to t...

Страница 42: ...ONES control To adjust the input levels press the REC RDY key to enter the record ready mode REC RDY indicator flashes The display changes to the input monitor screen which shows the format type input selection etc In the record ready mode the L and R level meters show input levels and you can now check and adjust the input levels The following shows input monitor screen examples for a BWF formatt...

Страница 43: ... SYS SETUP menu in the MENU mode you can select the file name mode from among Scene Name Take Number default Reel Number Take Number and Date see page 75 You can also edit the file name using the Edit File Name menu item of the SYS SETUP menu in the MENU mode see page 89 Note When the Select Input menu item is set to Digital the input moni tor screens for a BWF formatted disc and a CD DA formatted...

Страница 44: ...er of the tracks on the disc You can check the input level for recording When the analog input is selected you can adjust the input levels for left and right channels using the INPUT LEVEL controls See Adjusting recording levels described earlier in this chapter for details about how to adjust the input levels Press the RECORD key to start recording When you start recording the input monitor scree...

Страница 45: ...n audio file has been created as shown on the screen example below The time indication shows the last recording position The currently selected audio file To make another recording in succession repeat the operation above We recommend checking the recordable time and the number of the recordable files on the disc when you make recording Playing back a recorded audio file Note Each time you make re...

Страница 46: ...completing closing the disc is ejected Note that it takes some time for closing If you press the EXIT NO key the disc is ejected immediately Notes You cannot make additional recordings to a disc which is finalized using the Finalize item of the DISK UTILITY menu in the MENU mode see page 92 Each time you close a disc the number of remaining recordable files decreases by one and the remaining disc ...

Страница 47: ...sc Note An audio track recorded on a CD DA formatted CD RW disc may not be played back by a normal CD player REC RDY key INPUT LEVEL control Press the REC RDY key to enter the record ready mode The display changes to show the input monitor screen on which you can see the remaining recordable time and the number of the tracks on the disc You can check the input level for recording When the analog i...

Страница 48: ... screen example below The time indication shows the last recording position The currently selected audio track To make another recording in succession repeat the operation above Note that each time you make a recording check the recordable time and the number of the tracks on the disc Playing back the recorded audio track Note If you make recordings in succession the track numbers are shown in the...

Страница 49: ...e 92 Finalizing a disc While stopped press the OPEN CLOSE key Un closed track pops up followed by the confirmation screen To finalize the disc press the ENTER YES key To cancel finalizing press the EXIT NO key If you press the ENTER YES key Please Wait Finalizing track pops up After completing finalizing the disc is ejected Note that it takes some time for finalizing If you press the EXIT NO key t...

Страница 50: ...ress the CLEAR 10 key once the popup screen below left appears High lighted 1 indicates the tens digit is 1 If you press the CLEAR 10 key again highlighted 1 changes to 2 indicating that the tens digit is 2 That is pressing the CLEAR 10 key increments the tens digit number Selecting a song to be played back CLEAR 10 key MEMORY MEMORY SET key group For example to select track 15 press the CLEAR 10 ...

Страница 51: ... as described above 3 Use the MENU dial or the SKIP CURSOR keys to select a desired song and press the ENTER YES key The display changes to show the Home screen of the selected song and you can now play back the song Method 3 Using the FILE SEL screen You can bring up the FILE SEL screen by the following two methods Press the FILE SEL DIR SEL key to bring up the FILE SEL screen directly While stop...

Страница 52: ...52 CD R RW MASTER RECORDER CR500 Recording ...

Страница 53: ...in the PROGRAM PLAY mode 57 Creating the play list 58 Deleting a song form the play list 60 Deleting all songs in the play list 60 Playback in the MEMORY PLAY mode 61 Assigning audio data to a memory 62 Replacing the audio file in a memory bank 63 Editing a memory name 64 Editing the start time end time by entering time data 64 Editing the start time end time using the digital scrub function 65 De...

Страница 54: ...corded by the CR500 or other devices You can select the desired play mode from among the ALL PLAY SINGLE PLAY PROGRAM PLAY and MEMORY PLAY modes by pressing the PLAY MODE PROGRAM SET key while stopped See the Home screen examples of four play modes below The Home screen example of the PROGRAM PLAY mode assumes that there are entries in the play list Similarly the Home screen example of the MEMORY ...

Страница 55: ...d back Regard less of which song you start from the recorder stops at the end of the last song after finishing playback of the last song By default the Auto Play menu item of the PLAY SETUP menu in the MENU mode is set to On so if you select a song by using a key in the MEMORY MEMORY SET key group the recorder automatically starts playback of the selected song Home screen of the ALL PLAY mode Play...

Страница 56: ...the STOP key enters the scrub mode and the display changes to show the waveform screen as below In this mode you can scrub forward or backward in 10 milliseconds step using the MENU dial Note Cueing is possible in ALL PLAY SINGLE PLAY and PROGRAM PLAY mode Backward cueing Forward cueing Note To exit the scrub mode press any one of the STOP HOME key PLAY key EXIT NO key and ENTER YES key If you exi...

Страница 57: ...ers 01 through 04 are not played back Regardless of which program number you start from the recorder stops at the end of the last song when finishing playback of the last song By default the Auto Play menu item of the PLAY SETUP menu in the MENU mode is set to On so if you select a song by using a key in the MEMORY MEMORY SET key group the recorder automatically starts playback of the selected son...

Страница 58: ... display changes to show the song list screen 3 Use the MENU dial to select a desired song and press the ENTER YES key The selected song is set to program number 01 In the screen example below file 03 is set Creating the play list The description below assumes that a BWF formatted disc on which more than one WAV file is recorded is loaded However it is also applicable to a CD DA formatted disc on ...

Страница 59: ... ALL and SINGLE After setting all desired song to the play list select the play mode for PROGRAM PLAY 8 Use the MENU dial to move the cursor to SAVE and press the ENTER YES key The play list is created and the display returns to the Home screen shown before starting play list setting 7 Use the MENU dial to select the play mode and press the ENTER YES key The play mode is set and the display return...

Страница 60: ...isplay changes to shown the play list screen with no entry as shown below Deleting a song form the play list 2 Use the MENU dial to move the cursor to the song you want to delete and press the CLEAR 10 key 1 Pressthe SHIFT keytoturnontheShiftmode and press the PLAY MODE PROGRAM SET key The display shows the play list screen on which some songs are set You can delete a song from the play list The f...

Страница 61: ...ing a numeric key in the MEMORY key group instantly starts playback of audio data which is set to the corresponding memory bank instant start function The fol lowing shows the example when the 3 DEF key in the MEMORY key group is pressed PQRS 0 symbol TUV WXYZ 8 2 5 space ABC DEF CLEAR 1 4 7 MEMORY SET MEMORY GHI JKL MNO 9 3 6 10 MEMORY key group Note You can store memory play data for 100 discs t...

Страница 62: ...ORY PLAY mode All memory banks 1 through 10 are empty by default You can also select the MEMORY PLAY mode to bring up this screen using the Play Mode item of the PLAY SETUP menu in the MENU mode see page 81 2 Press the SHIFT key to turn on the Shift mode and specify the memory bank to which you want to assign audio data by pressing the corresponding numeric key in the MEMORY key group For example ...

Страница 63: ... audio file in a memory bank You can replace the audio file in a memory bank with another file The following description assumes that one or more memory banks have audio data and the display shows the Home screen of the MEMORY PLAY mode 1 Press the SHIFT key to turn on the Shift mode and specify the memory bank of which you want to replace the audio file by pressing the corresponding numeric key i...

Страница 64: ...esired time data or using digital scrub function as described on the next page The following description assumes that one or more memory banks have audio data and the display shows the Home screen of the MEMORY PLAY mode 1 Press the SHIFT key to turn on the Shift mode and specify the memory bank whose data you want to edit by pressing the corre sponding numeric key in the MEMORY key group For exam...

Страница 65: ...ime using the digital scrub function You can edit the playback start time and end time by using digital scrub function The following description assumes that one or more memory banks has audio data and the dis play shows the Home screen of the MEMORY PLAY mode 1 Pressthe SHIFT keytoturnontheShiftmode and specify the memory bank whose data you want to edit by pressing the corresponding numeric key ...

Страница 66: ...y the display changes to show the setting screen for memory bank 1 MEMORY 1 Note If you attempt to execute MEMORY PLAY Instant start of an empty memory bank Memory 1 No Entry appears and the operation is cancelled Note Do not forget to execute the save operation above To assign new audio data to the memory bank whose data has been de leted follow the procedure described above Example when you sele...

Страница 67: ...left you can select from among seven directories the root and six folders By selecting the root or a desired directory and creating the audio file table you can play back a WAV file recorded on an ISO9660 formatted disc 001 wav 002 wav 003 wav abwff cbwff bwf1 Root 3 Pressing the PLAY key starts playback from the first file on the audio file table You can use various playback functions as with a d...

Страница 68: ...enu item of the PLAY SETUP menu in the MENU mode is set to On by default the recorder automatically starts playback after locating the specified point If you want to change Auto Play setting see page 84 PQRS 0 symbol TUV WXYZ 8 2 5 space ABC DEF CLEAR 1 4 7 MEMORY SET MEMORY GHI JKL MNO 9 3 6 10 To locate a track numbered over 10 press the CLEAR 10 key followed by an appropriate key in the MEMORY ...

Страница 69: ...disc Locate ABS 0 function Pressing the F FWD key while holding down the STOP HOME key immediately locates the record end position of the current disc Locate REC END function Note With the Locate ABS 0 and Locate REC END functions you cannot select an audio file or audio track individually To select a file or track individually use the SKIP CURSOR key as described above or use other methods descri...

Страница 70: ...rack elapsed time Note If you enter an illegal time and attempt to locate the corresponding point the display shows Out of Zone and the operation is rejected Enter a legal value 3 After entering the time press the LOCATE EDIT TIME key The recorder immediately locates the corresponding point and stops Note When you press the LOCATE EDIT TIME key in step 3 above the time is stored to the LOCATE EDIT...

Страница 71: ...ser Save 79 Loading SYS SETUP data Sys User Load 79 Initializing system memory data Sys Default Set 80 Initializing flash memory Sys Initial Memory 80 ROM version checking Version 81 PLAY SETUP menu 82 Basic procedure for using the PLAY SETUP menu 82 Play mode selection Play Mode 83 Repeat mode on off Repeat 83 Auto play mode on off Auto Play 84 Auto play on off when powered on Power On Play 84 DI...

Страница 72: ...12 menu items for setting preferences see the next and following pages This menu has four menu items regarding playback modes and func tions Among the four menu items the Play Mode and Repeat menu items can be also accessed from the PLAY MODE and REPEAT keys respectively This menu has six menu items regarding a disc CD R RW disc or files You can format a disc store the file system edit an audio fi...

Страница 73: ...igital Analog AES EBU S P DIF AES EBU 0sec to 9sec 3sec 12dB 20dB 12dB US JAPAN US Initializes the system settings of the SYS SETUP and PLAY SETUP menu items Initializes the system settings of the SYS SETUP and PLAY SETUP menu items as well as clears the flash memory Y M D h m s Adjusted to the factory local time Displays the ROM version Shipped version Note This section explains all the menu item...

Страница 74: ...dial to select the desired menu item and press the ENTER YES key The display now shows the first level screen of the selected menu item Selecting a menu item with on the right goes down to the next level screen If you select a menu item without the current setting flashes and you can now make selection on the current level screen For details of each item see the next and following pages Example of...

Страница 75: ...etting If you select Take set Default File Name on the same screen see below When you select Date or Reel the Default File Name setting is not effective Date Take Reel The internal realtime clock data with wav the file extension is set to the file name Example B05h 05m 06s 10may 2006 wav SCENE NAME TAKE NUMBER with wav the file extension is set to the file name The TAKE NUMBER is incremented autom...

Страница 76: ...w below When Analog is selected When Digital is selected To exit the MENU mode press the STOP HOME key The Select Input menu item selects the recording source between analog and digital The setting is stored to the Flash ROM of the unit After entering the scene name and pressing the ENTER YES key the cursor automati cally moves to 001 in the take number field Enter the desired take number in the s...

Страница 77: ...t digital signal is output To exit the MENU mode press the STOP HOME key The Digital Out menu item selects the format AES EBU or S P DIF of the digital signal which is output from the DIGITAL OUTPUT connector Peak hold time setting Peak Hold Select the Peak Hold menu item on the SYS SETUP menu screen and press the ENTER YES key The current setting the default is 3sec starts flashing and you can no...

Страница 78: ...ONLY connector Reference level setting Ref Level Select the Ref Level menu item ob the SYS SETUP menu screen and press the ENTER YES key The current setting starts flashing the default is 12dB and you can now select the desired option Use the MENU dial to set the desired level and press the ENTER YES key to confirm your setting The reference level setting is reflected to the level meters on the fr...

Страница 79: ...up data including SYS SETUP data PLAY SETUP data and contrast level to the user memory The saved setup data can be loaded using the Sys User Load menu item see below for details at any time Loading SYS SETUP data Sys User Load Using the Sys User Load menu item you can load the setup data including SYS SETUP data PLAY SETUP data and contrast level from the user memory Select Sys User Load on the SY...

Страница 80: ...igital Out setting PLAY SETUP 1 Play Mode setting 2 Repeat setting 3 Auto Play setting 4 Power On Play setting Memory play data Play list for program play Contrast level User memory data Initializing system memory data Sys Default Set Using the Sys Default Set menu item you can initialize the setup data including SYS SETUP data PLAY SETUP data and contrast level to the factory preset data Select S...

Страница 81: ...nu ROM version checking Version Select Version on the SYS SETUP menu screen and press the ENTER YES key The display changes to show the ROM version To exit the MENU mode press the STOP HOME key Using the Version menu item you can check the version of the unit ...

Страница 82: ...n the MEMORY MEMORY SET key group and CLEAR 10 key Default ALL Off On Off Selects whether the recorder automatically starts playback when turning on the unit The basic procedure for using the PLAY SETUP menu is as described below 1 While the recorder is stopped press the ENTER YES key The unit enters the MENU mode and the MENU list screen as below is shown 2 Use the MENU dial to highlight PLAY SET...

Страница 83: ...epeat mode Select the Repeat menu item on the PLAY SETUP menu screen and press the ENTER YES key The current setting starts flashing the default is Off and you can now make selec tion Use the MENU dial to select Off or On and press the ENTER YES key to confirm the setting On Off The recorder repeats playback of the song s according to the current play mode until you stop The recorder stops playbac...

Страница 84: ...e ENTER YES key The current setting starts flashing the default is Off and you can now make selection Use the MENU dial to select Off or On and press the ENTER YES key to confirm the setting On Off The recorder automatically starts playback in the previously selected play mode when powered on The recorder stops after starting up default To exit the MENU mode press the STOP HOME key Note If you tur...

Страница 85: ... audio file recorded to a BWF formatted disc This item is not available with a CD DA disc Edits and saves a file name of a WAV audio file recorded to a BWF formatted disc This item is not available with a CD DA disc Deletes an unnecessary WAV audio file recorded to a BWF formatted disc This item is not available with a CD DA disc Restore Del File Finalize Restores a WAV audio file which has been d...

Страница 86: ...ber and select the format type between BWF and CD DA A disc volume label can be used as the default file name for audio files to be recorded in a BWF formatted disc If you do not edit a volume label skip steps 4 through 6 below Note You can reformat the following CD R RW discs 1 BWF formatted or CD DA formatted blank CD R RW discs 2 BWF formatted or CD DA formatted recorded CD R RW discs You canno...

Страница 87: ...YES key to confirm your selection 9 Use the MENU dial to highlight EXECUTE and press the ENTER YES key To cancel formatting highlight EXIT instead of EXECUTE The display shows the CAUTION screen as below on which Are you sure flashes To cancel formatting press the EXIT NO key 10 Press the ENTER YES key to start formatting the disc When you select any of the BWF types in step 8 above the unit erase...

Страница 88: ... press the EXIT NO key instead of the ENTER YES key when the popup screen above left is shown the disc is ejected without rewriting the file system In this case the editing you made is cancelled and the system returns to the condition before editing 4 Press the ENTER YES key to rewrite the system file The display shows the screen below while executing After rewriting completes the display shows th...

Страница 89: ... menu screen 3 Use the MENU dial to highlight Edit File Name and press the ENTER YES key The display now shows the screen for selecting an audio file from the audio file list 4 Use the MENU dial to select an audio file you want to edit and press the ENTER YES key The display now shows the EDIT FILE NAME screen On this screen you can edit the current file name the rightmost character of the name fl...

Страница 90: ...described on the next page 1 While the recorder is stopped press the ENTER YES key The unit enters the MENU mode and the MENU list screen as below is shown 2 Use the MENU dial to highlight DISK UTILITY and press the ENTER YES key The display now shows the DISK UTILITY menu screen 3 Use the MENU dial to highlight Delete File and press the ENTER YES key The display now shows the screen for selecting...

Страница 91: ...edited disc without rewriting the file system the popup screen for rewriting the file system appears see the previous page 1 While the recorder is stopped press the ENTER YES key The unit enters the MENU mode and the MENU list screen as below is shown 2 Use the MENU dial to highlight DISK UTILITY and press the ENTER YES key The display now shows the DISK UTILITY menu screen 3 Use the MENU dial to ...

Страница 92: ...well as file name editing and file deletion 1 While the recorder is stopped press the ENTER YES key The unit enters the MENU mode and the MENU list screen as below is shown 2 Use the MENU dial to highlight DISK UTILITY and press the ENTER YES key The display now shows the DISK UTILITY menu screen 3 Use the MENU dial to highlight Finalize and press the ENTER YES key The display now shows the confir...

Страница 93: ...93 CD R RW MASTER RECORDER CR500 Specifications Chapter 8 Specifications ...

Страница 94: ...10kΩ or higher Reference output level 4dBu Maximum output level 24dBu 20dBFS ANALOG OUTPUT L R unbalanced Connector RCA pin jack Output load impedance 10kΩ or higher Reference output level 10dBV Maximum output level 10dBV 20dBFS PHONES Connector ø6mm Stereo Phone jack Output load impedance 8Ω or higher Maximum output level 100mW 32Ω DIGITAL INPUT Connector XLR 3 31 type balanced pin 2 hot Format I...

Страница 95: ...8 kg Power requirements 120VAC 50 60Hz 230VAC 50 60Hz 240VAC 50 60Hz Power consumption Approx 14W Specifications and appearance are subject to change without notice for product improvement All company names and model names mentioned in this manual are trademarks or registered trademarks of their respective holders Recording playback General R P Frequency response 20H 20kHz 1dB fs 44 1 48kHz 20H 40...

Страница 96: ... 9 3 6 DISPLAY LOCATE 10 DIR SEL REC RDY ACCESS PLAY MODE PROGRAM SET REPEAT OPEN CLOSE R L MAX MIN MAX MIN MAX MIN PHONES INPUT LEVEL KYBD ONLY USB POWER AC IN CAUTION AVIS RISQUE DE CHOC ELECTRIQUE NE PAS OUVRIR WARNING TO REDUCE THE RISK OF FIRE OR ELECTRIC SHOCK DO NOT EXPOSE THIS EQUIPMENT TO RAIN OR MOISTURE UNBALANCED 10dBV BALANCED 4dBu 1 GND 2 HOT 3 COLD R L R L BALANCED 4dBu DIGITAL OUTP...

Страница 97: ... Switzerland TEL 41 1 4323230 FAX 41 1 4326558 UK NAME SCV London ADD 40 Chigwell Lane Oakwood Hill Industrial Estate Loughton Essex IG10 3NY U K TEL 44 20 8418 0778 FAX 44 20 8418 0624 AUSTRIA NAME ATEC Audio u Videogeraete VertriebsgesmbH ADD Im Winkel 5 A 2325 Velm Austria TEL 43 2234 74004 FAX 43 2234 74074 BELGIUM NAME General Audio ADD Raymond Pelgrimslaan 101 B 1702 Groot Bijgaarden Belgium...

Страница 98: ...esulting from accident misuse abuse or neglect 7 Damage resulting from failure to perform routine maintenance and or calibration procedures 8 Damage resulting from failure to follow instruction in the owner s manual 9 Damage resulting from repair or attempted repair or by someone other than a Fostex America Service technician or a technician at an authorized Fostex America service station 10 Damag...

Страница 99: ...to allow Fostex America to inspect or adjust the problem 3 All accessory items appurtenant to that problem LIMITATIONS OF INPLIED WARRANTIES AND EXCLUSIONS OF CERTAIN DAMAGES Unless considered unenforceable or unlawful under applicable law A All implied warranties including warranties of merchantability and fitness for a particular purpose are limited in duration to term of this warranty and to th...

Страница 100: ... PRINTED IN JAPAN MARCH 2006 8588 076 000 FX 438100 FOSTEX CO 3 2 35 Musashino Akishima shi Tokyo Japan 196 0021 FOSTEX AMERICA 13701 Cimarron Avenue Gardena CA 90249 U S A ...

Отзывы: