Foster BCCFTRI-1 Скачать руководство пользователя страница 2

1

Important Note to the Installer:

If you are not the user please pass this document on to them as 

it contains important guidelines on operation, loading, cleaning 

and general maintenance and should be kept for reference.  

GB

General Electrical Safety

Foster Refrigerator recommends that the equipment is electrically connected via a Residual 

Current Device; such as a Residual Current Circuit Breaker (RCCB) type socket, or through a 

Residual Current Circuit Breaker with Overload Protection (RCBO) supplied circuit.

Disposal Requirements

If not disposed of properly all refrigerators have components that can be harmful to the 

environment. All old refrigerators must be disposed of by appropriately registered and licensed 

waste contractors, and in accordance with national laws and regulations.

Start-Up and Operation

(For Modular units please refer to the separate Install & Erection Instructions)

After unpacking, clean and allow the cabinet to stand for 2 hours before turning on 

(cleaning directions supplied within this manual)

. Ensure the cabinet is situated where 

neither hot nor cold air sources will affect its performance. Make sure that a minimum clearance 

of 150mm around the cabinet is available for ventilation and effective operation. There is no 

minimum clearance for above the cabinets. Connect the unit to a suitable mains power outlet and 

turn the supply on. Please note that the BCT36 will require a 16amp supply and the BCFT36 and 

both 51kg models will require a 3 phase supply. 

Do 

not

 plug or unplug the unit with wet hands.
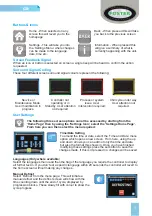
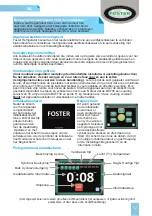
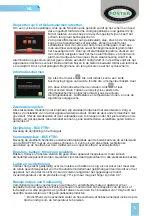
Initialisation 

screen


After power is 

applied to the unit the 

controller display will 

show the initialisation 

screen. This will 

only show for a few 

minutes stating both 

‘Booting’ and then displaying the software 

version at the bottom of the screen. When the 

controller has completed initialisation the screen 

will revert to the ‘Home Screen’.

Home Screen

This is shown 

after initialisation 

and when no 

programmes are 

running. From 

this page a cycle 

can be launched. 

Select the cycle 

type by pressing the relevant cycle button and 

then press ‘Start’. This page also shows the 

date, time and current air temperature and 

allows access to the ‘Settings Home Page’ and 

‘Information’ function. 
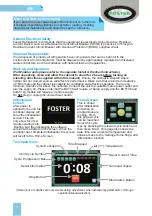
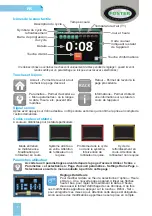
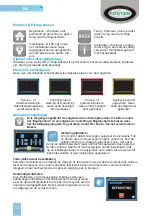
Touchpad Icons

Chill Cycle Symbol

Time Elapsed

Cycle Progression Bar

Detail Information

Stop Button

Information Button

Surround Signal

Day & Current Time

Air (T1) Temperature

(Some icons or switches are only visable during adjustment, when activated by parameters or through 

operation/manual selection).
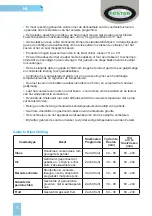
Cycle Description

Содержание BCCFTRI-1

Страница 1: ...ail support foster uk com www fosterrefrigerator co uk A Division of ITW Ltd Foster Refrigerator Oldmedow Road King s Lynn Norfolk PE30 4JU United Kingdom Original Operation Instructions Blast Chiller...

Страница 2: ...0mm around the cabinet is available for ventilation and effective operation There is no minimum clearance for above the cabinets Connect the unit to a suitable mains power outlet and turn the supply o...

Страница 3: ...can all be accessed by starting from the Home Page then by using the Settings Icon select the Settings Home Page From here you can then select the menu required Time Date Setting To amend the time or...

Страница 4: ...ing installation the unit is level if not the door may not close correctly Adjust castor s levels by inserting spacers under the appropriate Castor and the base of the unit As an alternative adjustabl...

Страница 5: ...s recommended that food is rested and cooled for 30 minutes before blast chilling Do not overload the Blast Chiller as this will mean the required temperature will not be achieved in time Always clean...

Страница 6: ...gaskets should be inspected on a regular basis and replaced if damaged To clean wipe with a warm damp soapy cloth followed by a clean damp cloth Finally thoroughly dry before closing the door Shelves...

Страница 7: ...rmances ne pas placer l appareil proche d une source d air froid ou chaud Pour une bonne ventilation et un fonctionnement optimum assurez vous de laisser un espace minimum de 150 mm autour de la cellu...

Страница 8: ...l utilisateur en cours Syst me arr t ou en veille Attention de l utilisateur non requise Probl me dans le cycle ou dans le syst me Intervention de l utilisateur requise Cycle de refroidissement en co...

Страница 9: ...que alors aucune autre intervention de la part de l utilisateur n est n cessaire Si elle apparait dans la liste active un technicien doit intervenir Ces deux mentions d alarme subsistent dans l histor...

Страница 10: ...e les couper en portions plus petites avant de les refroidir ou d effectuer un refroidissement plus rapide La temp rature d introduction du produit doit tre entre 70 et 90 Il est recommand de ne pas r...

Страница 11: ...arque les temps annonc s ne sont donn s qu titre indicatif et sont d pendants des types de produits du conditionnement et des quantit s Nettoyage et entretien Important Avant de nettoyer l appareil le...

Страница 12: ...cs sont lavables en lave vaisselle Les glissi res quant elles doivent tre nettoy s avec de l eau chaude savonneuse puis rinc s et s ch s Les chariots de four doivent tre nettoy s avec de l eau chaude...

Страница 13: ...ond de kast beschikbaar is voor ventilatie en effectieve werking Er is geen minimale vrije ruimte voor boven de kasten Sluit het apparaat aan door de stekker in een geschikt stopcontact te steken en s...

Страница 14: ...oor te starten vanuit het Beginscherm en vervolgens de Instellingen Beginscherm te kiezen door het Instellingenpictogram te gebruiken Vanaf hier kunt u dan het vereiste menu kiezen Instelling tijd dat...

Страница 15: ...n Zorg er tijdens de installatie voor dat het apparaat waterpas staat omdat de deur anders misschien niet goed sluit Stel de zwenkwielen af door vulplaatjes aan te brengen onder het juiste wieltje en...

Страница 16: ...treer de temperaturen Doe niet teveel in de bakken aanbevolen dikte is 25 mm en verspreid het voedsel gelijkmatig Laat het voedsel even rusten na het koken vooral vlees om de kwaliteit en de textuur v...

Страница 17: ...bruiken Maak de condensor minstens eenmaal per maand schoon deze bevindt zich achter het motorcompartiment opgepast voor hete en mogelijk scherpe onderdelen Verwijder de bevestigingsschroe f ven van d...

Страница 18: ...e stekker niet uit het stopcontact is geraakt en dat de hoofdstroomvoorziening aan staat bijv is de controller verlicht b U controleert of de kast niet in stand by staat c De zekering voor de kast nog...

Страница 19: ...det an dem er weder hei er noch kalter Luft ausgesetzt ist die die Leistung beeintr chtigen k nnte Stellen Sie f r die Luftzirkulierung und der ordnungsgem en Funktion des Schranks sicher dass ein Min...

Страница 20: ...rsicht ber das was derzeit mit dem Ger t passiert Kn pfe Symbole Service oder Wartungsmodus Benutzer Modifizierung im Gang Prozess oder Systemfehler Eingreifen des Benutzers erforderlich K hlzyklus im...

Страница 21: ...sbildschirme die sich im K hlzyklus befinden sind etwas anders als andere da sie auch den derzeitigen bertragungsstatus F hlerstatus und Temperaturen und auch die digitalen Eingangsinformationen anzei...

Страница 22: ...die bedacht werden m ssen wenn die Dauer beim Schockk hlen oder Schockfrosten berechnet und welches Programm benutzt werden soll Ein 10 kg Braten wird nicht die gleichen Voraussetzungen haben wie 10 k...

Страница 23: ...Shepherds Pie etc Hart Hard 50 90 90 240 Gem se H lsenfr chte Ged nstetes oder gebratenes Gem se Reis Kartoffeln etc Weich Soft 30 90 60 240 Obst Ged nstetes oder gebratenes Obst Weich Soft 60 90 60...

Страница 24: ...ollten regelm ig gewartet und ersetzt werden sollten sie besch digt sein Zum Reinigen benutzen Sie einen warmen seifigen Lappen und anschlie end einen sauberen Lappen Lassen Sie das Scharnier im Ansch...

Страница 25: ...e colocar el frigor fico en un lugar que no est expuesto a corrientes de aire fr o o caliente que puedan afectar al funcionamiento del mismo Aseg rese de dejar al menos 150 mm de holgura detr s del fr...

Страница 26: ...io Al seleccionar este bot n en cualquier pantalla volver a la pantalla de inicio Informaci n Presione este bot n para obtener un resumen de lo que sucede en ese momento en la unidad Botones e iconos...

Страница 27: ...er un ciclo presione el bot n de Parada Stop que aparece en pantalla hasta que los cuadros de progresi n cambien a color rojo Al soltar el bot n se habr detenido el ciclo y la pantalla volver a la p g...

Страница 28: ...programa que se va a utilizar Una pieza de carne de 10 kg no tendr las mismas necesidades de refrigeraci n que 10 kg de productos de reposter a La densidad el contenido de agua y el contenido de grasa...

Страница 29: ...s postres Postres hechos con fruta y flanes de huevo Fuerte Hard 30 90 70 240 Otros postres P dines y postres espesos como tarta de queso Fuerte Hard 30 90 70 240 Nota Todos los tiempos indicados debe...

Страница 30: ...lararlos y secarlos Para lavar los carros utilice un pa o caliente con jab n y seque con cuidado antes de volver a ponerlos en uso Soluci n de problemas Desbordamiento de la bandeja del evaporador est...

Страница 31: ...30 GB Page Left Blank Intentionally...

Страница 32: ...and have been designed realised and controlled according to the following regulations D das Ger t ist folgenden Normen gem entworfen angfertigt und gepr ft worden DK er blevet projekteret realiseret...

Отзывы: