background image


25 


5>


The record mode defaults in 

‘Fixture’

. Press 

[Rec. Mode]

 if you want to 

record by another mode; 


Record Mode = Fixture

 ----- all attributes of fixtures will be saved. 


Record Mode = Channel

 ----- only the changed attributes of fixtures will be 

saved. This function makes fixtures in different attributes can be run 
synchronously. 


Record Mode = Stage

 ----- all fixtures in stage (all the patched fixtures) will 

be saved whatever they are being selected. 

6>


Press the playback key or press 

[Save Step] 

to save the step; 

7>


Repeat the steps from 

3

 to 

6

 until the end. Press 

Edit Playback

 to exit. 

Besides, you can also create the Cue-lists playback under cue mode

1>


Press 

Save to Cue

 in 

‘LIVE SHOW’

2>


Select record and run mode you want, select as 

[Playback type=Cuelists]

(At the moment, the indicator led of 

Edit Playback

 will flash.) 

3>


Select the fixtures and set a scene by the attribute keys and wheels; 

4>


Select a playback key for the Cue-lists. The top of the menu bar on the touch 

screen will display as 

‘Current PLBK=n’

 (n means the number of playback fader); 

5>


Set a scene by the attribute keys and wheels; 

6>


Press again the playback key which indicator led keeping on to record, the top 

of the menu bar on the touch screen will display as

 ‘Total Steps=1’

7>


Repeat the steps from 

3

 to 

6

 until the end. Press 

Edit Playback 

or 

Save to 

Cue

 to exit when finished. 

7.4.2.


Edit Cue-lists 

7.4.2.1.


Edit Cue-lists Steps 

1>


Press 

Edit Playback

 in 

‘LIVE SHOW’

2>


Select a Cue-lists to be edited; 

3>


Select a cue from the Cue-lists; 

4>


Select 

[Edit Cue]

, the scene will be loaded with the used fixtures; 

5>


You can edit the scene directly or select other fixtures for a new scene; 

6>


Press 

[Save Step]


7>


Select 

[Overwrite Step]

 to take place the old step; Select 

[Merge Step] 

can add it into the original step; 

Select 

[Save to last step]

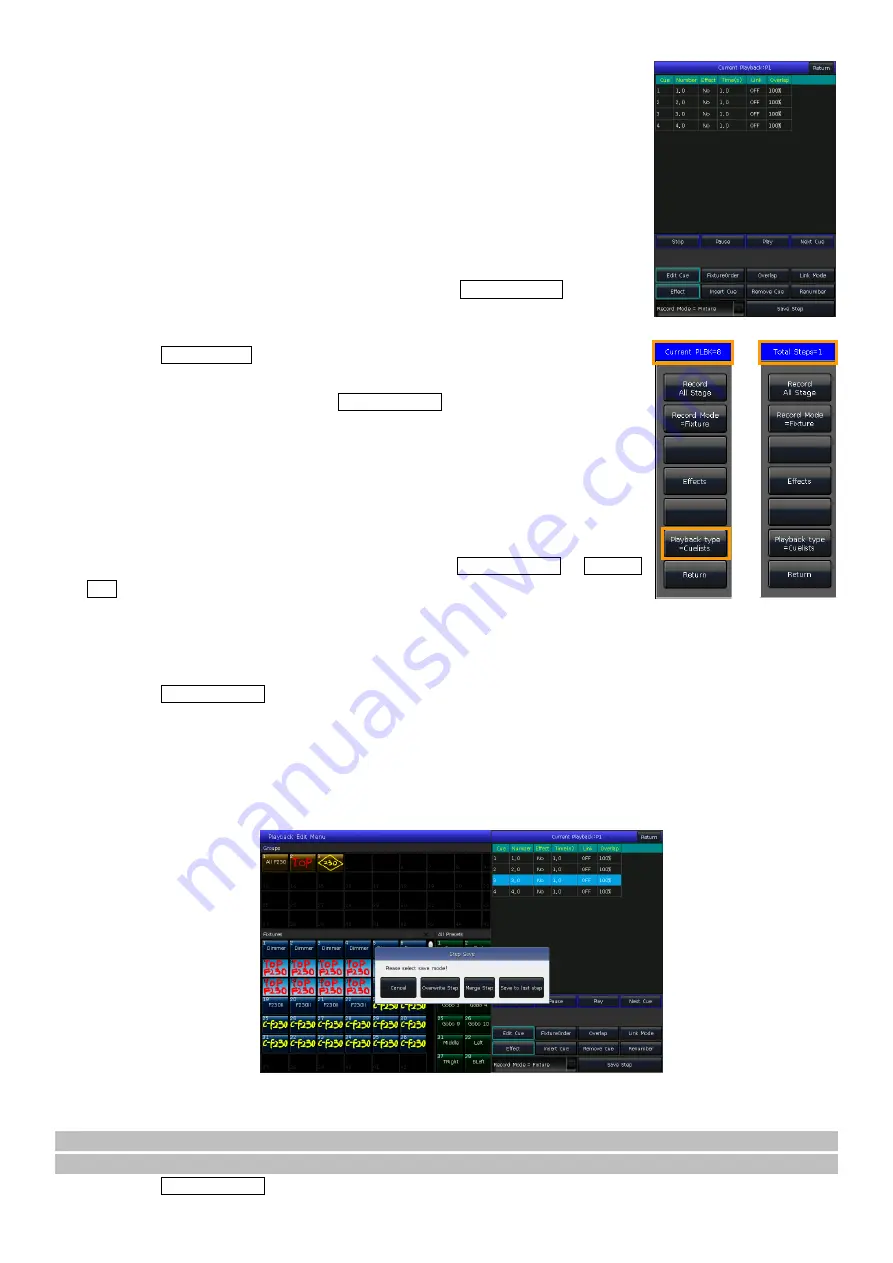
 will save as a new step; 

Note: If


the newly added scene contains the fixtures used in the original cue, those fixtures will be covered when 

using the merge function. 

8>


Press 

Edit Playback

 to quit when finished. 

Содержание Designer 2048

Страница 1: ...Designer 2048 Lighting Controller User Manual FOS Technologies LTD https www fos lighting eu...

Страница 2: ......

Страница 3: ...ts 19 6 Shape Effects 20 6 1 How Effect Generator Works 20 6 2 Using Effect 20 6 3 Effect Parameters 20 6 4 User Effect 22 7 Playback 24 7 1 Playback Modes 24 7 2 Playback Edit Menu 24 7 3 Cue 24 7 4...

Страница 4: ...erboard contains a Lithium Ion button cell CR2032 for time data retention This battery is used to maintain time data when the product is not powered this battery will need to be replaced at least ever...

Страница 5: ...o change the color and then use the Shift key along with or to adjust the backlight brightness Of course you can set it under the Key Backlight function in the Setup menu 1 1 1 1 Quick Record Key You...

Страница 6: ...the controller and editing playbacks 1 1 1 6 Numeric Keypad Keys You can use the numeric keypad to input numerical commands to change the running state of the playback Their functions will be introduc...

Страница 7: ...ptions while it is white then you can press the tool key for other functions 1 1 2 1 Setting Up Working Windows The position and size of the operation window are not fixed You can hold the top bar of...

Страница 8: ...enew the backup of the workspace 1 2 The Rear Panel Audio Output one 3 5mm audio interface and one audio optical interface allow you to connect with the audio device MIDI Interface there are 3 MIDI in...

Страница 9: ...lost if the controller is turned off without backing up The backup show files can be saved into the internal RAM or external USB disk You can back up the Show by pressing the Store key for a quick sav...

Страница 10: ...the Wheel D to change 5 The option Unit start number shows the initial unit ID to be patched 6 We can enter a value on the column of Quantity to set the patching quantity Enter 1 means to patch a sin...

Страница 11: ...f patch from user library list Note The channels details will be listed on the right bar after a fixture is selected 4 Select the fixture about to be patched and select Confirm to call out the patchin...

Страница 12: ...3 4 Repatch The function allows you to change the address and or the line of the patched fixtures 1 Select the fixture need to be changed 2 Press Repatch 3 Select the DMX line and start address on the...

Страница 13: ...sses You can also remotely change the modes and other settings on the practical fixtures Note Fixtures must be equipped with RDM for the function to work If you have connected with DMX buffers or spli...

Страница 14: ...ted as well Press Fixture Parameter on PATCH SETUP menu Swap PAN TILT to swap the controlling of Pan and Tilt channels Invert TILT to invert the controlling of Tilt channel Invert PAN to invert the co...

Страница 15: ...consecutive fixture grids on the Fixtures window It will be shown as a master unit ID and its series cell IDs 4 1 Setup Fixture Layout All patched fixtures will be listed in the Fixtures window but w...

Страница 16: ...B channels 4 2 Select Fixtures There are several ways to select the fixtures Touch Screen 1 Fixtures window you can select the fixtures one by one by pressing the unit ID the fixture order depends on...

Страница 17: ...If you want to locate the fixtures without re center the position press the key Locate and select Locate Fixture No PAN TILT to light up the fixtures All attributes except Pan and Tilt will be set to...

Страница 18: ...es to the same position You can press the Find key to re select all fixtures in the group after finished setting 4 3 5 Macro Function of Fixtures Macro is a sequence of fixtures program which run with...

Страница 19: ...ribute key can switch to other attribute Press the attribute name on the curve menu can switch into other attributes in current attribute key 5 Press 2 Points can switch to 3 Points mode Mirror functi...

Страница 20: ...group name can find all the fixtures included 4 You will find details of included fixtures of the current group such as the fixture unit ID fixture name picture legend and the sequence number 4 4 2 1...

Страница 21: ...ent 0 draw a selection box to select fixtures can set them all in the same sequence number When Step Increment 1 the sequence number of the fixtures selected by drawing a selection box increase 1 auto...

Страница 22: ...r All channel values of selected fixtures that have been edited will be saved There are 2 different Preset Modes Normal The preset can only be used by the selected fixtures when creating Global You ma...

Страница 23: ...enable the option Quick Palette in the setup menu for this feature If you recall a preset where the fade in time is already set it will use the time to fade in the preset if you have not set any time...

Страница 24: ...selection type is All Effects but you can also find more specific types of effects by using the effect type drop down list For your convenience any presently selected effects will display in the Curr...

Страница 25: ...n an input number with each group moving together as one However you ll first need to adjust the fixture spread or they will continue moving as a single group The Width controls the time a full cycle...

Страница 26: ...Effect The user effect system allows you to create user defined effects by effect forms Besides you may save a combined effect in User Effects for quick recall in the future 6 4 1 Create a User Effect...

Страница 27: ...ws you to save the running effects as a user effect You can recall the user effect for other fixtures to get the same effect However all parameters are based on the number of running fixtures You can...

Страница 28: ...saved This function makes cues in different attributes that can be run synchronously 7 3 2 Run Mode of Cue Mode Time Enable both HTP and LTP times If the times are set to 0 value of HTP channel depen...

Страница 29: ...key for the Cue lists The top of the menu bar on the touch screen will display as Current PLBK n n means the number of playback fader 5 Set a scene by the attribute keys and wheels 6 Press again the p...

Страница 30: ...il the first fixture is halfway 50 through fading The running sequence of fixtures follows the setting of the fixture order The running time will be divided equally for each fixture That means if ther...

Страница 31: ...the running playback by pressing Shift along with the key of the playback fader or the key playback key The velocity of the Cue lists in its present state can be adjusted by Wheel D The keys above or...

Страница 32: ...strated in the graphic below There is no delay out time if it is a cue playback When fading in the playback the fade in time starts to run after the delay in is finished When fading out the playback t...

Страница 33: ...t you can use Wheel D to adjust the speed directly If you need to adjust other Cue lists speed then you have to hold Shift and press the needed playback key to set the Cue lists at current Roll the Wh...

Страница 34: ...be used as a GOTO function after the playback has faded in Pressing it once means to run one step 7 7 3 Playback Start Time If you had set the running time on the Cue lists the time may affect the fir...

Страница 35: ...If there is a Cue playback you can select one of the modes Mode Time Enable both HTP and LTP times If the times are set to 0 the value of the HTP channel depends on the fader position Mode Fader Disa...

Страница 36: ...effect macros show or playback by delete function Select the units from each workspace window such as Group Fixture Preset Effect Macro and etc You can delete a single item by pressing the unit twice...

Страница 37: ...yping in the letters Picture You can draw a picture as the name The pen color and width can be changed accordingly Besides you may change the frame color of the unit by the option Border It helps you...

Страница 38: ...he USB disk The supported formats are mp3 aac m4a wav wma flac ape 9 2 Record a Macro Show 1 Open the Time Code window on LIVE SHOW 2 Select New to open a new record The record number and its mode wil...

Страница 39: ...e Macro Shows window The show starts to play once you pressing play on the external device If the macro show saved by Internal Music the macro show starts to play once you select the show record on th...

Страница 40: ...the selected playback or preset Delete Items 1 Select one or sequential operations to be deleted 2 Press Delete Items to delete the selected operations 9 2 1 3 Edit Timing of Macro Show While replayin...

Страница 41: ...on defaults in Enable the key upon Playback fader will be highlighted if it had a program If the option in Disable the key upon playback fader will show in backlight color whatever if it has a program...

Страница 42: ...a playback PB 9n pp ll pp playback number decimal 0 14 ll playback levels decimal 0 127 Example the midi channel on the controller is 1 a If you want to switch the playback page to page 3 Command B0 0...

Страница 43: ...r When entered the option it will list all loaded or created user fixtures on the left Select any of them that will show its channel details then you can edit it again 10 2 2 1 Create New Fixture 1 Pr...

Страница 44: ...cted fixture 10 2 2 3 Import System Fixture You can export the fixtures from the system library and edit the fixtures according to the physical lightings The edited user defined fixtures will not affe...

Страница 45: ...en after loaded the codeusrlib bin file 10 2 2 5 Export Library You can export all the user libraries to the USB driver You can backup the user libraries which may use in other controllers in the same...

Страница 46: ...it which can be set to different colors for 3 different states Individual keys for flash and pause functions for playbacks Provide midi In Out and Thru interfaces to connect and work with other device...

Отзывы: