Fe
26
AXIS INSTALLATION
35
Fig. 3
Fig. 4
Step 3:
Top Bracket Installation
1. Position wood 2” x 4” [60mm x 102mm]
on stairs in line
with bottom brackets.
2. Place panel on top of wood 2” x 4” [60mm x
102mm] next to bottom brackets. As shown in Fig. 1.
3. Rake the panel until center upright is parallel to the post
or level and positioned as close to final installation position
as possible.
4. Clamp the panel to the post. Be sure to clamp at four
touch points to keep panel in position. As shown in Fig. 2.
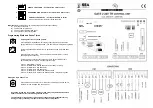
5. Position bracket parallel with top rail & flat
centered on post.
Make sure inside bottom of bracket is
flush with bottom of rail. As shown in Fig. 3.
6. Use pencil to mark
top edge of bracket
location on post.
7. Dis-assemble the bracket by removing the barrel
and screw. Reference the bracket options on page 32.
8. Place Bracket Base on previous top edge mark.
Center the base on the post and use pencil to add marks
for two screw hole locations. As shown in Fig. 4.
Note:
• Be sure bracket bases are centered on posts when marking
hole locations.