


7
19
Wheel reflector
30
Front fender support
20
Saddle
31
Rear fender support
21
Rear rack
32
Front brake cable
22
Foldable stem
33
Rear brake cable
23
Kickstand
34
Seat post clamp
24
Front fender
35
Bolts & nuts
25
Rear fender
36
Fender support
26
Display
37
Wrapping tape
27
Pedal
38
Frame buckle
28
Controller
39
Disc brake rotor
29
Chain
40
Nylon cable tie
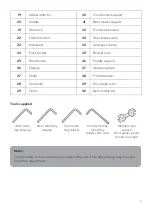
Tools supplied
3mm Allen
Key (display)
4mm Allen Key
(fender)
5mm Allen
Key (brake)
6mm & Phillips
Head Key
(bell & stem lock)
Multifunction
wrench
(front wheel, pedal,
front & rear light)
Notes:
The assembly of this e-bike does not require the use of the above tools, they are used
for further adjustment.


