Fortex Engineering Ltd, Unit 16, Freeman Road, Lincoln, LN6 9AP, United Kingdom
www.fortex.co.uk [email protected] +44(0)1522 718 168
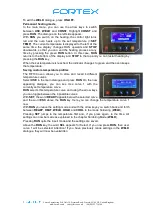
To exit the
WELD
dialogue, press
ON-OFF
.
Permanent heating mode
In the main menu, you can use the arrow keys to switch
between
USE
,
WELD
and
CONST
. Highlight
CONST
and
press
RUN
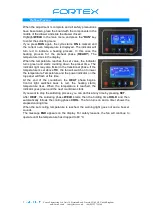
. The dialogue on the left side appears.
With
RUN
you switch on the heating, the control light turns
red and the oven heats up to the set temperature (=
SET
TEMP
). The current temperature is displayed to the left. At the
same time the display changes RUN upwards and
STOP
downwards, so that you can end the heating process at any
time by pressing the green
RUN
button. In this case,
RUN
returns to the bottom of the display and
STOP
to the top and you can restart heating by
pressing the
RUN
key.
When the set temperature is reached, the indicator changes to green and the oven keeps
the temperature.
Saving custom temperature profiles
The RF100 oven allows you to store and recall 4 different
temperature curves.
Select
USE
in the main dialogue and press
RUN
. On the now
appearing dialogue, you can see Use curve 1 with the
currently set temperature curve.
RUN
selects this temperature curve and using the arrow keys
you can toggle between the 4 possible curves.
With
SET
, the word
READY
appears below the selected curve
and the word
ESC
above the
RUN
key. Here you can change the temperature curve 1
now.
With
RUN
you leave the setting mode and with the arrow keys you switch back and forth
between
READY
,
HEAT
,
WELD
,
HOLD
and
COOL
in the mode Soldering (
WELD
).
Pressing
SET
jumps to the temperature first and, if you press again, to the time. All
settings can now be made as explained in the chapter Soldering Mode (
WELD
).
Pressing
RUN
quits the insert mode and the settings are saved.
Above the
RUN
key, the word
SEL
appears for Select. If you now press
RUN
, then user
curve 1 will be selected. Attention! If you have previously made settings in the
WELD
dialogue, they will now be overwritten

