background image


   Fortex Engineering Ltd, Unit 16, Freeman Road, Lincoln, LN6 9AP, United Kingdom 

www.fortex.co.uk     [email protected]      +44(0)1522 718 168 

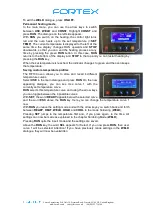
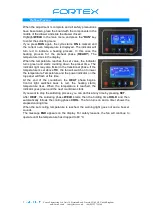
Turn on the main power switch on the back of the unit and the indicator light in the upper 
left of the screen lights up in green. If you press the red 

ON-OFF

 button, the display on 

the picture below will show 

USE

WELD

 and 

CONST


Soldering Mode (WELD) 

Preliminary  note:  the  temperature  and  time  settings  in  the 
delivery  condition  of  the  stove  are  only  indicative.  The 
parameters suitable for your application must be determined 
by  test  soldering.  Please  also  refer  to  the  information 
provided by the solder paste manufacturer. 
After pressing 

ON-OFF

WELD

 is highlighted. Press 

RUN

 to 

display the dialogue as shown in the picture on the left. 

RUN

  starts  the  cycle,  the  indicator  light  in  the  upper  left 

corner of the display turns red and the oven starts to heat up. 
The  soldering  cycle  will  be  explained  later.  Here  we  first 
explain the setting options. 
If you press 

SET

 instead of 

RUN

, then 

READY

 (pre-heat-phase) will be highlighted. Use 

the  arrow  keys  to  change  the  text  to 

HEAT

WELD

HOLD

  or 

COOL

.  Stay  on 

READY


and  press 

SET

.  The  marking  jumps  to 

TEMP

  (temperature)  and  you  can  adjust  the 

temperature between 

70

 and 

130°C

 with the arrow keys. Another press on 

SET

 and you 

can change the time between 

00:00

 and 

99:99

 (minutes: seconds). 

Button

 SET

 takes you back to 

READY

 and here you can use the arrow keys to go e.g. to 

HEAT

 to set the parameters for the heating phase. Press 

SET

 to go to the temperature 

settings  and  use  the  arrow  keys  to  set  values  between 

120

  and 

300°C

.  Another 

SET


takes you to the time setting for the heating phase. 
Back to 

HEAT

, press arrow down to get to the actual soldering phase. 

WELD

 is marked 

and with 

SET

 you can change the temperature again between 

120

 and 3

00 ° C

 and set 

the time with another 

SET

For 

HOLD

,  the  holding  time,  the  same  applies,  but  the  temperatures  can  only  be 

adjusted between 

70

 and 

230 ° C

 here. 

When  you  have  finally  arrived  at 

COOL

,  the  cooling  phase,  you  can  only  set  the 

temperature  between 

70

  and 

200  °  C

  here. A  time  is  not  set  in  section 

COOL

,  but  a 

signal terminates the entire soldering cycle when the set temperature is reached. 

Содержание RF100

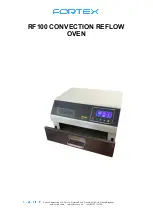
Страница 1: ...Fortex Engineering Ltd Unit 16 Freeman Road Lincoln LN6 9AP United Kingdom www fortex co uk sales fortex co uk 44 0 1522 718 168 RF100 CONVECTION REFLOW OVEN ...

Страница 2: ...ed Use of Machine 4 Safety Regulations 4 Scope of delivery 6 Installation 6 Overview 7 Description of the function keys 7 The temperature curve 8 Setting of Parameters 9 Reflow Process 12 Characteristics of soldering alloys 13 Temperature curve parameters 14 Cleaning and Maintenance 14 Error message 15 Spare Parts and Options 15 Guarantee 15 Disclaimer of Warranty 15 Copyright 16 ...

Страница 3: ...is suitable for SMT small series for research and development of electronic products school education and study The operating system software is in English The stove is well insulated by a special Aluminium silicate cotton which reduces energy consumption protects the circuit and allows optimal operation and keeps the temperature in the furnace constant Technical Data Power connection 200 230 VAC ...

Страница 4: ...r service and maintenance about 1m on all sides Do not use this device outdoors The table must be able to carry a weight of at least 30 kg The oven should be used at normal room temperatures of 15 to 25 degrees It is not allowed and even dangerous to install the oven in a cabinet or box Do not install this unit near a heating element or stove even in a damp environment Electricity The machine is m...

Страница 5: ...ly in well ventilated areas Follow the safety rules of the solder paste and adhesive suppliers During the soldering process gases can arise These gases may endanger your health We recommend the use of a hood or an alternative extractor option 1 Check the proper function of the stove using the following checklist 2 Check the drawer The drawer must not be kinked or damaged Do not use the oven if som...

Страница 6: ...mney effect Do not place any other objects on the device especially no flammable liquids such as As water hot water alcohol methanol gasoline The machine can be cleaned in the cooled state Wipe the inside of the machine with a dishcloth You can use some rinse water or anhydrous alcohol Do not switch on the machine until it is completely dry At the beginning of operation odours may occur during ope...

Страница 7: ... co uk 44 0 1522 718 168 Overview Description of the function keys There are 5 buttons on the front panel of the unit POWER UP DOWN SET and RUN with the RUN and SET buttons being multifunction buttons Depending on the dialog there are various commands above the keys that are activated by pressing the keys ...

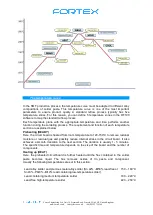
Страница 8: ...temperature section are explained below Preheating READY Here the circuit board is heated from room temperature to 120 150 C to remove residual moisture or residual gas and possibly reduce internal stress in the circuit board It also achieves a smooth transition to the next section The duration is usually 1 5 minutes The specific time and temperature depends on the size of the board and the number...

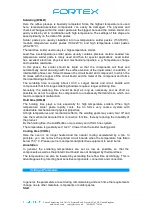
Страница 9: ...0 s Larger boards and circuit boards with components that form large soldering shadows require a longer soldering time Generally the soldering time should be kept as long as necessary and as short as possible so as not to expose the components to unnecessary thermal stress which can lead to component malfunction Hold time HOLD The holding time plays a role especially for high temperature solders W...

Страница 10: ...tead of RUN then READY pre heat phase will be highlighted Use the arrow keys to change the text to HEAT WELD HOLD or COOL Stay on READY and press SET The marking jumps to TEMP temperature and you can adjust the temperature between 70 and 130 C with the arrow keys Another press on SET and you can change the time between 00 00 and 99 99 minutes seconds Button SET takes you back to READY and here you...

Страница 11: ...mperature Saving custom temperature profiles The RF100 oven allows you to store and recall 4 different temperature curves Select USE in the main dialogue and press RUN On the now appearing dialogue you can see Use curve 1 with the currently set temperature curve RUN selects this temperature curve and using the arrow keys you can toggle between the 4 possible curves With SET the word READY appears ...

Страница 12: ... the preset time The indicator light may also flicker in the transitional phase If the temperature is set above 5 C the fan will switch on to lower the temperature Temperature and the power indicator on the top panel will flash at this time At the end of the countdown the HEAT phase begins Control light switches back to red the heating starts temperature rises When the temperature is reached the i...

Страница 13: ...le strength Elongatio n Hardne ss Sn Pb Ag Sb Bi In Au Cu Zn C Mpa HB 63 37 183 61 45 16 6 11 60 40 183 60 43 16 4 11 10 90 299 41 45 12 7 8 2 5 95 312 30 46 12 7 8 63 36 2 179 64 39 16 5 11 3 1 97 5 2 5 309 31 50 9 5 7 2 96 5 3 5 221 45 55 13 13 4 97 5 2 5 304 30 52 9 8 8 95 5 245 40 38 13 3 11 9 43 43 14 163 55 57 14 8 42 80 138 77 20 30 19 3 5 48 52 117 11 83 5 11 7 15 5 80 157 17 58 5 13 20 80...

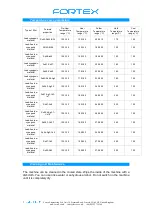
Страница 14: ...terial Sn62 Pb46 Ag2 130 150 170 180 230 240 180 150 Lead free low cypogenic material Sn96 5 Ag3 5 130 150 180 190 240 250 240 150 Lead free low cypogenic material Sn87 Ag3 Cu3 In7 130 150 180 190 240 250 240 150 Lead free low cypogenic material Sn91 Zn9 130 150 180 190 240 250 230 150 Lead free low cypogenic material Sn95 4 Ag3 1 Cn1 5 130 150 180 190 250 260 240 150 Lead free low cypogenic mater...

Страница 15: ...esponsible to implement aforesaid changes into machines sold already Fortex products and services are liable to the current prices and conditions which are subject to change The instructions and definitions in this document are also subject to change and mark no assurance on the part of Fortex Please regard the Sales terms and delivery conditions These are available after fulfilment of the contrac...

Страница 16: ...nd including loss of profit and prosecution for environmental pollution even if we could have been aware of the possibility of such damages All information was arranged with great care We reserve ourselves however mistake and technical changes without previous announcement Running the machine in corroding humid dusty extremely hot or explosive atmosphere happens at the operator s own risk and resp...

Отзывы: