background image

11

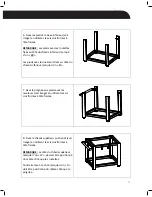
6.   Fissare   le   gambe   del   forno   alla   base   

inferiore,   come   illustrato   in   figura,   usando   

le   viti   a   croce   autofilettanti   a   testa   svasata.   


NOTA:   Le   gambe   con   le   ruote   vanno   

montate   sul   lato   della   struttura   inferiore   

contrassegnato   da   "W".   


Le   gambe   regolabili   si   montano   sul   lato   

della   struttura   inferiore   contrassegnato   da   

"H".   


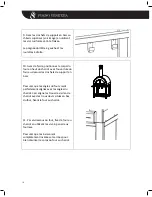
7.   Fissare   la   maniglia   alle   gambe   utilizzando   

le   staffe,   come   illustrato   nella   figura,   e   le   

viti   a   croce   autofilettanti   a   testa   svasata.   


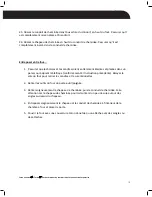
8.   Fissare   la   struttura   superiore   al   carrello,   

come   da   figura,   usando   le   viti   a   croce   

autofilettanti   a   testa   svasata.   


NOTA:   Il   lato   della   struttura   superiore   

contrassegnato   da   una   "W"   va   

posizionato   sullo   stesso   lato   delle   ruote.         


Di   conseguenza   il   lato   contrassegnato   da   

"H"   va   posizionato   sullo   stesso   lato   della   

maniglia.   


Содержание Pronto 300

Страница 1: ...Assembly Guide Istruzioni per il montaggio Guide d assemblage Pronto 300 ...

Страница 2: ...tzia Wood Burning Oven Assembly Guide 2 Storing Your Forno Venetzia Wood Burning Oven 7 Guida All assemblaggio 8 Immagazzinaggio Del Vostro Forno 13 Guide d assemblage 16 Entreposer votre four 21 Forno Venetzia and Pronto are Registered Trademarks ...

Страница 3: ... E 9 85 25 cm Product Weight 264 5 Lbs 120 Kg Pizza Capacity 2 Cooking surface 20 x 24 50 8 x 61 cm Max oven temperature Approx 850 F 450 C Heating time 15 20 min Shipping Dimensions L 37 5 x W 36 75 x H 37 5 L 95 5 x W 93 5 x H 94 5 cm Shipping Weight 315 Lbs 143 Kg Wood Burning Oven PRONTO 300 Product Specifications Specifiche del Prodotto Spécifications du Produit D G I E B C F H A ...

Страница 4: ...2 Wood Burning Oven Pronto 300 Assembly Guide ...

Страница 5: ... the oven This will make it lighter and easier to move Handle the bricks with care as they are fragile 3 Next ensure you have all the necessary parts and components Forno Venetzia Pronto 300 Hardware List Item Name Size Material Image Quantity Use for 1 Hexagon socket screws M6 x 16 Carbon steel 8 Oven 2 Allen key M4 Length 143mm Stainless steel 1 Tool 5 Countersink Cross head screws M5 x 20 Stain...

Страница 6: ...ven 5 Position the polystyrene packaging on the floor and place the parts on it to avoid scratches CAUTION AS THE OVEN IS HEAVY SOME STEPS REQUIRE TWO PEOPLE TO PERFORM THE ASSEMBLY 1 Chimney Cap 1 Chimney Pipe 1 Oven Body 1 Upper Frame 1 Door 1 Wood Carry Holder Hooks 1 Handle 1 Lower Base 2 Legs with levelers 2 Legs with Wheels ...

Страница 7: ...of the lower frame marked with an H 7 Attach the Handle to the legs with the levelers as illustrated using the Countersink head cross screws 8 Attach the Upper Frame to the cart as illustrated using the Countersink head cross screws NOTE The side of the Upper Frame marked with a W should be positioned on the same side as the wheels Conversely the side marked with an H should be positioned on the s...

Страница 8: ...en mouth over the wood carry holder hooks Ensure the corners of the oven are exactly lined up with the corners of the cart This aligns the screw holes in the cart with the threaded screw holes in the bottom of the oven that attach the oven to the cart 11 From underneath the oven attach the oven to the cart using the hexagon socket screws provided Ensure all 6 screws are completely inserted and tig...

Страница 9: ...raps or tie downs Forno Venetziaä and Torinoä are Registered Trademarks of Forno Venetzia Corporation 25 Slide the chimney pipe into the flue opening on the top of the oven Ensure it is completely in place and straight 26 Slide the chimney cap into the top of the chimney pipe Ensure it is also completely inserted into the chimney pipe Storing your oven 1 Ensure any embers and ash are extinguished ...

Страница 10: ...8 Wood Burning Oven Pronto 300 Istruzioni per il montaggio ...

Страница 11: ...rlo Maneggiate i mattoni con cura perché sono piuttosto fragili 3 Dopo di che verificate di avere a disposizione tutte le parti e i componenti necessari Forno Venetzia Pronto 300 Elenco della minuteria Art Nome Dimensioni Materiale Immagine Quantità Da usare per 1 Viti a esagono M6 x 16 Acciaio al carbonio 8 Forno 2 Chiave esagonale M4 lunghezza 143mm Acciaio inossidabi le 1 Utensile 5 Viti a croc...

Страница 12: ...imballi in polistirolo e posizionate sopra le varie componenti per evitare che si graffino ATTENZIONE IL FORNO É PESANTE IN ALCUNE FASI DI MONTAGGIO SONO NECESSARIE DUE PERSONE PER SPOSTARLO 1 Comignolo 1 Canna fumaria 1 Corpo del forno 1 Struttura superiore 1 Sportello 1 Ganci di supporto per la base portalegna 1 Maniglia 1 Base inferiore 2 Gambe regolabili 2 Piedini con ruote ...

Страница 13: ...tura inferiore contrassegnato da H 7 Fissare la maniglia alle gambe utilizzando le staffe come illustrato nella figura e le viti a croce autofilettanti a testa svasata 8 Fissare la struttura superiore al carrello come da figura usando le viti a croce autofilettanti a testa svasata NOTA Il lato della struttura superiore contrassegnato da una W va posizionato sullo stesso lato delle ruote Di consegu...

Страница 14: ... l apertura si trovi sopra i ganci del porta legna Verificate che gli angoli del forno siano perfettamente allineati con gli angoli del carrello In questo modo i fori delle viti presenti sul carrello saranno allineati con i fori delle viti filettate sul fondo del forno così da poter fissare il forno al carrello 11 Da sotto fissate il forno al carrello utilizzando le viti a esagono cavo fornite Con...

Страница 15: ...a di cinghie o legacci Forno Venetzia e Torino sono marchi registrati di Forno Venetzia Corporationä ä 25 Inserite la canna fumaria nell apertura di uscita fumi posta sulla parte superiore del forno Controllare che sia in posizione corretta e diritta 26 Inserite il comignolo sulla cima della canna fumaria Accertatevi che sia inserito completamente nella canna fumaria Come immagazzinare il vostro f...

Страница 16: ...14 Wood Burning Oven Pronto 300 Guide d assemblage ...

Страница 17: ...a plus léger et plus facile à déplacer Gérez les briques avec soin car elles sont fragiles 3 Ensuite assurez vous d avoir toutes les pièces et composants nécessaires Liste des pieces et composants Forno Venetzia Pronto 300 Éléments Nom Taille Matériau Image Quantité Utilisation 1 Vis à 6 pans creux M6 x 16 Acier au carbone 8 Four 2 Clé Allen M4 Length 143mm Acier inoxydable 1 Outil 5 Vis cruciform...

Страница 18: ...lystyrène au sol et placez les pièces dessus pour éviter toutes éraflures MISE EN GARDE COMME LE FOUR EST LOURD CERTAINES ÉTAPES NÉCESSITENT DEUX PERSONNES POUR EFFECTUER L ASSEMBLAGE 1 Chapeau de cheminée 1 Conduit de cheminée 1 Corps du four 1 Châssis supérieur 1 Porte 1 Crochets de support en bois 1 Poignée 1 Base inférieure 2 Pieds avec niveleurs 2 Pieds avec roulettes 16 ...

Страница 19: ...châssis inférieur marqué d un H 7 Fixez la poignée aux pieds avec les niveleurs voir image en utilisant les vis cruciformes à tête fraisée 8 Fixez le châssis supérieur au chariot voir image en utilisant les vis cruciformes à tête fraisée REMARQUE Le côté du châssis supérieur marqué d un W devrait être positionné du même côté que les roulettes Contrairement Le côté marqué d un H doit être positionn...

Страница 20: ...u four au dessus des crochets de support en bois S assurer que les angles du four soient parfaitement alignés avec les angles du chariot Ceci aligne les trous de vis dans le chariot avec les trous de vis situés en bas du four fixant le four au chariot 11 Par en dessous du four fixez le four au chariot en utilisant les vis à 6 pans creux fournies S assurer que les 6 vis soient complètement insérées...

Страница 21: ... ou des attaches Forno Venetziaä et Torinoä sont des marques de commerce de Forno Venetzia Corporation 25 Glissez le conduit de cheminée dans l ouverture du conduit en haut du four S assurer qu il est complètement mis en place et bien droit 26 Glissez le chapeau de cheminée en haut du conduit de cheminée S assurer qu il est complètement inséré dans le conduit de cheminée Entreposer votre four 1 S ...

Страница 22: ...20 www fornovenetzia com email info fornovenetzia com ...

Страница 23: ......

Страница 24: ...www fornovenetzia com email info fornovenetzia com ...

Отзывы: