Igloo
Brick House
Wall Oven
Stone House
Gabled House
Giardino Installation and Operating Manual
© Forno Bravo, LLC 2010. All Rights Served.
Ver. 1.2
37
Страница 1: ...S TO COMBUSTIBLE MATERIALS IT IS OF UTMOST IMPORTANCE THAT THIS OVEN BE INSTALLED ONLY IN ACCORDANCE WITH THESE INSTRUCTIONS This Oven is Designed and Intended for Outdoor Installation Only Forno Brav...
Страница 2: ...kerosene or similar liquids to start or maintain a fire BEWARE of very high temperatures in the oven and use long oven gloves and mitts to handle pots and tools DO NOT put unprotected hands or arms i...
Страница 3: ...and purchaser specifically renounces any rights to recover special incidental consequential or other damages of any kind whatsoever including but not limited to injuries to persons or damage to prope...
Страница 4: ...r 29 5 Dome Assembly 30 6 Chimney Installation 31 7 Insulate the Oven 34 8 Optional Brick Arch 35 9 Enclosure Design Styles 36 10 Igloo Enclosure 39 11 Walled Enclosures 40 12 Curing Your Oven 42 13 F...
Страница 5: ...gh temp waterproof mortar 12 terracotta chimney with detached rain cap Options Three piece decorative brick arch DuraTechUL103 double wall chimney system Infrared thermometer Remote probe thermometer...
Страница 6: ...meter 5 5 Chimney Type Single wall steel UL103 or clay Single wall steel UL103 or clay Commercial Grade Kiln Fired Cooking Floor 3 Ceramic Blanket Insulation 40 sq ft 60 sq ft 2 Floor Ceramic Board In...
Страница 7: ...y must be covered with non combustible material Non combustible construction may contact the oven and must then maintain 1 25 mm clearance to combustibles If the space between the legs of the stand is...
Страница 8: ...Oven Dimensions Giardino60 Front View Giardino60 Top View Giardino Installation and Operating Manual Forno Bravo LLC 2010 All Rights Served Ver 1 2 8...
Страница 9: ...Giardino60 Side View Giardino70 Front View Giardino Installation and Operating Manual Forno Bravo LLC 2010 All Rights Served Ver 1 2 9...
Страница 10: ...Giardino70 Top View Giardino70 Side View Giardino Installation and Operating Manual Forno Bravo LLC 2010 All Rights Served Ver 1 2 10...
Страница 11: ...Top Elevation Giardino Installation and Operating Manual Forno Bravo LLC 2010 All Rights Served Ver 1 2 11...
Страница 12: ...Front Elevation The example uses standard concrete blocks CMU Giardino Installation and Operating Manual Forno Bravo LLC 2010 All Rights Served Ver 1 2 12...
Страница 13: ...Cross Section Igloo Giardino Installation and Operating Manual Forno Bravo LLC 2010 All Rights Served Ver 1 2 13...
Страница 14: ...Cross Section Walled Enclosure Giardino Installation and Operating Manual Forno Bravo LLC 2010 All Rights Served Ver 1 2 14...
Страница 15: ...idth insulation thickness enclosure wall thickness Depth Oven exterior depth rear insulation thickness rear enclosure wall thickness landing depth The sample dimensions above are based on 3 woven cera...
Страница 16: ...Corner Installation Giardino70 Giardino Installation and Operating Manual Forno Bravo LLC 2010 All Rights Served Ver 1 2 16...
Страница 17: ...r a standard 3 1 2 rebar reinforced concrete slab Oven Stand Assembled a block stand to the appropriate hearth width Concrete Hearth Frame and pour a 3 1 2 rebar reinforced concrete hearth using Hardi...
Страница 18: ...y concrete Do not use adhesive Oven Floor Assembly Assemble and level the cooking floor on a bed of fine sand Oven Dome Assembly Seal the bottom of the dome and the oven landing to the insulation boar...
Страница 19: ...l For refractory chimney installation follow the instructions in Chapter 6 of this manual Oven Insulation Wrap the oven in three layers of 1 FB Blanket Overlap the joints Finish the Enclosure Shape th...
Страница 20: ...r a 5 14 cm foundation is best composed of 2x6 inch lumber set so the top of the form is 2 3 5 8 cm above ground level The longer form boards should sit inside the shorter boards and the completed for...
Страница 21: ...rial such as thoroughly compacted pea gravel or crushed rock which will allow for the drainage of water from under the concrete slab Placing a layer of plastic sheeting over the material will help pre...
Страница 22: ...rrow might use up energy and time that will serve you better later in the project Rent a mixer from Home Depot and ask a friend or pay a local teenager to help you mix and pour the slab There are also...
Страница 23: ...hat the first course of blocks is level front and back side to side and on the diagonals Take your time with getting the first course set correctly because it will be increasingly difficult to correct...
Страница 24: ...ions include round stands corner ovens oven with an attached outdoor kitchen pre cast lintels and metal stands 2 4 A corner installation 2 5 Custom metal stand with stud frame 2 6 Stand with cast lint...
Страница 25: ...other core or the corners with concrete It s a lot faster and sturdier as well Block the cores that you have not filled with your empty concrete bag to stop your hearth concrete from spilling into the...
Страница 26: ...Giardino Installation and Operating Manual Forno Bravo LLC 2010 All Rights Served Ver 1 2 26...
Страница 27: ...to accurately set the top of the frame The top of the 2 x4 frame should be about 3 4 below the top of the stand to allow for the 1 2 Hardibacker form bottom and shims 3 1 The form bottom ready for the...
Страница 28: ...and allow for it to start curing before adding the FB Board Yo do not want to install FB Board on wet concrete as it will wick up water 3 6 Structural layer waiting on insulating layer 7 Cut and plac...
Страница 29: ...you place your oven to the correct depth on the hearth slab Instructions Spread a 3 8 layer of fine sand using a notched trowel Lay your cooking surface in place butting the joints tightly together Ch...
Страница 30: ...ooking floor Instructions Set your oven dome pieces around the cooking floor and vent floor taking care to ensure that the oven faces in the proper direction 5 1 Line up the dome pieces Seal the oven...
Страница 31: ...lengths and 30 angle sets to create an offset The system specifies a clearance of at least 2 between the chimney and any combustible materials and a height of 3 above the roof and 2 above any roof wi...
Страница 32: ...les Use sheet metal supports fastened securely to wall surfaces on all sides to maintain the 9 228 6 mm air space When fastening supports to chimney length do not penetrate the chimney liner the insid...
Страница 33: ...single wall steel chimney connector Keep solid pak section concentric with and spaced 1 25 4 mm off the chimney connector by way of sheet metal support plates at both ends of chimney section Cover ope...
Страница 34: ...The layers of FB Blanket Instructions Blanket insulation such as FB Blanket is easy to work with is easy to cut and shape Always use a mask when working with any ceramic insulation Take care to overl...
Страница 35: ...the front of the oven dome body and vent assembly A custom site built arch can also be used and can be constructed from virtually any non combustible material Attach the brick arch to the front of you...
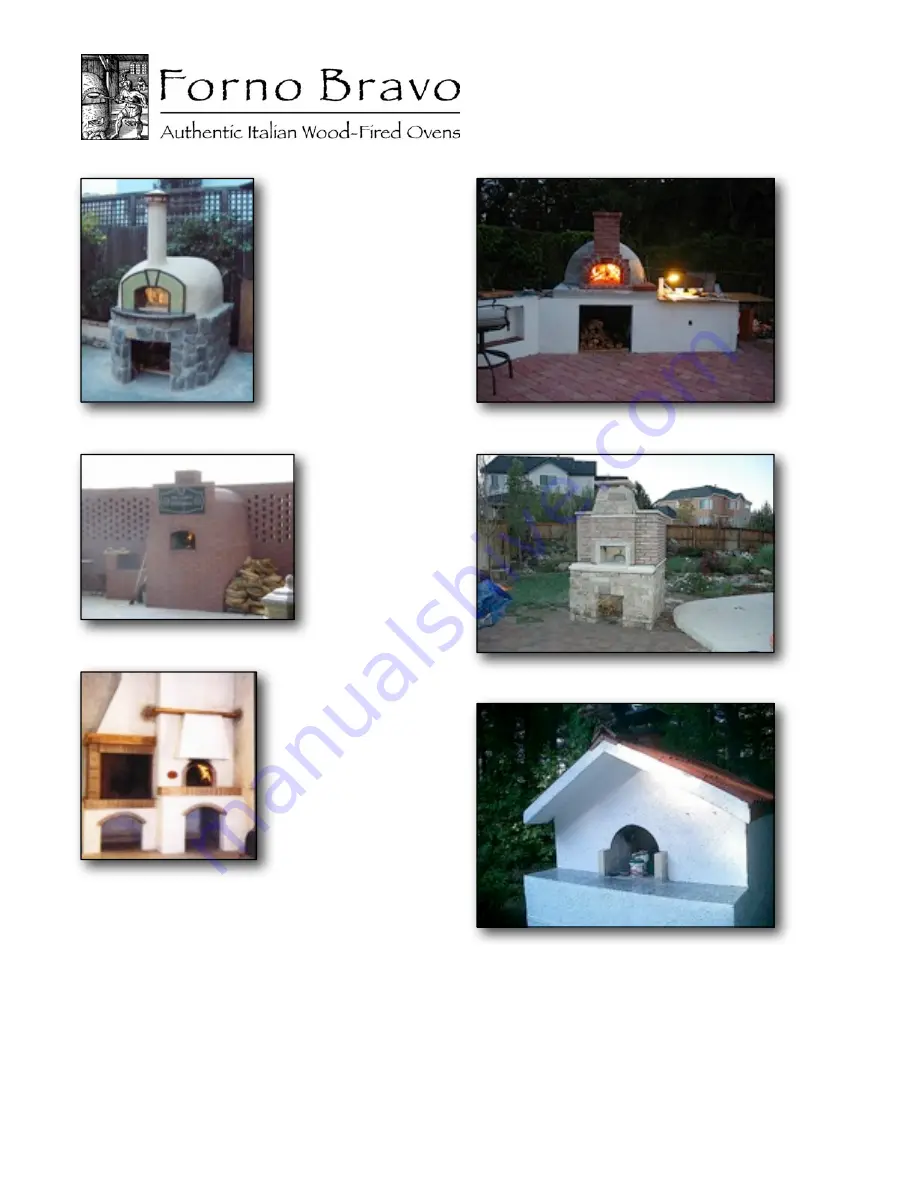
Страница 36: ...availability of local materials The examples shown here from around the country will give you a start A MAJOR CAUSE OF OVEN RELATED FIRED IS FAILURE TO MAINTAIN REQUIRED CLEARANCES AIR SPACES TO COMBU...
Страница 37: ...Igloo Brick House Wall Oven Igloo Stone House Gabled House Giardino Installation and Operating Manual Forno Bravo LLC 2010 All Rights Served Ver 1 2 37...
Страница 38: ...Stone House Corner Oven Gabled Stone House Stone House Giardino Installation and Operating Manual Forno Bravo LLC 2010 All Rights Served Ver 1 2 38...
Страница 39: ...me Drill 1 4 holes around the perimeter of the oven hearth the distance you want away from the exterior of your oven to accommodate your insulation thickness Insert pieces of pencil rebar in the holes...
Страница 40: ...the top plates for each wall Attach the bottom plate to the concrete hearth slab using concrete screws Set metal studs every 16 in the body of the wall to support the concrete board Interlock the top...
Страница 41: ...the vertical studs on 15 centers and always center your concrete board seams directly on your vertical studs Use the flat head screws design specifically for attaching concrete board to metal studs as...
Страница 42: ...ature fires it is critical for proper curing that you do not go above these temperatures during the first two days ___________________________________________ Day 3 Repeat at 400 F Day 4 Repeat at 450...
Страница 43: ...en Ensure that no combustible materials are within range of oven at any time DO NOT close the oven door fully while a fire is in the oven Closing the door fully will cut off oxygen to the fire causing...
Страница 44: ...ase The Tee Cleanout Cap can be removed by turning counter clockwise Be sure to replace Tee Cleanout Cap when you are finished cleaning the chimney Creosote Formation and need for removal When wood is...
Страница 45: ...k It will save you time from not having to frequently change blades on your circular saw A chalk line A builder s pencil A notched tile trowel for setting the cooking floor Goggles and a dust mask A m...
Страница 46: ...nails Block Stand 40 8 x8 x16 blocks 5 8 x8 x8 blocks 3 x 10 1 2 rebar each cut into 3 40 sections to fill nine block cores 10 80 lb bags concrete for filling every other core 2 1 5 x1 5 x56 angle iro...