FORM FIT HD 21H19 Скачать руководство пользователя страница 6

                                                           Rev0.July 24, 2018               HD 21H19                      Page 

6

 of 

6


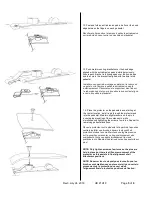
15. Starting at the center location tighten all the screws 

that were loosely installed in step 13. To ensure proper 
seating of the components, maintain slight pressure on 
the pin while simultaneously tightening the screw.  
Repeat for all remaining pedestal locations.  


À partir de l'emplacement du centre serrer toutes les vis qui 

ont été lâchement installés à l'étape 13. Pour assurer un 
bon positionnement des composants, maintenir une légère 
pression sur la broche tout en serrant la vis simultanément. 
Répétez l'opération pour tous les emplacements de 
piédestal restants. 


NOTE: To allow the adhesive to cure do not 
wash the vehicle for 24 hrs.  
 
NOTE: Pour permettre adhésif pour guérir ne 
pas laver votre véhicule pendant 24 heures. 


Содержание HD 21H19

Страница 1: ...s less likely to harm the hood protector SERVICE Periodically check to confirm the protector is securely attached to the hood WARNINGS Do not pull push on the protector when opening closing the hood NOTE On some vehicles it may be necessary to adjust the hood bumpers and or latch for proper clearance INSTALLATION S assurer que le véhicule est propre et complètement sec avant l installation Ce prod...

Страница 2: ... the center mark on the leading edge of the pedestals for accurate measuring The fingers incorporated on the leading edge of the pedestal will help ensure the correct position relative to the hood edge When correctly positioned the fingers should contact the leading edge of the hood Les positions des piédestaux sont représentées dans l illustration Utiliser la marque de centre à la fine pointe des...

Страница 3: ...eux 2 grand socles adhésifs à l endroit indiqué sur l illustration 7 Remove the hood protector installation tape measure Place the hood protector on the pedestals to confirm proper positioning Ensure the holes in the protector align with those in the pedestals If necessary reposition the pedestals so all attachment positions are correct and the protector is well centered Retirer le ruban à mesurer...

Страница 4: ...emove the protective backing from the adhesive and install on the hood surface Use caution to not contaminate the adhesive surface Tip Hook the fingers on the pedestal over the hood edge and rotate the unit into position After installation remove the masking tape and wet out the adhesive to the hood surface by applying pressure with your thumb around the complete surface of the pedestals Important...

Страница 5: ...starting at the center location install a pin through the protector and into the pedestal Maintain slight pressure on the pin to ensure proper seating of the components while simultaneously tightening the screw a few turns Repeat for remaining pedestal locations Placez le protecteur sur le piédestal et à partir de la position centrale installer une broche à travers le dispositif de protection et d...

Страница 6: ...ng pedestal locations À partir de l emplacement du centre serrer toutes les vis qui ont été lâchement installés à l étape 13 Pour assurer un bon positionnement des composants maintenir une légère pression sur la broche tout en serrant la vis simultanément Répétez l opération pour tous les emplacements de piédestal restants NOTE To allow the adhesive to cure do not wash the vehicle for 24 hrs NOTE ...

Отзывы: