


Rev0.July 24, 2018 HD 21H19 Page
5
of
6
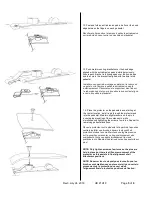
12. Peel and fold an anti-abrasion pad in half over the hood
edge between the fingers on each pedestal.
Décoller et plier en deux le tampon à pellicule anti-abrasive
sur le rebord du capot entre les crochets du piédestal.
13.
Push metal mounting brackets over the hood edge
aligned with the anti-abrasion pads installed previously.
Ensure each bracket is fully engaged over the hood edge
and the hole in the bracket is aligned with the hole in the
pedestal.
Installer un support de montage en métal sur le rebord du
capot et sur le tampon à pellicule anti-abrasive monté
antérieurement. S’assurer que le support est bien fixé sur
le rebord du capot et que le trou dans le support est aligné
avec le trou dans le piédestal.
14.
Place the protector on the pedestals and, starting at
the center location, install a pin through the protector and
into the pedestal. Maintain slight pressure on the pin to
ensure proper seating of the components, while
simultaneously tightening the screw a few turns. Repeat for
remaining pedestal locations.
Placez le protecteur sur le piédestal et à partir de la position
centrale installer une broche à travers le dispositif de
protection et dans le socle. Maintenir une légère pression
sur la goupille pour assurer un bon positionnement des
composants, tout en serrant simultanément la vis de
quelques tours. Répétez l'opération pour autres endroits sur
pied.
NOTE: Only tighten screws a few turns so the pins are
held in place but there is still some movement of the
protector as this assists in final alignment of all
attachment positions.
NOTE: Ne serrer les vis de quelques tours afin que les
broches sont maintenues en place mais il ya un certain
mouvement de la protection que ceci aide à
l'alignement final de toutes les positions de fixation.


