Forensis UC39G6000 Скачать руководство пользователя страница 20

19

Instructions for Intelligent Platform Operation
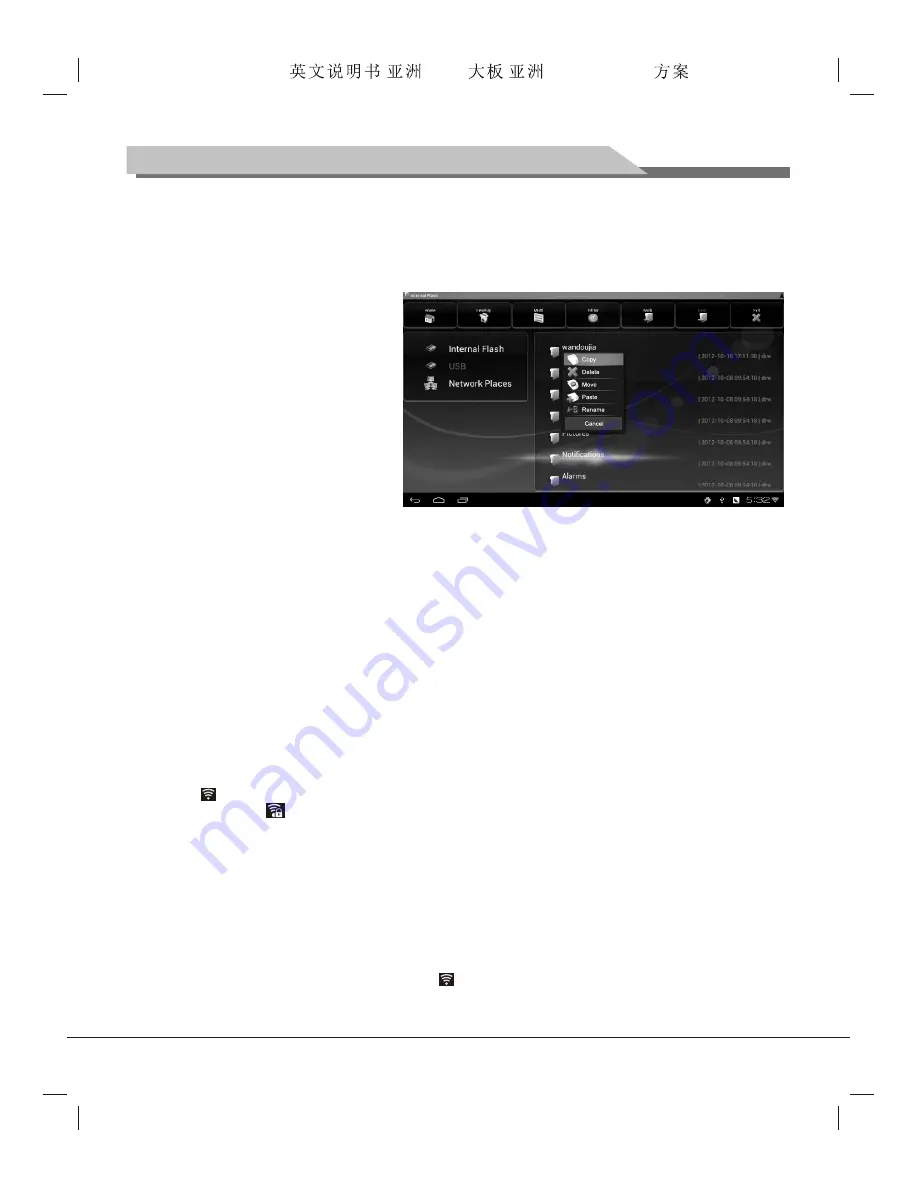
File Management

By the option, users can manage files saved on the local disk and external U disk. You can run, copy, move, 

delete and rename a file.

Edit Files

1. Select the disk, press "

OK

" key to 

enter.

2. Select the folder, press "

OK

" key to 

enter. 

3. Select the target file, press "

OK

" key 

to run the file; long press "

OK

" key to 

display the edit menu, conduct 
operations by selecting options like 
Copy, Delete, Move, Paste and 
Rename, etc.

4. By the Multi-Select function on the 

menu, several files and folders can be 
selected at the same time (names of 
selected files will become light red); 
click the Edit option on the tool bar to do operations like Copy, Delete, Move and Rename, etc. for the 
files.

Network Setting

Select the 

Setting

 option on the tool bar, press "

OK

" key to enter.

¡ö

 What is Wi-Fi technology?

Wi-Fi is a short range wireless transmission technology, supporting radio signal accessed by the internet 

within a range of several hundred inches. If the location where the TV locates is covered by Wi-Fi network, you 
can connect the TV with the internet in the wireless connection way by Wi-Fi; the intensity of the Wi-Fi network 
signal is related with the location, that is, the closer TV is to an access point, the stronger signal is obtained. 

¡ö

 How to connect with the Wi-Fi network?

1. Select the 

Wi-Fi

 option, press "

OK

" key ;

2. After the Start Wi-Fi option is selected, press "

OK

" key to enable the Wi-Fi function;

3.The system will auto search the Wi-Fi network signal in your area. Available network signals will show on 

the screen. You also can select the 

Scan

 option on the top of the screen, and press "

OK

" key to rescan; 

if the      icon appears next to the searched network, it indicates the network can be connected without 
password; if the       icon appears, it indicates the network cannot be connected without password, and in 
this case, you need to input the correct password to connect it;

4. Select a network to connect in the network list, and press "

OK

" key;

5. Input the network access password, if DHCP function is enabled on the router, select the 

Connection


option, and press "

OK

" key to connect. If DHCP function is not enabled on the router, you have to 

configurate the static IP address by the following steps;

6. After the password is input, select 

Display Advanced

 Option, and press "

OK

" key; 

7. Select 

Static

 in the IP setting, and press "

OK

" key;

8. Input information like static IP address, gateway, network prefix length, domain name, etc. Select the 

Connection

 option,  and press "

OK

" key (information to be input manually).

9. After the Wi-Fi is successfully connected, the      icon will display on the status bar on the right bottom of 

the screen.

After the network is successfully connected, the system will keep record of the connected Wi-Fi network; 

Forensis 39S61F 50S31

(

)(T9E


V59+RK2908

)        190x250mm

Содержание UC39G6000

Страница 1: ...UC39G6000 UC50G6500 Forensis 39S61F 50S31 T9E V59 RK2908 190x250mm...

Страница 2: ...four intelligent image modes are presented 14 Dynamic contrast technology is adopted which can remarkably improve the definition and contrast of various images 15 Support HD line oriented input YPbPr...

Страница 3: ...ble or corrosive gas 4 In bathroom kitchen etc Do not use damaged or improper power socket and ensure that the plug and socket are connected properly Keep the power plug and socket free of dust and me...

Страница 4: ...ove slowly to avoid falling off Do not rub with hard object knock at bend or squeeze the screen Do not use machine immediately after transfering machine to the places with high temperature from low te...

Страница 5: ...ews Screws Base supporting cover The base assembly The base supporting B Insert base supporting to supporting holes of base Need to align the locating bulge on base supporting and the locating slot in...

Страница 6: ...circulation 30cm 10cm 10cm Please keep this space at least around the TV as shown in the figure Do not cover the air vents or insert any object into the enclosure Do not put the device in limited spa...

Страница 7: ...2 If an earphone is inserted the speaker of the TV set turns off automatically 6 G G B B R R W W R R HDMI signal cable Audio cable YPbPr cable Connect to the device with YPbPr YCbCr output interface...

Страница 8: ...connection Connect to the devices with AV input interface e g Monitor AV output connection VGA input connection PC audio cable VGA cable Note The peripheral equipment and cables described in this manu...

Страница 9: ...erface so we recommend users insert the receiver of wireless mouse and keyborad to this USB interface Mounting and Connecting Network Connection 1 Cable network connection connect one end of the netwo...

Страница 10: ...n Conversion between normal working and standby Intelligent mode on or off Sound on or off Numeric input keys effective under the TV mode Freeze picture To check the channel list effective under the T...

Страница 11: ...ss key on the remote control or CH CH on the control panel to select what is needed to adjust in sort menu 4 Press t u key on the remote control or VOL VOL on the control panel to adjust the value or...

Страница 12: ...s the t u key to start scanning in the process of scanning you can press MENU key to interrupt the scanning Menu setting list Refer to the table below for the specific menu settings 0 50 25 MHz VHF L...

Страница 13: ...0M unit min Restore factory settings Select the color system PAL NTSC SECAM AUTO please select the proper system or else the picture isn t clear Select the audio system I DK M or L and BG please selec...

Страница 14: ...methods The method introduced in this instruction is for reference only Please operate according to practical situation Some functions even can t be operated by remote control To obtain a better exper...

Страница 15: ...nd other information on the internet can be displayed by a browser Before accessing internet you have to connect the TV to the internet For details please refer to the Installation Connection and Sett...

Страница 16: ...he mouse 2 When a pair of cursors for selection show on the screen drag the cursors to select the text content you want 3 Select Copy on the top of the screen and click the Confirm button How to save...

Страница 17: ...o remove applications 1 Select Manage and press OK key to enter 2 Select an application to uninstall and press OK key 3 Select Uninstall and press OK key to remove the application by the system automa...

Страница 18: ...d press OK key to run the application Select a video file and press OK key to play 00 00 05 00 03 25 1 2 3 4 5 6 7 8 9 10 1 2 3 4 5 6 7 8 9 10 Volume button turn the volume down up Bookmark Setting Af...

Страница 19: ...older shown and press OK key Introduction to the option icons on the play interface 8 9 10 11 12 13 14 1 2 3 4 7 6 5 Equalizer Setting Play songs at random Setting of the repeat play mode Display the...

Страница 20: ...e Wi Fi network 1 Select the Wi Fi option press OK key 2 After the Start Wi Fi option is selected press OK key to enable the Wi Fi function 3 The system will auto search the Wi Fi network signal in yo...

Страница 21: ...rity What is Virtual Private Network VPN VPN is a technology building a private network on a public network By this technology you can securely access the company internal network by a public network...

Страница 22: ...ages 1 The antenna connector is loose or the cable is damaged 2 The channel setting is improper 3 The antenna type is improper 4 The antenna direction or position is inaccurate 5 The signal is weak Th...

Страница 23: ...e with other addresses to obtain better resources Problem Possible causes Solutions Master unit Technical Specifications 3 Unpacking 886 514 71 mm 3 Unpacking 886 574 71 mm 3 Packing 1100 622 152 mm N...

Страница 24: ...z 60Hz Refresh rate VGA display mode Power management 50 110W 0 5W 1 Supported standard PAL NTSC SECAM 2 Antenna input 75 coax unbalanced 3 AV video input 75 1Vp p RCA terminal 4 AV audio input 20K 50...

Отзывы: