Forensis UC39G6000 Скачать руководство пользователя страница 10

9

Method for Installation of Remote Control Battery 


Remove the battery compartment cover and insert two AAA (No. 7, 1.5V) batteries; make sure the polarity 

of the batteries is in compliance with the polarity mark ''+'' and ''-'' in the battery compartment of the remote 
control.

Precautions for using the remote control:


The remote control should be pointed at the remote control sensor during operation. An object placed 

          between the remote control and the remote control sensor may impede normal operation. 
     

 The remote control should be prevented from strenuous vibration. Besides, please do not set or place the 

          remote control under direct sunshine, as heating power may result in deformation of the remote control. 
     

 Remote control failure may occur when the remote control sensor of the main unit is under direct 

          sunshine or strong lighting; in this case, please change the angle of lighting or this TV set, or operate the 
          remote control near the remote control sensor. 
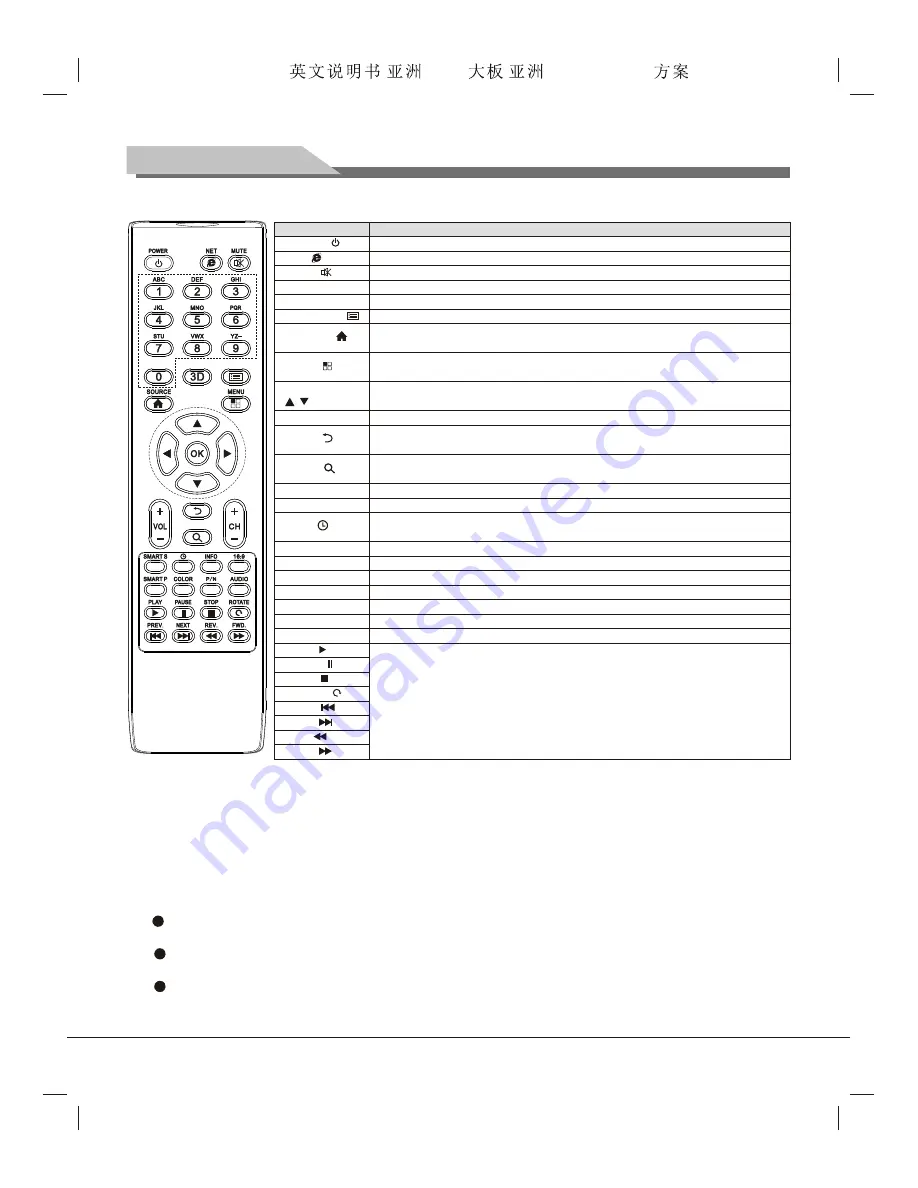
Remote Control

Keys of the Remote Control


Note

: The appearance of the remote control may be different from this diagram; please refer to the real 

object as standard.

Key

POWER (   )
NET (    )
MUTE (    )
Numerical key
F1 (3D)

SOURCE (    )

MENU (    )

Cursor key

VOL+/VOL-

Return (    )

Search (    )

CH+/CH-
SMART S

Sleep (    )

INFO
16:9
SMART P
COLOR
P/N
AUDIO(optional)
OK

Channel list (    )

PLAY (    )
PAUSE (   )
STOP (    )
ROTATE (   )
PREV. (     )
NEXT (     )
REV. (     )
F WD.  (      )

Function

Conversion between normal working and standby.
Intelligent mode on or off.
Sound on or off.
Numeric input keys, effective under the TV mode.
Freeze picture.
To check the channel list, effective under the TV mode
Press this key to display the source selection menu. Under the intelligent mode, 
press this key to return to the home page.
Press this key to display the main menu. Under the intelligent mode, press this 
key to display the operation menu.


Select or adjust menu options.

Adjust the volume.
Under the TV mode, press this key to fast return to the last channel. Under the 
intelligent mode, press this key to return to the previous menu or the last webpage.
Shortcut key for searching local media files or for website edit, effective under 
the intelligent mode.
Progressive increase or decrease of channel number, effective under the TV mode.
Sound mode conversion key, disabled under the intelligent mode.
Button for sleep time setting. Press this key to set the power-off time. Disabled 
under the intelligent mode. 
System screen information display key, disabled under the intelligent mode.
Display mode switch key, disabled under the intelligent mode.
Image mode conversion key, disabled under the intelligent mode.
Color temperature conversion key, disabled under the intelligent mode.
Color system selection, disabled under the intelligent mode.
NICAM mode selection, disabled under the intelligent mode.
Confirm the operation. 


Used for intelligent platform multimedia function operation.

F1

(

,

,

t

,

u

)

Forensis 39S61F 50S31

(

)(T9E


V59+RK2908

)        190x250mm

Содержание UC39G6000

Страница 1: ...UC39G6000 UC50G6500 Forensis 39S61F 50S31 T9E V59 RK2908 190x250mm...

Страница 2: ...four intelligent image modes are presented 14 Dynamic contrast technology is adopted which can remarkably improve the definition and contrast of various images 15 Support HD line oriented input YPbPr...

Страница 3: ...ble or corrosive gas 4 In bathroom kitchen etc Do not use damaged or improper power socket and ensure that the plug and socket are connected properly Keep the power plug and socket free of dust and me...

Страница 4: ...ove slowly to avoid falling off Do not rub with hard object knock at bend or squeeze the screen Do not use machine immediately after transfering machine to the places with high temperature from low te...

Страница 5: ...ews Screws Base supporting cover The base assembly The base supporting B Insert base supporting to supporting holes of base Need to align the locating bulge on base supporting and the locating slot in...

Страница 6: ...circulation 30cm 10cm 10cm Please keep this space at least around the TV as shown in the figure Do not cover the air vents or insert any object into the enclosure Do not put the device in limited spa...

Страница 7: ...2 If an earphone is inserted the speaker of the TV set turns off automatically 6 G G B B R R W W R R HDMI signal cable Audio cable YPbPr cable Connect to the device with YPbPr YCbCr output interface...

Страница 8: ...connection Connect to the devices with AV input interface e g Monitor AV output connection VGA input connection PC audio cable VGA cable Note The peripheral equipment and cables described in this manu...

Страница 9: ...erface so we recommend users insert the receiver of wireless mouse and keyborad to this USB interface Mounting and Connecting Network Connection 1 Cable network connection connect one end of the netwo...

Страница 10: ...n Conversion between normal working and standby Intelligent mode on or off Sound on or off Numeric input keys effective under the TV mode Freeze picture To check the channel list effective under the T...

Страница 11: ...ss key on the remote control or CH CH on the control panel to select what is needed to adjust in sort menu 4 Press t u key on the remote control or VOL VOL on the control panel to adjust the value or...

Страница 12: ...s the t u key to start scanning in the process of scanning you can press MENU key to interrupt the scanning Menu setting list Refer to the table below for the specific menu settings 0 50 25 MHz VHF L...

Страница 13: ...0M unit min Restore factory settings Select the color system PAL NTSC SECAM AUTO please select the proper system or else the picture isn t clear Select the audio system I DK M or L and BG please selec...

Страница 14: ...methods The method introduced in this instruction is for reference only Please operate according to practical situation Some functions even can t be operated by remote control To obtain a better exper...

Страница 15: ...nd other information on the internet can be displayed by a browser Before accessing internet you have to connect the TV to the internet For details please refer to the Installation Connection and Sett...

Страница 16: ...he mouse 2 When a pair of cursors for selection show on the screen drag the cursors to select the text content you want 3 Select Copy on the top of the screen and click the Confirm button How to save...

Страница 17: ...o remove applications 1 Select Manage and press OK key to enter 2 Select an application to uninstall and press OK key 3 Select Uninstall and press OK key to remove the application by the system automa...

Страница 18: ...d press OK key to run the application Select a video file and press OK key to play 00 00 05 00 03 25 1 2 3 4 5 6 7 8 9 10 1 2 3 4 5 6 7 8 9 10 Volume button turn the volume down up Bookmark Setting Af...

Страница 19: ...older shown and press OK key Introduction to the option icons on the play interface 8 9 10 11 12 13 14 1 2 3 4 7 6 5 Equalizer Setting Play songs at random Setting of the repeat play mode Display the...

Страница 20: ...e Wi Fi network 1 Select the Wi Fi option press OK key 2 After the Start Wi Fi option is selected press OK key to enable the Wi Fi function 3 The system will auto search the Wi Fi network signal in yo...

Страница 21: ...rity What is Virtual Private Network VPN VPN is a technology building a private network on a public network By this technology you can securely access the company internal network by a public network...

Страница 22: ...ages 1 The antenna connector is loose or the cable is damaged 2 The channel setting is improper 3 The antenna type is improper 4 The antenna direction or position is inaccurate 5 The signal is weak Th...

Страница 23: ...e with other addresses to obtain better resources Problem Possible causes Solutions Master unit Technical Specifications 3 Unpacking 886 514 71 mm 3 Unpacking 886 574 71 mm 3 Packing 1100 622 152 mm N...

Страница 24: ...z 60Hz Refresh rate VGA display mode Power management 50 110W 0 5W 1 Supported standard PAL NTSC SECAM 2 Antenna input 75 coax unbalanced 3 AV video input 75 1Vp p RCA terminal 4 AV audio input 20K 50...

Отзывы: