background image

82

  MEMORIA DEL MEDIDOR

Su medidor almacena en la memoria los 450 resultados de las 
pruebas de la glucosa en la sangre más recientes, junto con sus re-
spectivas fechas y horas. Para ingresar en la memoria de su medidor 
comience con el medidor apagado.

Revisando los Resultados de la Prueba

 Paso 2

Presione

   para revisar 

los resultados guardados 
en el medidor cada vez que 
lo presiona. 

 Paso 1

Presione 


.

“   ” aparecerá en la pantalla. Presione   otra vez y la primera lectura 

que aparecerá en pantalla será el resultado de la última medición de 
glucosa en la sangre con su fecha y hora, así como el tipo de medición.

Содержание G30a

Страница 1: ...1 Owner s Manual Manual del Usuario Blood Glucose Monitoring System Sistema de Vigilancia de Glucosa Sanguinea...

Страница 2: ...ucose levels can help you and your doctor gain better control of your diabetes Due to its compact size and easy operation you can use the ForaCare G30a Blood Glucose Monitoring System to easily monito...

Страница 3: ...ng other family members Do not use on multiple patients All parts of the kit are considered biohazardous and can potentially transmit infectious diseases even after you have performed cleaning and dis...

Страница 4: ...cause erroneous results 10 Do not use this instrument in close proximity to sources of strong electromagnetic radiation as these may interfere with the accurate operation 11 Proper maintenance and pe...

Страница 5: ...g the Meter 13 THE FOUR MEASURING MODES 18 BEFORE TESTING 20 Control Solution Testing 20 Performing a Control Solution Test 21 TESTING WITH BLOOD SAMPLE 24 Preparing the Puncture Site 24 Alternative S...

Страница 6: ...ing for Your Test Strips 41 Important Control Solution Information 42 SYSTEM TROUBLESHOOTING 43 Result Readings 43 Error Messages 44 Troubleshooting 46 DETAILED INFORMATION 48 Reference Values 48 Comp...

Страница 7: ...e treatment advice of your healthcare professional Use only fresh whole blood samples to test your blood glucose Using other substances will lead to incorrect results If you are experiencing symptoms...

Страница 8: ...m upper arm calf and thigh It should not be used for the diagnosis of diabetes or testing on neonates Test Principle Your system measures the amount of sugar glucose in whole blood The glucose testing...

Страница 9: ...e check the contents on your product box They can be purchased separately NOTE If any items are missing from your kit or opened prior to use please contact local customer services or place of purchase...

Страница 10: ...lay Screen M Button Enter the meter memory and silence a reminder alarm C Button Marks a control solution test 1 3 4 2 Data Port Download test results with a cable connection Test Strip Ejector Eject...

Страница 11: ...rip Symbol Blood Drop Symbol Measurement Unit Test Result Measuring Modes Memory Symbol Alarm Function Indicator Control Solution Mode Date Time Ketone Warning Day Average Error 1 8 6 4 7 5 3 2 9 10 1...

Страница 12: ...This is where you con rm if enough blood has been applied to the absorbent hole in the strip Test Strip Handle Hold this part to insert the test strip into the slot Contact Bars Insert this end of th...

Страница 13: ...re you complete the steps below and have your desired settings saved Entering the Setting Mode Start with the meter off no test strip inserted Press SET to turn on the meter Step 1 Setting the date Wi...

Страница 14: ...Step 2 Setting the time format Press and release to select the desired time format 12h or 24h Press SET Step 3 Setting the time With the hour ashing press until the correct hour appears Press SET Wit...

Страница 15: ...e display press and select no to keep the results in memory then press SET to skip To delete all the results press and select YES Then press SET to delete all memory OK is displayed in the meter which...

Страница 16: ...SET to set the hour When the hour is ashing press to add an hour Press SET to con rm and go to minutes press to add one minute Hold longer to add faster Press SET to con rm and go to the next alarm se...

Страница 17: ...ting If you do not press the meter will beep for 2 minutes then switch off If you do not want to test at this time press to switch off the meter Congratulations You have completed all settings NOTE Th...

Страница 18: ...any time of day without regard to time since last meal no food intake for at least 8 hours 2 hours after a meal testing with the control solution You can switch between each mode by Step 1 Start with...

Страница 19: ...19 Step 2 Press to switch between General AC and PC mode Step 3 Press to switch to QC mode...

Страница 20: ...ol solution test when you rst receive the meter at least once a week to routinely check the meter and test strips you begin using a new vial of test strips you suspect the meter or test strips are not...

Страница 21: ...urn on the meter Insert the test strip into the meter Wait for the meter to display the test strip and blood drop symbols Step 2 Press to mark this test as a control solution test If you press again t...

Страница 22: ...e con rmation window lls completely the meter will begin counting down To avoid contaminating the control solution do not directly apply control solution onto a strip Step 4 Read and compare the resul...

Страница 23: ...e working properly Do NOT test your blood Contact the local customer service or place of purchase for help NOTE The control solution range printed on the test strip vial is for control solution use on...

Страница 24: ...ed prior to blood extraction the difference was signi cantly reduced Please follow the suggestions below before obtaining a drop of blood Wash and dry your hands before starting Select the puncture si...

Страница 25: ...or AST Pull the cocking control back until it clicks When lancing the forearm upper arm hand thigh or calf avoid lancing the areas with obvious veins because of excessive bleeding NOTE Choose a differ...

Страница 26: ...with results equivalent to ngertip testing What is the advantage Fingertips feel pain more readily because they are full of nerve endings receptors At other body sites since nerve endings are not so...

Страница 27: ...2 hours since the last meal Two hours or more after taking insulin Two hours or more after exercise Do NOT use AST if You think your blood glucose is low You are unaware of hypoglycemia You are testi...

Страница 28: ...easuring mode please refer to the FOUR MEASURING MODES section on page 17 Step 3 Obtaining a blood sample Use the pre set lancing device to puncture the desired site After penetration discard the rst...

Страница 29: ...d sample to the test strip within 3 minutes the meter will automatically turn off You must remove and reinsert the test strip to start a new test The con rmation window should be lled with blood befor...

Страница 30: ...t strip and remove the lancet To eject the test strip point the strip at a disposal container for sharp items The meter will switch itself off automatically after the test strip is ejected Step 7 Alwa...

Страница 31: ...r switched off Reviewing Test Results Step 1 Press will appear on the display Press again and the rst reading you see is the last blood glucose result along with date time and the measuring mode Step...

Страница 32: ...mode in the order of Gen AC then PC Step 3 Exit the meter memory Keep pressing and the meter will turn off after displaying the last test result NOTE Any time you wish to exit the memory keep pressing...

Страница 33: ...to a RS232 port on your computer With the meter switched off connect the other end of the RS232 cable to the meter data port PC will appear on the meter display indicating that the meter is in commun...

Страница 34: ...the instructions provided with the software Results will be transmitted with date and time Remove the cable and the meter will automatically switch off WARNING While the meter is connecting to the PC...

Страница 35: ...Low Battery Signal The symbol appears along with display messages The meter is functional and the result remains accurate but it is time to change the battery The symbol appears with E b Error and low...

Страница 36: ...rted correctly you will hear a beep afterwards NOTE Replacing the battery does not affect the test results stored in the memory As with all small batteries these batteries should be kept away from sma...

Страница 37: ...ion Use one disin fecting wipe to clean exposed surfaces of the meter thoroughly and remove any visible dirt blood or any other body uid with the wipe Use a second wipe to disinfect the meter by follo...

Страница 38: ...ound the test slot but be careful not to allow excess liquid to get inside Keep meter wet with disinfection solution for a minimum of 2 minutes for Micro Kill wipes Follow the instructions on the pack...

Страница 39: ...infections per day over a 5 years the expect life of the device The meter should be replaced after the validated number of disinfec tion cycles or the warranty period which ever comes rst Stop using t...

Страница 40: ...meter and lancing device should be decontaminated prior to use by the second person Do NOT allow cleaning and disinfecting solution to get in the test slot battery compartment or strip ejection button...

Страница 41: ...p tightly Touch the test strip with clean and dry hands Use each test strip immediately after removing it from the vial Write the opening date on the vial label when you rst opened it Discard remainin...

Страница 42: ...months It is recommended that the control solution test be done at room temperature 68 F to 77 F 20 C to 25 C Make sure your control solution meter and test strips are at this speci ed temperature ra...

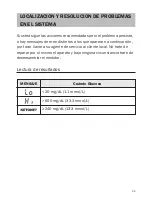
Страница 43: ...error messages other than the ones below appear please call your local customer service Do not attempt to repair by yourself and never try to disassemble the meter under any circumstances Result Read...

Страница 44: ...batteries immediately Remove the strip after applying blood to the absorbent hole Appears when a used test strip is inserted Re test with a new test strip Repeat with a new test strip Problem with the...

Страница 45: ...mbient temperature is below system operation range System operation range is 50 F to 104 F 10 C to 40 C Repeat the test after the meter and test strip are in the above temperature range Appears when a...

Страница 46: ...pletely Defective meter or test strips 2 If the test does not start after applying the sample POSSIBLE CAUSE WHAT TO DO Repeat the test using a new test strip with larger volume of blood sample Repeat...

Страница 47: ...e expiry date of the control solution Control solution meter and test strips should be at room temperature 68 F to 77 F 20 C to 25 C before testing Repeat the test with a new test strip Please contact...

Страница 48: ...and adjust your treatment plan to gain better control of your diabetes Source American Diabetes Association 2012 Clinical Practice Recommendations Diabetes Care 35 Supplement 1 S1 S100 Please consult...

Страница 49: ...etween meter and laboratory results follow the guidelines below Before going to the lab Perform a control solution test to make sure that the meter is working properly Fast for at least eight hours be...

Страница 50: ...han blood drawn from a vein venous sample used for a lab test 3 Therefore it is best to fast for eight hours before doing comparison tests Factors such as the amount of red blood cells in the blood a...

Страница 51: ...Auto reaction time count down Auto switch off after 3 minutes without action Temperature Warning Operating Conditions 50 F to 104 F 10 C to 40 C below 85 R H non condensing Storage Transportation Con...

Страница 52: ...52...

Страница 53: ...e ayudarle a usted y a su doctor a controlar m s e cientemente la diabetes Gracias a su tama o compacto as como a su f cil op eraci n usted podr usar el Sistema de Vigilancia de Glucosa en la Sangre F...

Страница 54: ...te 1 FDA Public Health Noti cation Use of Fingerstick Devices on More than One Person Poses Risk for Transmitting Bloodborne Pathogens Initial Communication 2010 http www fda gov MedicalDevices Safety...

Страница 55: ...use este instrumento cerca de fuentes de radiaci n electromagn ticas ya que podr an interferir en su oper aci n 11 El mantenimiento correcto y la prueba peri dica de la so luci n de control son aspect...

Страница 56: ...S DE MEDICI N 69 ANTES DE HACER LA PRUEBA 71 Probando la Solucion de Control 71 Realizando una Prueba con la Soluci n de Control 72 HACIENDO UNA PRUEBA CON MUESTRA DE SANGRE 75 Preparando el Lugar de...

Страница 57: ...tante Sobre la Soluci n de Control 94 LOCALIZACION Y RESOLUCION DE PROBLEMAS EN EL SISTEMA 95 Leyendo Resultados 95 Mensages de Error 96 Localizaci n y Resoluci n de Problemas 98 INFORMACI N DETALLADA...

Страница 58: ...nto recomendado por su m dico Aplique solamente muestra fresca de sangre capilar para realizar la prueba de glucosa La aplicaci n de otras sustancias causar resultados incorrectos Si usted tiene s nto...

Страница 59: ...l dedo la palma el antebrazo el brazo la pantorrilla y el muslo No debe ser usado para diagnosticar la diabetes ni para examinar a reci n nacidos Principios de la Prueba Su sistema mide la cantidad de...

Страница 60: ...caja del medidor Estos pueden ser adquiridos por separado ATENCI N Si alguno de estos art culos no est n incluidos o si la caja ha sido abierta an tes de su uso por favor contacte con su distribuidor...

Страница 61: ...emoria del medidor y silencie la alarma recordatoria BOT N C Marca la prueba de Control de Soluci n 1 3 4 2 Puerto de Datos Descargue los resultados del an lisis con un cable de conexi n Expulsi n de...

Страница 62: ...S mbolo de Gota de Sangre Unidad de Medici n Resultados de la Prueba Mode de Medici n S mbolo de memoria Indicator de Funcion de Alarma Modo de Control de Soluci n Fecha Hora Advertencia Cetona Promed...

Страница 63: ...on rma si ha puesto su ciente sangre en el ori cio absorbente de la tira Mango de la Tira Reactiv Coja la tira por esta parte para introducirla en la ranura Barras de Contacto Inserte este extremo de...

Страница 64: ...os nuevos cambios deseados Entrando a la funci n de configuraci n Comience con el medidor apagado sin haber insertado la tira reactiva Mantenga presionando el bot n SET por 3 segundos hasta que el med...

Страница 65: ...ando el formato de hora Presione y libere para seleccionar el formato de hora 12h o 24h Presione SET Paso 3 Configurando la hora Con la hora parpadeando presione hasta que la hora correcta aparezca Pr...

Страница 66: ...para conservar los resultados en memoria luego presione Set para saltarlos Si desea borrar TODA la memoria presione el bot n para seleccio nar yes Luego presione el seteo para borrar Toda memoria OK s...

Страница 67: ...rla Presione para seleccionar On encendido luego presione Set para con gurar la hora Cuando la hora est parpadeando presione para a adir una hora Presione Set para con rmar y vaya a los minutos presio...

Страница 68: ...prueba en ese momento pre sione para apagar el medidor Felicitaciones Ha terminado de programar su medidor NOTA Estos par metros pueden ser cambiados SOLO en modo de configuraci n o programaci n Si e...

Страница 69: ...ra del d a sin tomar en cuenta cu ndo fue su ltima comida sin la ingesta de alimentos durante por lo menos 8 horas 2 horas despu s de la comida Probando la soluci n de control Usted puede cambiar entr...

Страница 70: ...70 Paso 2 Presione para cambiar entre la funci n General AC PC o QC Paso 3 Presione para cambiar a la funci n QC...

Страница 71: ...adquirir por primera vez su gluc metro Al menos una vez a la semana como prueba rutinaria para veri car el funcionamiento del gluc metro y de las tiras reactivas Al empezar un envase nuevo de tiras r...

Страница 72: ...tira reactiva dentro del medidor Espere hasta que el medidor le muestre la tira reactiva y el s mbolo de gota de sangre en pantalla Paso 2 Presione para marcar esta prueba como prueba de soluci n de...

Страница 73: ...ra tomar la muestra sostenga el medidor con la tira reactiva in sertada y ll velo hasta la parte superior donde est el l quido Toque levemente el canal absorbente de la tira con la gota Una vez que la...

Страница 74: ...car la soluci n de control Este rango NO es reco mendado para los niveles de su glucosa en la sangre Vea la secci n de Mantenimiento para obtener mayor informaci n sobre la soluci n de control Paso 4...

Страница 75: ...amente a la extracci n de la sangre la diferencia se ve signi cativamente reducida Por favor siga las siguientes sugerencias antes de obtener la gota de sangre L vese y s quese bien las manos antes de...

Страница 76: ...tr s hasta que haga clic Cuando obtiene sangre en la palma de la mano el antebrazo el brazo la pantorrilla o el muslo tenga cuidado de la venas evidente debido a la hemorragia excesiva NOTA Escoja una...

Страница 77: ...l dedo para revisar sus niveles de gluco sa Este sistema le permite hacer la prueba en la palma de la mano el antebrazo el brazo la pantorrilla o el muslo con resulta dos equivalentes a los de las pru...

Страница 78: ...mpre tome la muestra de sangre nicamente de su dedo Le recomendamos seriamente que usted realice el LAP SOLAMENTE en los siguientes intervalos Antes de una comida o en ayunas espere m s de 2 horas des...

Страница 79: ...ci n en el lugar deseado Despu s de la penetraci n descarte la primera gota de sangre con un algod n limpio Presione el lugar de punci n gentilmente hasta obtener otra gota de sangre Por favor tenga c...

Страница 80: ...utom ticamente si no aplica la muestra de sangre en 3 minutos Si esto ocurriera deber de remover y reinsertar la tira reactiva y comenzar el procedimiento de nuevo La sangre debe llenar la ventana de...

Страница 81: ...ara expulsar la tira reactiva coloque el medidor de forma que la tira est de frente a un basurero y oprima el bot n de expulci n El medidor se apagar autom ticamente despues de haber expulsado la tira...

Страница 82: ...moria de su medidor comience con el medidor apagado Revisando los Resultados de la Prueba Paso 2 Presione para revisar los resultados guardados en el medidor cada vez que lo presiona Paso 1 Presione a...

Страница 83: ...l bot n presionado por 3 segundos hasta que aparezca parpadeando appears Release Libere el bot n M y el resultado del promedio de 7 d as en funci n general aparecer en la pantalla Paso 2 Presione para...

Страница 84: ...guna acci n por 3 minutos y el medidor se apagar autom ticamente Los resultados de la soluci n de control NO est n incluidos en el promedio diario Si est usando el medidor por primera vez ser mostrado...

Страница 85: ...dora Con el medidor apagado conecte el otro extremo del RS232 cable de transmisi n al puerto de datos del medidor Aparecer en pantalla PC indicando que el medidor est en funci n de comunicaci n Descar...

Страница 86: ...por el software para transmitir los datos Los resultados ser n transmitidos con la hora y la fecha El medidor se apagar autom ticamente al remover el cable ADVERTENCIA No se podr realizar ninguna prue...

Страница 87: ...mensajes en la pantalla el medidor est funcionando y el resultado es exacto sin embargo es tiempo de cambiar las bater as El s mbolo aparecer con E b Error y low bater a no tiene su ciente bater a par...

Страница 88: ...o las bater as no afecta los resultados guardados en la me moria Como con todas las bater as peque as stas deben estar fuera del al cance de ni os peque os En caso de que ser ingeridas por favor busqu...

Страница 89: ...cte el monitor despu s de cada paciente para prevenir infecciones C mo limpiar y desinfectar el medidor Es necesario limpiar el medidor antes de su desinfecci n Utilice un pa o desinfectante para limp...

Страница 90: ...dea cuidando no mojar en exceso el interior de la ranura Mantenga el medidor h medo con la soluci n desin fectante del pa o durante al menos 2 minutos para toallitas Micro Kill Siga las instrucciones...

Страница 91: ...al d a durante 5 a os la vida til esperada del dispositivo El medidor debe sustituirse despu s del n mero validado de ciclos de desinfecci n o del per odo de garant a lo primero que suceda Deje de us...

Страница 92: ...a las instrucciones de la etiqueta del envase de los pa os desinfectantes Micro Kill para un uso seguro de los pa os Si el medidor es usado por otra persona ser necesario descontaminar tanto el medido...

Страница 93: ...le la tira reactiva con las manos limpias y secas Use cada tira reactiva inmediatamente despu s de sacarla del envase Escriba la fecha de expiraci n en la etiqueta cuando abra el frasco por primera ve...

Страница 94: ...que la prueba para soluci n de control se lleve a cabo a temperatura ambiente de 68 F a 77 F 20 C a 25 C Aseg rese de que su soluci n de control su medidor y sus tiras reactivas est n dentro del rango...

Страница 95: ...nsajes de error distintos a los que aparecen a continuaci n por favor llame a su agente de servicio al cliente local No trate de reparar por s mismo el aparato y bajo ninguna circunstancia trate de de...

Страница 96: ...spues de haber aplicado sangre al canal absorbente Aparece cuando se in serta una tira reactiva que est usada Haga la prueba nueva mente con una nueva tira reactiva Haga la prueba con una nueva tira r...

Страница 97: ...e la temperatura operacio nal del sistema El rango operacional del sistema es 50 F a 104 F 10 C a 40 C Repita la prueba despu s de que el medidor y la tira reactiva es t n a temperatura ambiental Apar...

Страница 98: ...tacto primero Medidor defectuoso Por favor contacte con servicio al cliente CAUSAS POSIBLES QU HACER Muestra de sangre insu ciente Repita la prueba con una nueva tira reactiva aumentando la can tidad...

Страница 99: ...e control y repita la prueba nuevamente Soluci n de control expirada o contaminada Veri que la fecha de expiraci n de la soluci n de control La soluci n de control est muy caliente o fr a La soluci n...

Страница 100: ...ar su plan con el n de obtener un mejor control de su diabetes Fuente American Diabetes Association 2012 Clinical Practice Recommenda tions Diabetes Care 35 Supplement 1 S1 S100 Por favor consulte con...

Страница 101: ...y del medidor siga las indicaciones a continuaci n Antes de ir al laboratorio Realice una prueba de la soluci n de control para asegurarse de que el medidor est funcionando apropiadamente Si es posibl...

Страница 102: ...la sangre extra da de la vena muestra de sangre venosa usada para la prueba del laboratorio 3 Por lo tanto es mejor ayunar ocho horas antes de hacer las pruebas de comparaci n Factores como la canti...

Страница 103: ...regresiva Se desconecta autom ticamente despu s de 3 minutos sin acci n Advertencia de Temperatura Condiciones de operaci n 50 F a 104 F 10 C a 40 C bajo un 85 de humedad relativa no condensando Condi...

Страница 104: ...Productos hecho en Taiwan Toll Free N mero de Tel fono Gratuito 1 888 307 8188 7 00am 6 00pm PST Mon Fri 7 00am 6 00pm N Lunes a Viernes For assistance outside of these hours please contact your heal...

Отзывы: