13
• ENGLISH •
• ENGLISH •
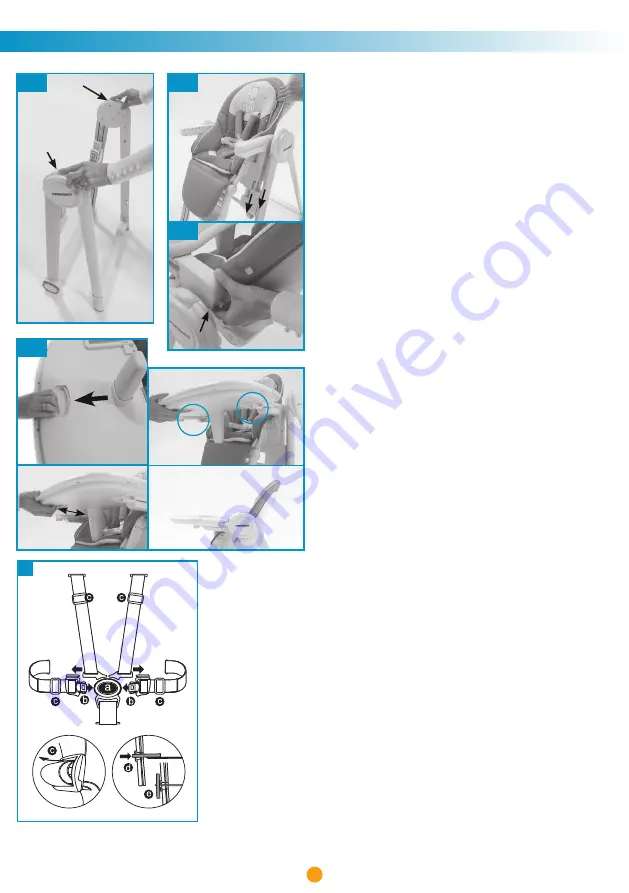
1. OPENING THE FRAME
Press the open / close button on the frame and expand the legs
until you hear a click to indicate that they are locked in an open
position.
2. ASSEMBLING AND REMOVING THE SEAT
ASSEMBLY:
Place the seat on the frame the right way around,
facing the wheels, as shown in the figure.
Align and insert the plastic connectors of the seat into their slots
on the frame.
Press until a click is heard indicating that it has been fastened
correctly.
WARNING:
Before use, always check that both the seat
supports are fastened correctly to the chassis. When the seat is
lifted upwards, it must not detach from the chassis.
REMOVING
: press button “F” on both sides and remove the
seat by lifting it.
IMPORTANT:
Never remove the seat with the child inside.
3. ASSEMBLING THE TRAY
Hold down the lever on the underneath of the tray (7) and place
the tray on the seat, checking that the armrests are inside the
guides located on the bottom of the tray itself. Release the lever
and push the tray towards the inside of the HIGH CHAIR, until it
locks in place. A click will indicate that it has locked in position
correctly.
CAUTION:
Always check before use that the tray is attached
and locked correctly on the armrests.
IMPORTANT
: Check before use that the tray is correctly locked
in the chosen position by pulling it outwards without pressing
the lever; the tray should stay in place.
CAUTION:
Do not allow the child to place his hand on the
armrest when mounting the tray.
4. SAFETY HARNESS
CAUTION
: Using a safety harness with leg separator is essential
to ensure your child’s safety.
CAUTION
: The tray alone being attached to the seat does not guarantee that your
child is secured. Always use the safety harness!
The HIGH CHAIR is equipped with a 5-point safety harness.
• Unclipping the buckle: Press the button (a) and pull out the components (b).
• Clip the buckle: Insert the components (b) into the buckle (a); you will hear a click
when they are attached correctly.
Adjust the harness depending on the size of the child, using the adjusters (c).
Adjust the position of the straps, or chest belts, depending on the height of the child.
The straps must be adjusted in the slots close to the child’s shoulders.
• To adjust the straps or to remove the safety harness, rotate the plastic locking ring
of the safety harness “straps” and “lap belt” on the rear side of the backrest (d), and
remove the harness by pulling it from the inner side of the seat, through the slots in the
seat shell and padding.
• To refit the straps,insert the plastic ring, fixed to the end of the strap, through the slots
in the fabric and the corresponding slots in the seat shell.
Rotate the ring into a vertical position, on the outer side of the backrest (e).
Make sure that it is correctly mounted and locked. When pulling the straps from the
inner side of the seat, the belts should not disengage.
Always make sure that the straps are positioned in the backrest slots located at the
same height.
IMPORTANT
: The harness must only be used with all the components attached.
IMPORTANT
: Adjust the harness correctly each time the HIGH CHAIR is used.
ASSEMBLY
1
3
2a
B
A
A
2b
F
12
11
4
B
Содержание Misterchef
Страница 3: ...3 VA NO PRO ITAJTE PA LJIVO UPUTSTVA I SA UVAJTE ZA BUDU E KORI TENJE EL RU HR...
Страница 36: ...36 i A B C D E D E A C B...
Страница 37: ...37 1 2 P F 3 7 4 5 1 3 2a B A A 2b F 12 11 4 B...
Страница 38: ...38 5 3 P1 P2 P3 C 6 3 6 5 D 7 8 n 8 3 6 7 8 D E E 5 C P1 P2 P3...
Страница 39: ...39 9 9 10 4 clip 11 11 11b P1 P2 3 9 10 P1 P2 P3 11a 11b MAX 3 kg...
Страница 40: ...40 12 9 6 A 12 C 12 A A 13...
Страница 41: ...41 6 9 kg P3 EN 12790 2009 6 3 15 EN 14988 2017 3 15 6 9 kg o N N 3 15 6 15...
Страница 42: ...42...
Страница 44: ...44 A B C D E D E A C B...
Страница 45: ...45 1 2 F 3 4 b b d e 1 3 2a B A A 2b F 12 11 4 B...
Страница 46: ...46 5 3 P1 P2 P3 C 6 3 6 5 D 7 8 8 3 E 6 7 8 D E E 5 C P1 P2 P3...
Страница 47: ...47 9 9 10 4 11 11a 11b P1 P2 P3 9 10 P1 P2 P3 11a 11b MAX 3 kg...
Страница 48: ...48 12 9 6 A 12 b C 12 A A 13...
Страница 49: ...49 6 9 P3 EN 12790 2009 6 3 15 EN 14988 2017 3 15 6 9 3 15 6 15...
Страница 50: ...50...


