background image

Getting started with the Follett Panther 

Page 18 of 25 

© Copyright 2008 Follett Software Company. 10919A Rev 11 06-08-A 

Setting up a workstation with ActiveSync 

Once you've installed ActiveSync on your workstation, you'll need to 
configure it: 

1.  Double-click the ActiveSync icon 

 in the system tray. 

2.  In the ActiveSync application, select 

File 

Connection Settings

3.  Select the 

Allow USB connections

 check box: 


4.  Click 

OK

 to close Connections settings, and then select 

File

 > 

Close

 to close the ActiveSync application.  

Setting up a workstation with  
Windows Mobile Device Center 

Once you've installed Windows Mobility Center on the workstation, you'll 
need to configure it: 

1.  Connect the Panther to a USB port. Vista automatically detects the 

device and installs the appropriate driver. 

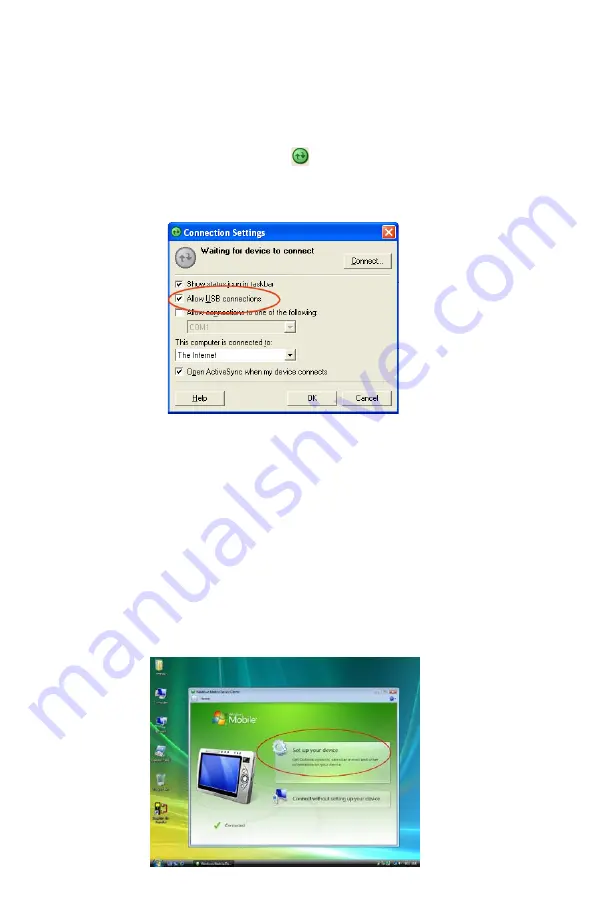
2.  Select 

Start > All Programs > Windows Mobile Device Center

.  

On the dialog that appears, choose 

Set up your device


Содержание Panther

Страница 1: ...ting up your Panther and communicating with your workstation or wireless network It includes the following sections Resources to help you p 1 Getting started p 2 Managing the batteries p 2 Starting the Panther p 4 Features of the Panther p 5 Communication options p 13 Communicating with the Panther p 22 Resources to help you Destiny Customers Quick Help for Wireless Destiny Library Quick Help for ...

Страница 2: ...rge the batteries The Panther has two types of battery power The main battery pack on the back panel and the backup battery located inside the Panther Both batteries work together to prevent data loss when you use the Panther over long periods of time You must charge both batteries to full capacity before using the Panther for the first time Inserting and removing the main battery pack To insert a...

Страница 3: ...or power adapters from other manufacturers will void the warranty and may damage the Panther Managing main battery power Data and files saved on the Follett Panther may be stored in RAM Make sure to maintain a continuous power supply to the Panther to help prevent data loss When you remove a battery pack insert another charged battery pack in the Panther If the main battery pack is low either conn...

Страница 4: ...tomatically cold boots when you install a fully charged battery pack If this happens you ll need to re configure your wireless network settings and reset the real time clock Charging the backup battery The internal backup battery charges off the main battery pack and requires eight hours charge time to back up RAM data for 30 minutes You can begin using the Panther after charging the main battery ...

Страница 5: ...cessfully decodes a barcode scan Touch screen display The Panther comes with a stylus located in the stylus slot on the back of the unit Use this stylus or your finger to select or enter information on the touch screen The stylus functions like a mouse generally a tap is the same as a click Tap Tap the touch screen once to open menu items and select options Drag Hold the stylus on the screen and d...

Страница 6: ...e the touch screen and will void the warranty Care and cleaning of the Panther When needed clean the scanning lens and the LCD display with a clean non abrasive lint free cloth You can clean the Panther case with a damp cloth About the keys Color coding The keyboard overlays are color coded to indicate the functions performed or characters typed when you press a color coded key and the red or blue...

Страница 7: ...tain four types of keys Hardware application buttons Function keys Navigation keys Modifier keys Hardware application buttons The four hardware application buttons are programmed to launch software applications from the Desktop Key Function P1 Launches Internet Explorer P2 Launches WordPad P3 Launches Scan Wedge If it s already running asks you if you want to close it P4 Launches Follett Remote ...

Страница 8: ...d each time you backspace Backtab Red plus TAB keys Moves the cursor back to the previous tab stop or field on a form or application window Escape Cancels an action Enter Functions as an Enter key Power Blue plus Backlight keys Suspends or resumes operation Scan SCAN Activates the scanning LED to scan a barcode or take an image Shift Provides shift functionality for application windows and functio...

Страница 9: ...y Description Function with blue key with red key PG Move the cursor up one row or line Volume up Scroll page up PG Move the cursor down one row or line Volume down Scroll page down Move the cursor one character to the right N A Space Move the cursor one character to the left N A Backspace Modifier keys Blue Key combinations Press the Blue key once in combination with the next key Key Combination ...

Страница 10: ...ith the next key Key Combination Function Special Character Red Left Arrow Backspace Red Right Arrow Space Red Up Arrow Page up Red Down Arrow Page down Red ESC hold Soft reset warm boot Red TAB hold Hard reset cold boot Warning This procedure deletes WLAN configurations Red 1 F1 Red 2 F2 Red 3 F3 Red 4 F4 Red 5 F5 Red 6 F6 Red 7 F7 Red 8 F8 Red 9 F9 Red BKSP Red 0 F10 Red SP ...

Страница 11: ...with white characters that indicates which letter or symbol is typed when you press that key in Alpha mode Please note that when typing in Alpha mode you must use the same multi press method you would use when typing letters on a phone keypad Each keypress types the next letter in the sequence as displayed by the Alpha indicator Note You can still use the Blue modifier key for regular Blue Key com...

Страница 12: ...ry status This icon means that the battery is low Double tap to open the Power control panel setting Tap to open the Bluetooth Manager Indicates that barcode scanning is enabled Indicates whether the keyboard is in numeric or alpha mode temporarily or permanently Radio status Tap to open the network manager 802 11b g radio signal strength If the radio is not transmitting an x appears over the bars...

Страница 13: ...ucture You will need specific information from your network administrator Before you can communicate with your wireless network you ll need to do the following Enable the on board radio so that the Panther can transmit signals Configure the settings for the radio you re using Each radio has its own configuration program I O connector wired communication The mechanical connector on the bottom panel...

Страница 14: ...cation the Panther supports the following methods LEAP FAST GTC PEAPv0 MSCHAPV2 FAST TLS PEAPv1 MSCHAPV2 TLS PEAPv1 GTC TTLS MD5 PEAPv1 TLS TTLS MSCHAPV2 FAST MSCHAPV2 TTLS GTC To communicate with your wireless network you ll need to turn the power on to the radio and configure your WLAN settings on the Panther You ll need to obtain the information from your network administrator Powering the radi...

Страница 15: ... your network configuration from the list Select To connect with None No authentication or encryption WEP WEP encryption IEEE 802 1X WEP WEP encryption and EAP authentication WPA Personal PSK WPA2 Personal PSK WPA encryption and PSK authentication WPA Enterprise EAP WPA2 Enterprise EAP WPA encryption and EAP authentication The fields and options required by the association mode encryption and EAP ...

Страница 16: ... on the Config tab and tap Activate The Status tab appears displaying the connection status The radio status icon in the taskbar changes to indicate the status Color Meaning Status tab status Gray The radio is disabled idle not connecting NO RADIO RADIO OFF DISCONNECTED INACTIVE Yellow The connection is Associating icon stops spinning Authenticating icon stops spinning Negotiating DHCP address ico...

Страница 17: ...e or Ultimate Windows XP Windows 2000 Windows Me Windows NT 4 0 SP6 or higher or Windows 98 Second Edition You ll need the following software ActiveSync 4 1 or higher installed and configured on the workstation If ActiveSync is not installed on your host workstation you can download and install the most current version from www microsoft com Or Windows Mobility Center 6 1 or higher installed and c...

Страница 18: ...onnection Settings 3 Select the Allow USB connections check box 4 Click OK to close Connections settings and then select File Close to close the ActiveSync application Setting up a workstation with Windows Mobile Device Center Once you ve installed Windows Mobility Center on the workstation you ll need to configure it 1 Connect the Panther to a USB port Vista automatically detects the device and i...

Страница 19: ... items do you want to sync leave all boxes unselected and click Next 4 On the next dialog Ready to set up the Windows Mobile Partnership enter a descriptive name of your choice next to Device name For the synchronize data question leave it at Merge the existing items It does not affect the way information for Destiny is transferred Then click Set Up ...

Страница 20: ... started with the Follett Panther Page 20 of 25 Copyright 2008 Follett Software Company 10919A Rev 11 06 08 A 5 The Windows Mobile Device Center reappears Your scanner should appear with a status of Connected ...

Страница 21: ...ny 10919A Rev 11 06 08 A Page 21 of 25 Setting up the Panther As shipped the Panther defaults to USB communication with your workstation To verify or change the default setting 1 Tap Start Settings Control Panel PC Connection 2 Tap Change Connection to change the current settings ...

Страница 22: ...ector on the Panther and to a USB port on the workstation This is a communication only cable unless you plug the power cable into the power port Connecting the power cable The Power Port on the back end of the USB connector fits the power cable that comes with each Follett Panther To charge the device while communicating connect the power cable to the Power Port Communicating with the Panther Afte...

Страница 23: ...xplore on its toolbar The Mobile Device folder opens in Windows Explorer 2 Locate and transfer your Follett Remote files by dragging and dropping or copying and pasting them to a location on your workstation just as you would when moving any files between folders You ll find your Follett Remote files in IPSM Follett Remote Uploading the files from the workstation to your application Once you ve mo...

Страница 24: ... Title List Select by Titles via PHD Patron Barcode List Select by Patrons via PHD Patron Cards Select by Patrons via PHD Patron Name List Select by Patrons via PHD To upload a file 1 Select Data File from the Select the PHD model list 2 Click Browse to locate and select your Follett Remote file 3 To use a transaction date other that the one shown enter the desired Date 4 To begin uploading the fi...

Страница 25: ...er in the Back Office to review any exceptions If you re uploading them wirelessly 1 After logging in tap Upload File 2 On the Upload File page select the type of file you re uploading 3 For offline circulation verify or change the Transaction Date For inventory select the one you re working on In Textbook Manager select your Location For textbook or asset transfers select the destination site 4 T...

Отзывы: