8
❑
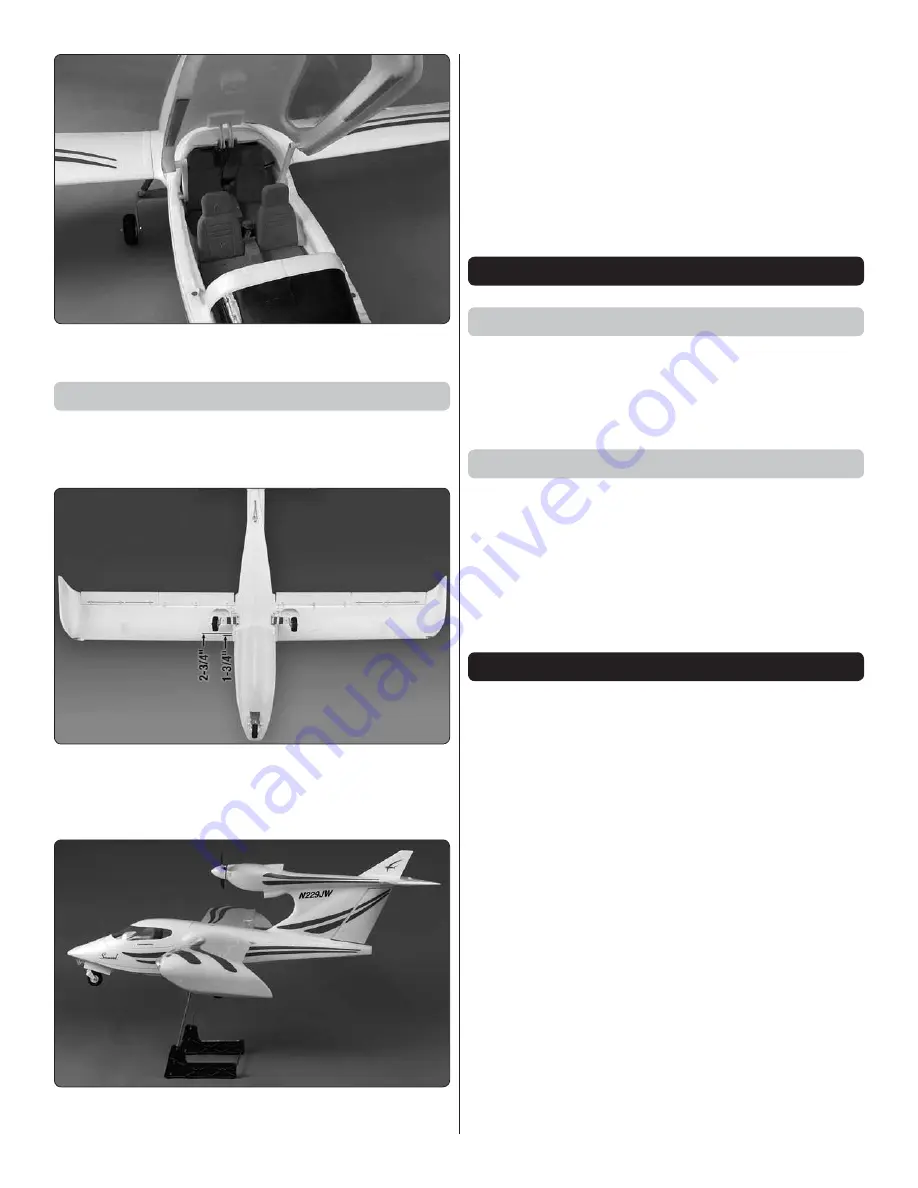
4. Install the two sets of seats. They are held in place
with magnets.
Check the C.G. (Center of Gravity)
DO NOT OVERLOOK THIS IMPORTANT PROCEDURE.
A
model that is not properly balanced will be unstable and
possibly unfl yable.
❑
1. Mark the C.G. range on the bottom of the wing. The
plane should balance between 1-3/4" – 2-3/4" [44mm-
70mm] back from the leading edge. We recommend
starting at 2" [51mm].
❑
2. With the plane ready to fl y, motor battery and seats
installed, use a Great Planes C.G. Machine or apply narrow
(1/16" [2mm]) strips of tape at the front and rear C.G.
locations so you will be able to feel them when lifting the
model with your fi ngers to check the C.G. location.
Do not
at any time balance the model outside this C.G. range.
❑
3. If the Seawind does not balance within the
recommended range, reposition the battery to get the
model to balance. Once the correct battery location has
been determined, mark the location on the inside of the
fuselage so that the battery can be installed in the same
location every time.
PREFLIGHT
Identify Your Model
You should always have your name, address, telephone
number and AMA number on or inside your model. It
is required at all AMA R/C club fl ying sites and AMA
sanctioned fl ying events. Fill out the identifi cation tag on
page 10 and place it on or inside your model.
Ground Check and Range Check
Follow the radio manufacturer’s instructions to ground
check the operational range of your radio before the fi rst
fl ight of the day. This should be done once with the motor
off and once with the motor running at various speeds.
If the control surfaces do not respond correctly,
do not
fl y
. Find and correct the problem fi rst. Look for loose
servo connections or broken wires, corroded wires or
connectors or try relocating the receiver and antennas.
ELECTRIC MOTOR SAFETY
●
ALWAYS
Wear safety glasses whenever running motors.
●
ALWAYS
Keep your face and body as well as all
spectators away from the plane of rotation of the
turning propeller.
●
ALWAYS
Keep loose clothing and objects such as
pencils or screwdrivers that may fall out of a shirt or
jacket pockets away from the prop.
●
NEVER
touch the motor during or right after operation.
The motor gets HOT!
●
ALWAYS
remove the propeller from the plane when
working on it if the motor batteries will be connected.
●
ALWAYS
remove the motor batteries from the plane
when charging.
●
ALWAYS
follow the charging instructions included with
your charger for charging LiPo batteries. LiPo batteries
can cause serious damage if misused.
●
ALWAYS
make sure the fail safe is set on your radio
to prevent the motor from starting if the signal is lost.
Once the motor batteries are connected, the motor can
start at anytime.
●
ALWAYS
unplug the motor batteries fi rst.


