background image

Automatic Line Feed System cont’

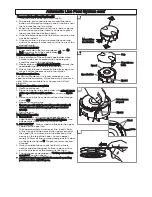
.To manually feed the nylon line (K)
1. If required line can be fed out manually.
2. To operate, press and release manual line feed

button, whilst gently pulling on one of the lines until
the line reaches the line cutter.

3. When the required amount of line is fed out, gently

pull on the second line (there is no need to press
the manual line feed button again).

4. If the line extends past the line cutter, too much line

has been fed out.

5. If too much line is fed out, remove the spool cap

and click spool anti-clockwise until the line is at the
desired length.

To remove spool cap
1. Press and hold in the two cap release latches. (L).
2. Pull cap away from the spoolholder. (L).
When refitting the spool cap
1. Keep all areas of the cap and spoolholder clean.

Failure to do so may prevent the cap being se-
curely located in the spoolholder.

2. Replace the cap, pressing firmly DOWN towards the

spoolholder to ensure cap is fully located.

3. Check that the cap is correctly fitted by trying to re-

move it without depressing the two latches.

To replace nylon line.
For your convenience it is recommended you buy
spool and line complete.  Nylon line only is also avail-
able.  Both are available from Husqvarna UK Ltd.
stockists.
To fit spool and line complete:
1. Remove old spool.
2. Place new spool into spoolholder with cut out areas

of the spool in line with eyelets as shown in figure
M.

3. Release one line from cleat and feed line through

eyelet (M).

4. Repeat for second line.
• Ensure spool is fully located by gently rotating it

during fitment, whilst keeping the spoolholder
steady.

5. Refit the cap.
To fit nylon line only: 
• Remember ! Your Trimmer is designed to use only

nylon line with a maximum diameter of 1.5mm. Use
only genuine Husqvarna UK Ltd. nylon line.

1. IMPORTANT - Always wind the line onto the upper

section of the spool first.
Take approximately 5 metres of line. Insert 15mm
of line into one of the holes in the upper section of
the spool (N) and wind line in the direction of the
arrows on the top of the spool.  Leave approxi-
mately 100mm of line unwound and place into cleat
as illustrated in figure N.  Repeat on lower section
of spool.

2. Care should be taken to ensure that the line is

neatly coiled on the spool. Failure to do so will im-
pair the efficiency of the automatic line feed.

3. Then fit spool as described in ‘To fit spool and line

complete’, section above.

• Always return the product to its normal operating

position before switching on.

Manual line
feed button

Cap

Cap release
latch

Spool

Spoolholder

Eyelet

K

L

M

N

Cleat

Cut out area
of spool

Eyelet

Содержание STXT25

Страница 1: ... Original Instructions IMPORTANT INFORMATION Read before use retain for future reference Speedi Trim ...

Страница 2: ...on of Symbols on the product Warning Read the user instructions carefully to make sure you understand all the controls and what they do Keep others including children pets and bystanders outside the 10 metre hazard zone Stop the trimmer immediately if you are approached Wear eye protection To avoid the possibility of electric shock do not use in damp or wet conditions Switch off Remove plug from m...

Страница 3: ...oiding kinking 12 Use only on AC mains supply voltage shown on the product rating label 13 Our trimmers are double insulated to EN60335 Under no circumstance should an earth be con nected to any part of the trimmer Preparation 1 While using your product always wear eye protec tion substantial footwear and long trousers Do not operate the equipment when barefoot or wearing open sandals 2 Before usi...

Страница 4: ...ble 4 Only use extension cables specifically designed for outdoor use and which conform to one of the following specifications Ordinary rubber 60245 IEC 53 Ordinary PVC 60227 IEC 53 or Ordinary PCP 60245 IEC 57 CONNECTORS Our connectors are suitable for use with 2 core cable only Under no circumstances should these connectors be used for earthed products All of our connectors and cables are of spl...

Страница 5: ... trimmer around trees H and near plants E G F H 1 Automatic Line Feed System Line cutter J How the automatic line feed works J 1 When initially switching on the trimmer a small length of line is fed out 2 A clattering noise will be heard when the nylon line hits the line cutter DO NOT BE ALARMED this is quite normal After approximately 5 seconds the line will be cut to the correct length and the n...

Страница 6: ...h are available from Husqvarna UK Ltd stockists To fit spool and line complete 1 Remove old spool 2 Place new spool into spoolholder with cut out areas of the spool in line with eyelets as shown in figure M 3 Release one line from cleat and feed line through eyelet M 4 Repeat for second line Ensure spool is fully located by gently rotating it during fitment whilst keeping the spoolholder steady 5 ...

Страница 7: ... Centre or Husqvarna UK Ltd Customer Service Is the line cutter missing from the safety guard Contact Husqvarna UK Ltd Customer Service Telephone 0844 844 4558 UK 1800 882 350 ROI No No No Yes Yes LINE NOT FEEDING OR LINE TOO SHORT OR TRIMMER VIBRATES CONTINUOUS CLATTERING NOISE LINE SNAPS CONTINUOUSLY IF NONE OF THE ABOVE OR IF FAULT PERSISTS Has the motor reached full speed before use No Allow t...

Страница 8: ...varna UK Ltd or by the ma chine having been modified in any way Guarantee Guarantee Policy Service Recommendations Your product is uniquely identified by a silver and black product rating label We strongly recommend that your product is serviced at least every twelve months more often in a professional application EC Declaration of Conformity Husqvarna AB S 561 82 Huskvarna Sweden Declare under ou...

Отзывы: