8
EASY CONNECTION SYSTEM INSTALLATION
This section only applies to Fluval Aquariums with Fluval External filter and “EasyConnect” System.
If your Aquarium Kit is equipped with a Fluval Internal filter, go directly to “Fluval Filter installation”
chapter.
Installing water intake/output with “EasyConnect”
system
(Intake/output fittings are included in the filter packaging)
Some Fluval Aquarium models feature the new and innovative “EasyConnect”
system, which allows the direct connection of the tank to the external filter
through the bottom glass by means of special fittings. Normally, the same
type of connection is achieved through specially-made devices, which are
complex and require the intervention of expert technicians. On the contrary,
in a few minutes the “EasyConnect” system can be easily and safely installed,
giving your aquarium the most professional and clean solution.
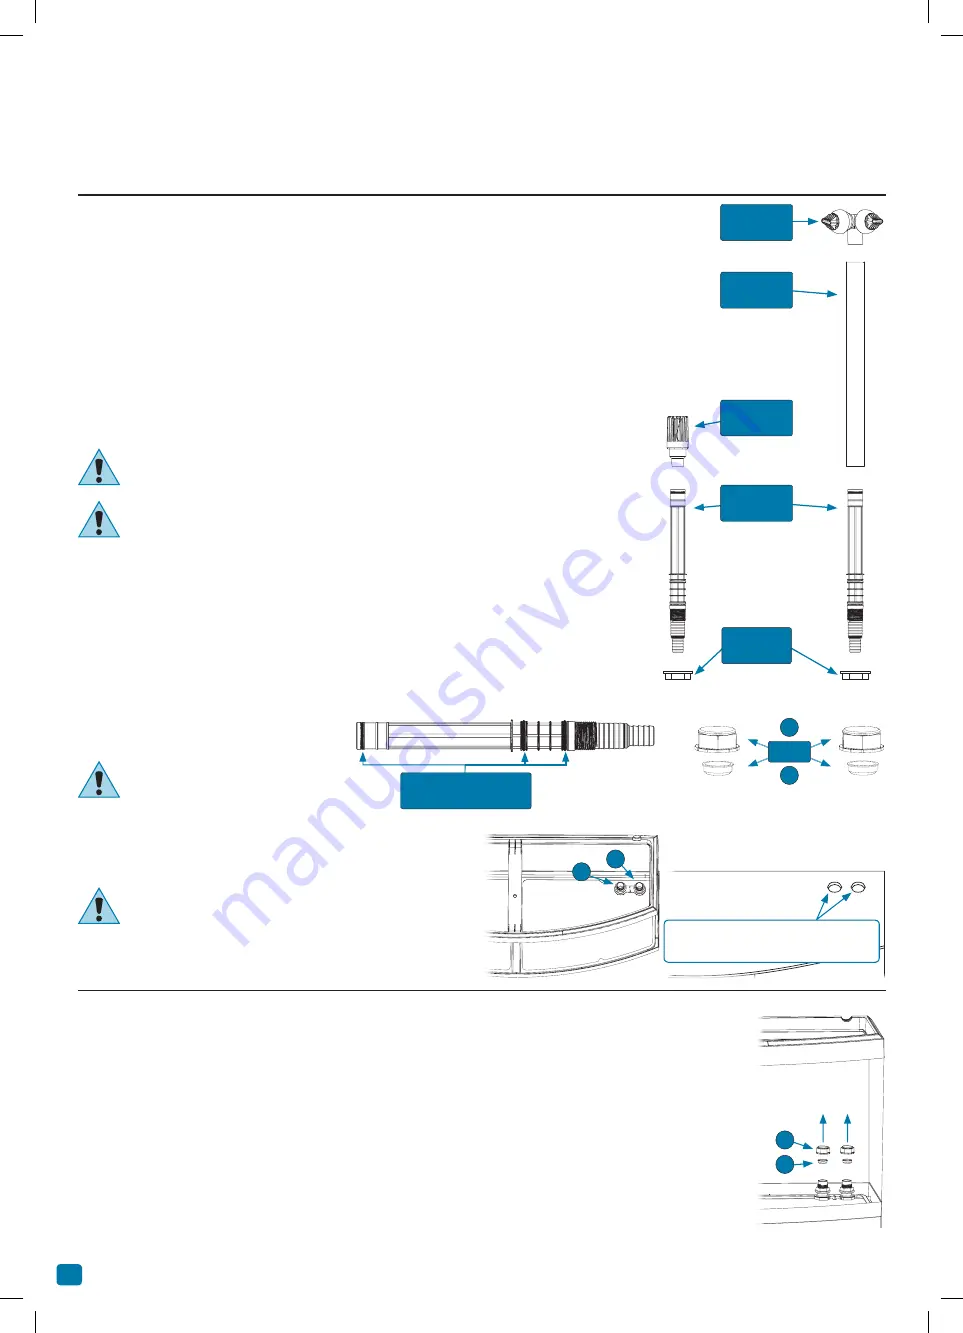
Before proceeding, identify and count all parts required by referring
to the exploded view in the side illustration. If any part is missing, do
not proceed with the installation and contact your local supplier.
Before proceeding, check stems (A) for the presence of all 3 rubber
rings (C). Do not proceed with the installation if one of the rubber
rings (C) is missing and contact your local supplier.
Locate the 2 openings in the tank bottom glass and assure that the
corresponding openings in the cabinet are aligned with them. The 2 openings
in the tank bottom glass are complete with factory installed special plastic
fittings, which must never be removed, turned or loosened and with two
sealing plugs (P) and (Q). The
output group should be installed in
the opening (O), whereas the
intake group should be installed in
the opening (I).
Once the output/intake
groups are installed, do
not shift the tank with
respect to the cabinet as this
may damage the output/intake
devices and the glass tank.
Do not force, loosen or turn the
factory-installed special fittings
on tank openings (I) and (O).
Output system installation
1. Manually unscrew plug (P) and remove plug (Q) from opening (O) (Pict. 1).
IMPORTANT
: keep plugs (P) and (Q) for any future use.
2. Slip connector stem (A) fully through opening (O) until it stops (Pict. 2).
3. Open the cabinet. Screw and tighten the ring nut (R) onto the bottom end of stem (A) (Pict. 3).
4. Insert the ouput nozzle (N) into one end of output stem (B).
5. Insert output stem (B) onto connector stem (A) (Pict. 4).
6. Regulate the height of output nozzles according to your requirement by sliding outlet stem
(B) along connector stem (A).
INTAKE
GROUP
OUTPUT
GROUP
Output
Nozzle (N)
Output
Stem (B)
Intake
Strainer (S)
Connector
Stem (A)
Ring Nut
(R)
TANK BOTTOM SEALING PLUGS
P
Q
Plugs
Connector Stem’s
Rubber Rings (C)
I
O
Locate the 2 openings (I) and (O) in the
tank bottom glass and the corresponding
holes in the cabinet
Pict. 1
Q
P


