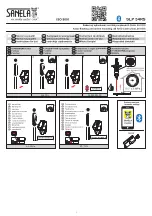
background image

 Operation

        . When the user's hand approach the detection zone, the sensor sends a signal to activate the solenoid valve 
          which lifts the flapper and flushes the toilet.

        .  Electronic manual button gives users the option of flushing the toilet by simply pressing the button.

 Care and Cleaning Instructions


1   eep t e displa  panel clean at all ti es to pre ent sensor  unction  ailure


2  Do not place  ea  ob ects or cigarette butts on t e casing


3  Do not spra   ater or  as  t e casing  it   ig l  concentrated


       c e ical cleaners  T is  a  result in s ort-circuiting or

            corrosion. Use mild soap and water , then wipe dry with a soft 
            clean cloth after washing.

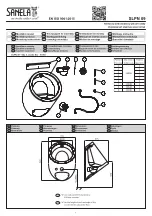
       4. Clean Filter Screen:
           Poor water quality will result in obstructed and reduced water flow. 
           To clean the filter screen do the following: 
            

 1 Turn o   ater suppl

             2. Remove the filter screen.  
             3. Wash the screen with clean water and re-insert. 

       5. Replace Batteries
            Need to replace batteries when 

1 The red light on the sensor unit flashes
2 The solenoid valve "BEEPS" continuously.

            Note: Replace with four AA batteries for either sensor unit or solenoid valve assembly

Filter Screen

Beep

Red light flashes

cid

4

Содержание CF107

Страница 1: ...Display P1 Inside Parts P1 Product Features P2 Specification P2 Parts List P3 Operation P4 Care and Cleaning Instructions P4 Installation Instructions P5 Function Test and Adjustment P9 Cautions P10...

Страница 2: ...CF107 Smart Toilet Installation Instructions Product Display Inside Parts Fill al e ater Pipe Open Solenoid al e Sensor ater Pu p Close Flus al e 1...

Страница 3: ...nsor as installation Fle ible installation its ost tan designs It can be used it id to standard eig t ater tan s and all standard toilet bo ls It can be installed on ne Cs or it can be used to upgrade...

Страница 4: ...Scre s t 2 Peg t 1 in C ain Clips t 1 nc ors t 2 Code Matc ing Tool t 1 l aline T pe atteries t Sensor Unit t 1 Solenoid al e Unit t 1 Fill al e Unit t 1 ater Connector t 1 P C Tube t 1 ater Pu p Uni...

Страница 5: ...sing it ig l concentrated c e ical cleaners T is a result in s ort circuiting or corrosion Use mild soap and water then wipe dry with a soft clean cloth after washing 4 Clean Filter Screen Poor water...

Страница 6: ...l stop See Figure 3 Fig 3 4 Assemble the fill valve unit and water connector as illustrated in Figure 4 5 Lock the PVC tube to the water connector with a nut provided See Figure 4 6 Install the fill v...

Страница 7: ...a screw Fig 6 8 Install the flexible tube into the solenoid valve unit See Figure 7 Install the combined parts into the water connector See Figure 8 Fig Fig 7 9 When positioned properly secure it wit...

Страница 8: ...re it with a nut See Figure 11 12 Fig 12 13 Install the link chain as illustrated in Figure 13 Fig 13 Correct Installation Too short Too long Flapper can not close Flapper can not open 14 Remove the c...

Страница 9: ...t drill two holes in their proper positions z Install the bracket on the wall Secure with anchors and screws included z Insert the sensor unit onto the bracket Place the sensor unit at the bottom of t...

Страница 10: ...he level Counterclockwise to decrease the level Adjust only if necessary 3 For courtesy flush press the manual button on the sensor unit When the sensor senses a user in the detection zone for 5 secon...

Страница 11: ...ctory setting ON OFF ON 6 SEC ON ON OFF 7 SEC ON ON ON 8 SEC Cautions Prior to installation Make certain the code on the solenoid valve matches the code on sensor unit If not do as follows Step1 Find...

Страница 12: ...installed improperly 4 Solenoid valve fails 4 Replace solenoid valve unit Solenoid valve continuously Low batteries in the solenoid valve unit Replace batteries beeps Incomplete flushing 1 Filter obs...

Страница 13: ...e double sided tape and place it on the back side of the sensor unit as shown in the illustration Be sure to press firmly while keeping the tape straight Check to see if the bond is even and secure St...

Отзывы: