


CONTROL
OPERATING THE
CONTROL
DISPLAY
GPIB-CODE
One ATTx1/x10 push
button for each of input
A and B. Switch the
indicator ON to select
10 times attenuation and
OFF to switch off the
attenuator.
ATT ON
ATT OFF
You must first
select input
with INPA or
INPB.
One SLOPE push-
button for each of input
A and B. Switch the
indicator ON to select
negative slope, and OFF
to select positive slope.
TRGSLP POS
TRGSLP NEG
You must first
select input
with INPA or
INPB.
One DC/AC push-button
for each of input A and
B. Switch the indicator
ON to select AC and
OFF to select DC.
NOTE: Sensitivity can
be set when AC-coupled
and Trigger Level when
DC-coupled.
COUPL AC
COUPL DC
You must first
select input
with INPA or
INPB.
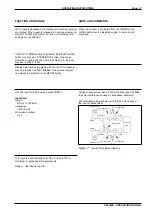
A depression switches
the AUTO LEVEL
indicator on or off.
AUTO ON
AUTO OFF
Depress the SET
VALUE button once and
the indicator in the
button switches on. Now
the auto level and Read
level buttons have the
red arrow up and down
function. Another press
will switch off the
function.
NOTE: Sensitivity can
be set when AC-coupled
and Trigger Level when
DC-coupled.
Separate
Codes for
trigger level
and sensitivity
SENS1 =20 mV
SENS2 =50 mV
SENS3 =100mV
TRGLVL
<num>
<num> = –5.1
to +5.1 V.
You must first
select input
with INPA or
INPB.
ATTx1
x10
DC
AC
AUTO
LEVEL
HOLD
DISPLAY
MEASURING TIME
10s
1s
0.2s
SINGLE
REF
EXT
MAN
TOT A
B
TOT A
B
TOT A
A-B
TIME
A/B
RATIO
A
PERIOD
C
FREQ
A
FREQ
FUNCTION
COMMON
B via A
VOLT A
MAX-MIN
LEVEL
AUTO
LEVEL
READ
SET
A
HOLD
DISPLAY
MEASURING TIME
10s
1s
0.2s
SINGLE
REF
EXT
MAN
TOT A
B
TOT A
B
TOT A
A-B
TIME
A/B
RATIO
A
PERIOD
C
FREQ
A
FREQ
FUNCTION
COMMON
B via A
VOLT A
MAX-MIN
LEVEL
AUTO
LEVEL
READ
HOLD
DISPLAY
MEASURING TIME
10s
1s
0.2s
SINGLE
REF
EXT
MAN
TOT A
B
TOT A
B
TOT A
A-B
TIME
A/B
RATIO
A
PERIOD
C
FREQ
A
FREQ
FUNCTION
COMMON
B via A
VOLT A
MAX-MIN
LEVEL
AUTO
LEVEL
READ
Page: 18
OPERATING INSTRUCTIONS
PM 6666 - OPERATORS MANUAL


