87V MAX
Calibration Information
20
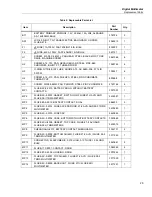
Disassembling the Meter
To disassemble the Meter:
1. Use a Philips screwdriver to remove the six battery-door screws (H1).
2. Lift the battery door (MP1) at the top end of the Meter and remove it from the
case back.
3. Remove three AA batteries.
4. Remove the fuse access door (MP4).
5. Remove the fuse cap (MP5).
6. Use a Philips screwdriver to remove the bottom-case screws (H2) with their
0-rings (H3).
7. Separate the bottom case (MP6) from the top case (MP19).
8. Use a Philips screwdriver to remove the bottom-shield screw (H4).
9. Remove the bottom shield (MP9) from the Meter.
10. Use a Philips screwdriver to remove four PCA input screws (H5).
11. Use a Philips screwdriver to remove six PCA screws (H4) from the board.
12. Remove the PCA from the top case.
13. Remove the top shield (MP13) from the top case.
14. Remove the elastomeric (MP10) from the top shield.
15. Unsnap mask (MP15) from the top shield (MP13).
16. Remove the LCD (DS1) from the top shield.
17. Remove the backlight (MP14) from the top shield.
18. Remove the keypad (MP18) from the top case.
19. Remove the RSOB spacer (MP16) from the top case.
20. Remove the E-clip holding the spring detent (MP17) from the top case.
21. Remove the sprint detent from the top case.
22. Remove the knob (MP20) from the top case.
Содержание 87V MAX
Страница 26: ...87V MAX Calibration Information 26 ...


