background image


Infusion Device Analyzer 


Product Operation 

13 

Occlusion Tests 

To do an occlusion test: 

1. Select 

Occlusion

 from the Start menu. 

2.  Complete the fields on the Occlusion Information screen. See the 

How to Set 

Up for a Test

 section in this manual. 

3. Touch 

Next

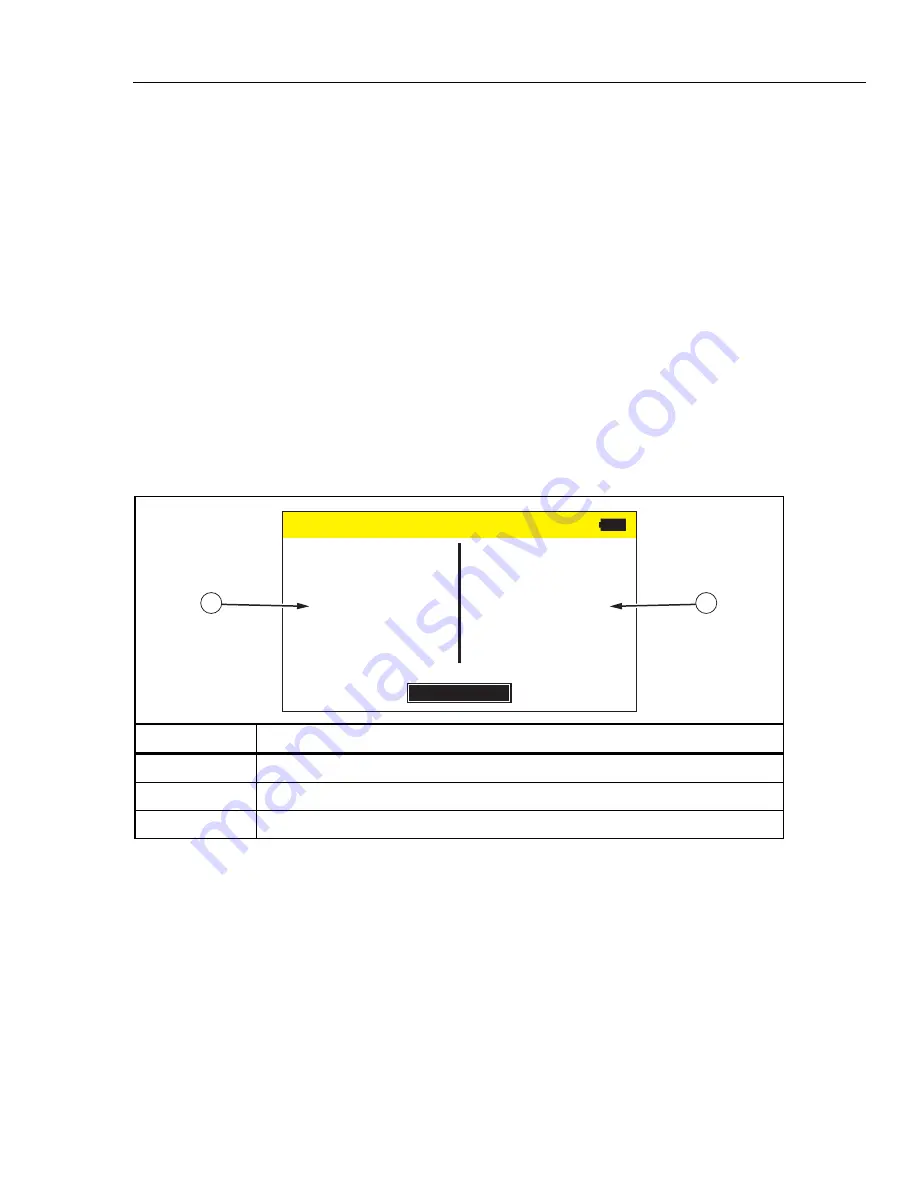
 and follow the on-screen instructions. See Table 6 for an 

example of the Occlusion Measurement screen. 

4.  When the test is complete, touch 

End

. The Product prompts you to save the 

results. 

Note 

You must remove the tube from the occlusion inlet, before you touch 
ZERO to make sure that the Product senses the pressure correctly. 

The initial display shows the pressure field is 0 (zero). The units of pressure 
display as selected on the User Preferences screen. See the 

Utilities

 section 

in this manual. 

Table 6. Occlusion Measurement Screen 

7.05

INST PRESSURE 

(mmHg)

OCCLUSION

END

8.05

PEAK PRESSURE

(mmHg)

TIME OF PEAK

00:05:49

ELAPSED TIME

00:06:52

2

1


hqf08.eps

Item Description 


The current pressure detected by the Product.  


The peak pressure and the time the pressure was detected. 

End 

Stops the test. The Product prompts you to save the test. 

Содержание 4468525

Страница 1: ...014 Rev 2 10 14 2014 Fluke Corporation All rights reserved Specifications are subject to change without notice All product names are trademarks of their respective companies IDA 1S Infusion Device Ana...

Страница 2: ...ke Biomedical service facility NO OTHER WARRANTIES SUCH AS FITNESS FOR A PARTICULAR PURPOSE ARE EXPRESSED OR IMPLIED FLUKE SHALL NOT BE LIABLE FOR ANY SPECIAL INDIRECT INCIDENTAL OR CONSEQUENTIAL DAMA...

Страница 3: ...ative Returns and Repairs Return Procedure All items being returned including all warranty claim shipments must be sent freight prepaid to our factory location When you return an instrument to Fluke B...

Страница 4: ...esult in electrical shock hazards or improper operation Fluke Biomedical will not be responsible for any injuries sustained due to unauthorized equipment modifications Restrictions and Liabilities Inf...

Страница 5: ...ces 9 How to Set Up for a Test 9 Flow Tests 11 Occlusion Tests 13 Utilities 14 Recall Tests 14 User Preferences 15 View Settings 16 Set Clock 16 Report Heading 16 Instructions 16 Calibration History 1...

Страница 6: ...IDA 1S Users Manual ii...

Страница 7: ...l Controls and Indicators 5 3 Side Panel Connections 6 4 Information Screen 10 5 Flow Measurement Screen 11 6 Occlusion Measurement Screen 13 7 Recall Tests Screen 14 8 User Preferences Screen 15 9 Bu...

Страница 8: ...IDA 1S Users Manual iv...

Страница 9: ...v List of Figures Figure Title Page 1 Front Panel Controls and Indicators 4 2 Side Panel Connections 6 3 Infusion Device Connections to the Product 7 4 Drain Connections to the Product 8...

Страница 10: ...IDA 1S Users Manual vi...

Страница 11: ...te performance of infusion devices through measurement of flow volume and pressure The performance of a wide range of infusion devices can be analyzed including syringe drop counting peristaltic and v...

Страница 12: ...indicator shows to prevent incorrect measurements Carefully read all instructions Do not touch voltages 30 V ac rms 42 V ac peak or 60 V dc Do not use the Product around explosive gas vapor or in dam...

Страница 13: ...ature limits see the Specifications section Do not use the Product in close proximity to sources of strong electromagnetic radiation for example unshielded intentional RF sources These sources may int...

Страница 14: ...A 1S Users Manual 4 Instrument Familiarization Figure 1 and Table 2 show the controls and indicators on the front panel of the Product 1 2 3 4 5 6 hqf01 eps Figure 1 Front Panel Controls and Indicator...

Страница 15: ...ion Integrated Carrying Handle Touch Display LCD Charging Indicator Illuminates when the battery is charging Power On Indicator Green Operating on ac power using the charger Orange Operating on batter...

Страница 16: ...el of the Product 1 2 3 4 5 hqf02 eps Figure 2 Side Panel Connections Table 3 Side Panel Connections Item Description Power Input for Battery Charger Power Supply 9 V dc USB Port Computer connection F...

Страница 17: ...ide panel also has the connections for drain hoses and accessories Connect Infusion Devices Figure 3 shows the Product connected for a flow test with a 20 ml syringe attached to one 3 way stopcock inl...

Страница 18: ...t the tubing the syringe and stopcocks make sure it is within the specified use period of the manufacturer Many sets are made to be used only once Connect Drains Figure 4 shows a drain tube connected...

Страница 19: ...t is ready to use 2 Touch PRESS TO PROCEED The Start menu has these options Flow Occlusion Utilities Shut Down Preferences Before you use the Product for the first time set your preferences for displa...

Страница 20: ...m of 20 characters VOLUME The amount of fluid intended to be supplied during the test in ml A maximum of 20 characters BACK Return to the previous screen NEXT Advance to the next screen CLEAR Clear al...

Страница 21: ...instantaneous current flow rates The deviation of the average flow rate from the set flow rate The prime indicator When the Product senses fluid in the measuring tube the prime indicator is blue If th...

Страница 22: ...the flow As an alternative touch Start to start the test immediately 0 00 0 00 VOLUME ml DEVIATION 0 00 AVE FLOW RATE ml hr 0 00 INST FLOW RATE ml hr FLOW AUTO START START END ELAPSED TIME 00 00 00 h...

Страница 23: ...e You must remove the tube from the occlusion inlet before you touch ZERO to make sure that the Product senses the pressure correctly The initial display shows the pressure field is 0 zero The units o...

Страница 24: ...select an individual test touch anywhere on the line of the test The Product displays the final test result in the same layout as the end screen for that test Table 7 Recall Tests Screen RECALL TESTS...

Страница 25: ...nits to display Options are mmHg psi Bar kPa Beep Volume Sets the volume of the alert beep Touch or to change the volume Display Brightness Sets the brightness of the LCD screen Touch or to change the...

Страница 26: ...medical recommends using the first line for the name of the establishment Touch a line and use the on screen keyboard to enter up to 20 characters per line Touch Utilities to return to the Utilities m...

Страница 27: ...al to prime the product Degassing of the test fluid For longer flow tests let the test fluid become stable to room temperature before use Table 10 Air Lock Errors Possible causes Solution Incorrect ar...

Страница 28: ...nlight Do not short the battery terminals together Do not keep cells or batteries in a container where the terminals can be shorted Remove the input signals before you clean the Product Use only speci...

Страница 29: ...Fluid Inlet Port After 5 minutes flush with clean water Always pass water from the fluid inlets to the outlets Replaceable Parts Table 11 lists the replaceable parts for the Product Table 11 Replacea...

Страница 30: ...e a 0 05 dilution MICRO 90 is available from International Product Corp 201 Connecticut Dr P O Box 70 Burlington NJ 08016 0070 USA Tel 609 386 8770 also International Product Corp 1 Church Row Chistle...

Страница 31: ...esults stored for later viewing printing or transfer to PC Typical practical capacity 100 tests Power Down The results of tests in progress will be saved in the case of accidental power down Computer...

Страница 32: ...IDA 1S Users Manual 22...

Отзывы: