background image

3

Description of the Controls and Jacks on the Main Unit

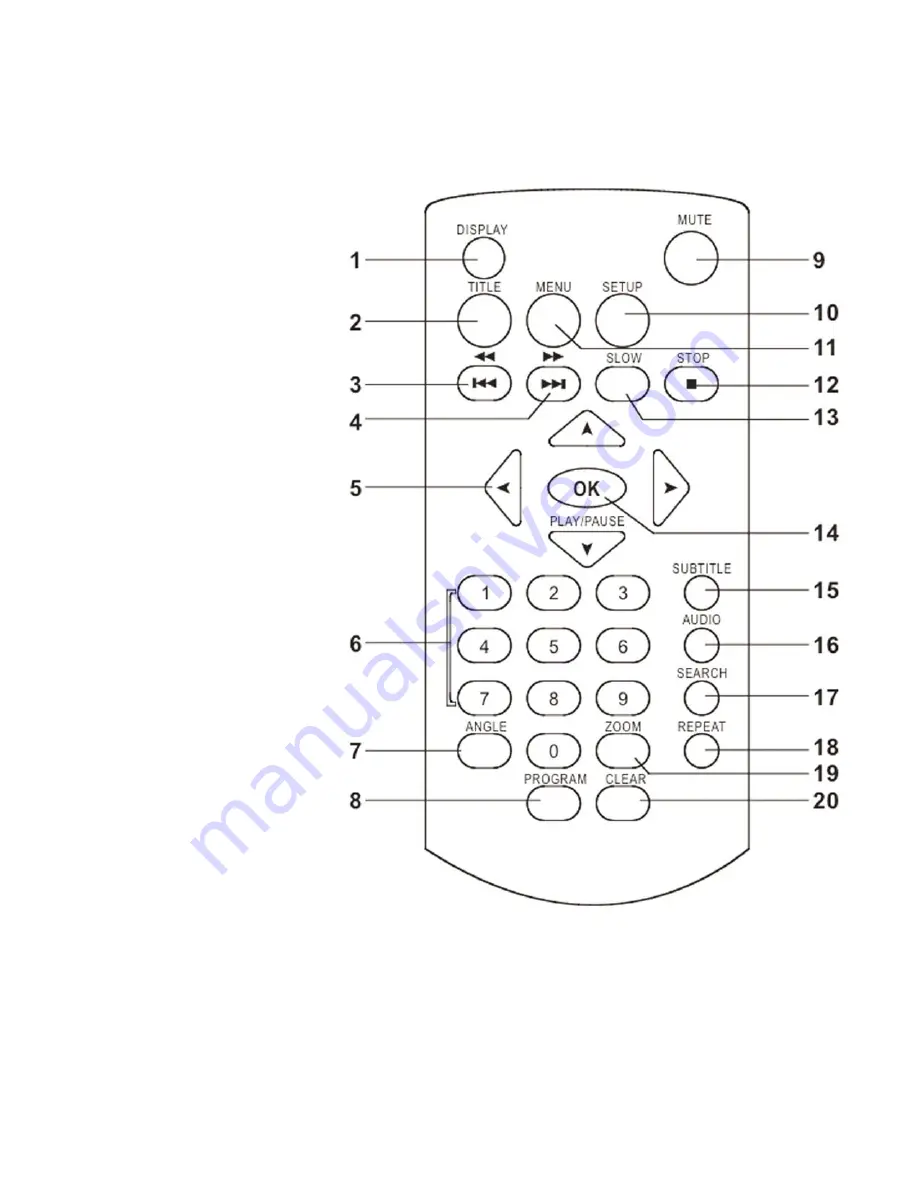
Remote control unit

1. DISPLAY button
2. TITLE button
3. PREV&REW button
4. NEXT& F.FWD button
5. NAVIGATION buttons
6. NUMERIC buttons
7. ANGLE button
8. PROGRAM button
9. MUTE button
10. SETUP button
11. MENU button
12. STOP button
13. SLOW button
14. OK (PLAY/PAUSE) button
15. SUBTITLE button
16. AUDIO button
17. SEARCH button
18. REPEAT button
19. ZOOM button
20. CLEAR button

Содержание 1607001

Страница 1: ...e DVD Boombox with 7 LCD Display Owner s Manual 1607001 Before attempting to connect operate or adjust this player please read these instructions completely Keep this manual in a safe place for future reference ...

Страница 2: ...T 13 FAST BACKWARD BUTTON 14 STOP BUTTON 15 SPEAKERS 16 MIC SOCKET 17 MIC LEVEL 18 USB PORT 19 LCD DISPLAY 20 HANDLE 21 POWER INDICATOR 22 REMOTE SENSOR 23 FM STEREO INDICATOR 24 FM TELESCOPIC ANTENNA 25 VIDEO OUTPUT JACK 26 AUDIO RIGHT JACK 27 AC SOCKET 28 HEADPHONE JACK 29 BATTERY COMPARTMENT 30 AC VOLTAGE SELECTOR for dual voltage version and at bottom of unit not applicable to all models 31 DI...

Страница 3: ...n 3 PREV REW button 4 NEXT F FWD button 5 NAVIGATION buttons 6 NUMERIC buttons 7 ANGLE button 8 PROGRAM button 9 MUTE button 10 SETUP button 11 MENU button 12 STOP button 13 SLOW button 14 OK PLAY PAUSE button 15 SUBTITLE button 16 AUDIO button 17 SEARCH button 18 REPEAT button 19 ZOOM button 20 CLEAR button ...

Страница 4: ... so that air can circulate freely Read through the instructions before connecting other equipment Ensure that you observe the colour coding when connecting audio and video cables Note During DVD play the TV volume may be at a lower level than during TV broadcasts If this is the case adjust the volume to the desired level If the DVD CD player is connected to the TV through a video cassette recorder...

Страница 5: ...ion When connecting to a stereo TV set Connecting microphone and headphone Connect the microphone 1 Connect one microphone to MIC jack 2 Adjust the MIC Volume to desired level 3 Connect one headphone to headphone jack ...

Страница 6: ...SKIP or PREV SKIP button once during play to skip a chapter DVD or a track CD forward or backwards RAPID ADVANCE REWIND During playback press F FWD button or REW button several times to scan the disc forward or backward at X2 X4 X8 X20 normal speed Press PLAY button to resume normal play STOP PLAYBACK Press STOP button during playback to stop playback the player will activate the resume function w...

Страница 7: ...esired Titles Chapters numbers with the numeric buttons Note Inputting leading zero is not necessary If the chapter title track number is greater than 10 press the first digit and then the next digit Example Track 3 press 3 Track 12 press 1 and then 2 Track 21 press 2 and then 1 3 To start programmed playback select PLAY on the menu press PROGRAM button again to exit programming 4 To clear programm...

Страница 8: ...hanges with the current soundtrack number shown on the TV screen NOTE If no soundtrack languages are recorded this button will not function MULTI ANGLE VIEWING DVD ONLY Press ANGLE button during playback to display the number of angles being played and then select a desired angle to view the scene Note Only DVDs shot with multi angle scenes have this function CHANGING SUBTITLE LANGUAGE DVD ONLY Pr...

Страница 9: ...e the navigation buttons to select the desired folder and then press OK button to confirm The files in this folder are displayed and you can select your favourite pictures using the up down navigation buttons and press OK button to start playback Previews of the pictures will be displayed while you scroll across the filenames KODAK PICTURE CD JPEG CD OPERATIONS 1 PLAY MODES Press REPEAT button during...

Страница 10: ...IDE SHOW TRANSITION MODES During slide show playback press the PROGRAM button to scroll through the following modes of play WIPE TOP WIPE BOTTOM WIPE LEFT WIPE RIGHT DIAGONAL WIPE LEFT TOP DIAGONAL WIPE RIGHT TOP DIAGONAL WIPE LEFT BOTTOM DIAGONAL WIPE RIGHT BOTTOM EXTEND FROM CENTER H EXTEND FROM CENTER V COMPRESS TO CENTER H COMPRESS TO CENTER V WINDOW H WINDOW V WIPE FROM EDGE TO CENTER RANDOM ...

Страница 11: ...rs USB mode The display shows READING on the LCD and after the USB is successfully detected and read the track numbers as a total shows on the screen Press PLAY PAUSE button to begin playback from track Number 1 NOTE The player can successfully play the music files with USB 1 0 and USB 2 0 storage device OR Insert an SD MMC card into the card slot Press MODE button on the main unit continuously unt...

Страница 12: ...elect the LCD MODE Options 4 3 16 9 1 3 TV TYPE used to select the TV scan mode please set as per your TV set Options 4 3PS Normal Pan scan mode 4 3LB normal Letter box mode 16 9 16 9 wide screen mode 1 4 PASSWORD input password to unlock the system The steps are as follows 1 4 1 Enter SYSTEM SETUP select the PASSWORD item by scrolling with the down navigation button and then press the right navig...

Страница 13: ...IO LANG Select preferred audio language DVD only need disc software support 2 3 SUBTITLE LANG Select preferred subtitle language DVD only need disc software support 2 4 MENU LANG Select preferred disc menu language DVD only need disc software support 3 VIDEO SETUP 3 1 BRIGHTNESS to set the brightness for the display Options 0 2 4 6 8 10 12 3 2 CONTRAST to set the contrast effect for display Option...

Страница 14: ...n is heard 5 Adjust the volume level to a comfortable listening level 6 To turn off the radio slide the FUNCTION switch to OFF position NOTES If a particular FM STEREO station is weak or you hear too much background noise try moving the position of the band selector switch to the FM MONO position This can often result in a much clearer reception When the band selector switch is set to FM STEREO an...

Страница 15: ...ection properly The battery may be drained Replace with a new one Check that the signal transmission is directed at the remote control sensor on the DVD player Remove any obstacle between the remote controller and remote control sensor No picture or sound Check that the A V cables are securely connected Check that the disc is a DVD region number 1 or all DVD RW or AUDIO CD Do not use a disc that h...

Страница 16: ...n tested and found to comply with the limits for a Class B digital device pursuant to Part 15 of the FCC Rules These limits are designed to provide reasonable protection against harmful interfer ence in a residential installation This equipment generates uses and can radiate radio frequency energy and if not installed or used in ac cordance with the instructions may cause harmful interference to r...

Отзывы: