16
U-Type
®
Secondary Cleaner
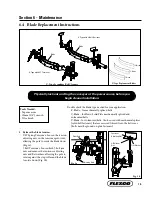
3. Install the new blade.
a.
Center the blade in the holder (Fig. 3).
b. Tighten all plate retaining screws.
c. Tighten blade retaining screws 8 turns and tighten the blade
retaining screw locknuts (Fig 3).
5. Inspect for full blade contact to the belt. Important - Always be
sure there is uniform contact between the blade and the belt. If the
blade is not in full contact with the belt at the edges and center, raise
or lower the pole position of the cleaner and reapply the tension (See
Installation Instructions).
Section 6 - Maintenance
2. Remove the worn blade.
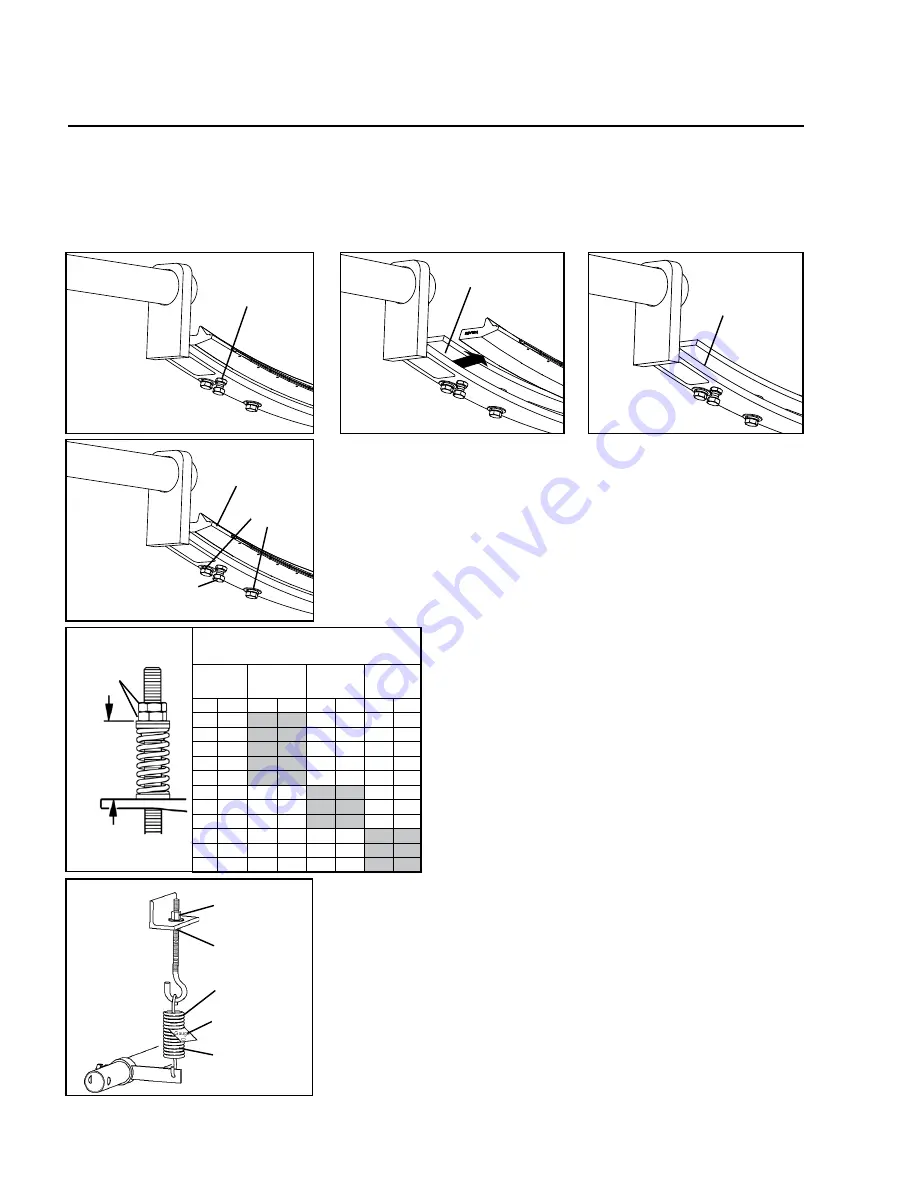
a. Loosen both locknuts on the blade retaining screws. Turn blade retaining screws out 8 turns (Fig. 2a).
b. Loosen or remove all plate retaining screws.
c. From one end, insert a screwdriver under the blade and lightly pry the blade up and out of the blade
holder (Fig. 2b). Once the blade breaks free, pull it out by hand.
c. Remove the blade from the holder and clean material buildup from holder with a wire brush (Fig. 2c).
Clean buildup
from blade holder
Loosen both
locknuts and blade
retaining screws
Insert
screwdriver,
pry blade up
Fig. 2a
Fig. 2b
Fig. 2c
Tighten both blade
retaining screws
and locknuts
Plate
retaining
screws
Center new blade
in blade holder
Fig. 3
Tensioner
Adjusting Nut
J Bolt Jam Nut
Tension Spring
Clearance .030"
between coils
Fig. 4b
Spring Tension
Gauge
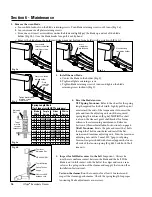
4. Reset the blade tension.
UST Spring Tensioner: Refer to the chart for the spring
length required for the belt width. Lightly pull the pivot
arm toward the end of the torque arm slot nearest the
pole and turn the adjusting nuts until the required
spring length is achieved (Fig. 4a). NOTE: The chart
is also on the cleaner’s pivot shaft bracket for future
reference for retensioning maintenance. Reference
Section 4 (Cleaner Installation Instructions) on page 6.
J-Bolt Tensioner: Rotate the pole and insert the J bolts
through the J bolt mount holes and install the flat
washers and tensioner adjusting nuts. Turn the tensioner
adjusting nuts until a .7mm (.030”) gap (use Spring
Tension Gauge included with cleaner) appears between
all coils of the tension spring (Fig. 4b). Lock both J bolt
jam nuts.
Test run the cleaner. Run the conveyor for at least 15 minutes and
inspect the cleaning performance. Check the spring length for proper
tensioning. Make adjustments as necessary.
Top of
washer
to top of
torque arm
Adjusting
Nuts
Spring Length Chart
(for Cleaners with UST Tensioners)
Blade
Width
Purple
Spring
Silver
Spring
White
Spring
mm
in.
mm
in.
mm
in.
mm
in.
450
18
154
6 1/8
160
6 3/8
162
6 3/8
600
24
148
5 7/8
148
6 1/4
160
6 1/4
750
30
140
5 1/2
156
6 1/8
158
6 1/4
900
36
136
5 3/8
152
6
156
6 1/8
1050
42
128
5
150
5 7/8
154
6 1/8
1200
48
N/A
N/A
146
5 3/4
152
6
1350
54
N/A
N/A
142
5 5/8
150
5 7/8
1500
60
N/A
N/A
140
5 1/2
150
5 7/8
1800
72
N/A
N/A
N/A
N/A
140
5 1/2
2100
84
N/A
N/A
N/A
N/A
136
5 3/8
2400
96
N/A
N/A
N/A
N/A
132
5 1/4
Fig. 4a


