background image

17

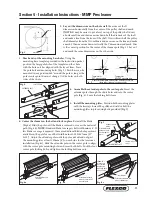
3.  Install the new blade.


Slide the new blade onto the pole, 

locking it into the far blade pin, then reinstall the removed 

blade pin, washer and clip (Fig. 3).

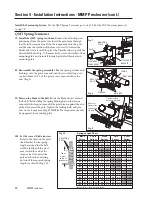
4.  Reset the correct blade tension. Refer to the chart for the 

spring length/PSI required for the belt width. For QMT lightly 

pull the pivot arm toward the end of the torque arm slot 

nearest the pole and turn the adjusting nuts until the required 

spring length is achieved (Fig. 4).

NOTE: The chart is also on the cleaner’s pivot shaft bracket for 

future reference for retensioning maintenance.

Fig. 3

Test run the cleaner. Run the conveyor for at least 15 minutes and inspect the cleaning performance. Check the 

spring length for proper tensioning. Make adjustments as necessary.

Slide blade 

into far side 

blade pin

Section 6 -  Maintenance (cont.)

Spring Length Chart

Blade 

Width

Purple 

Springs

White 

Springs

Gold 

Springs

Silver 

Springs

mm

in.

mm

in.

mm

in.

mm

in.

mm

in.

450

18"

117

4 5/8"

152

6"

159

6 1/4"

6 1/2"

600

24"

102

4"

149

5 7/8"

159

6 1/4"

162

6 3/8"

750

30"

N/A

N/A

143

5 5/8"

156

6 1/8"

162

6 3/8"

900

36"

N/A

N/A

140

5 1/2"

152

6"

159

6 1/4"

1050

42"

N/A

N/A

133

5 1/4"

149

5 7/8"

159

6 1/4"

1200

48"

N/A

N/A

130

5 1/8"

146

5 3/4"

155

6 1/8"

1350

54"

N/A

N/A

124

4 7/8"

143

5 5/8"

155

6 1/8"

1500

60"

N/A

N/A

121

4 3/4"

143

5 5/8"

155

6 1/8"

1650

66"

N/A

N/A

N/A

N/A

140

5 1/2"

152

6"

1800

72"

N/A

N/A

N/A

N/A

137

5 3/8"

152

6"

1950

78"

N/A

N/A

N/A

N/A

133

5 1/4"

149

5 7/8"

2100

84"

N/A

N/A

N/A

N/A

130

5 1/8"

149

5 7/8"

2150

90"

N/A

N/A

N/A

N/A

N/A

N/A

146

5 3/4"

2400

96"

N/A

N/A

N/A

N/A

N/A

N/A

143

5 5/8"

2550

102"

N/A

N/A

N/A

N/A

N/A

N/A

140

5 1/2"

2700

108"

N/A

N/A

N/A

N/A

N/A

N/A

140

5 1/2"

2850

114"

N/A

N/A

N/A

N/A

N/A

N/A

137

5 3/8"

Shading indicates preferred spring option.

Fig. 4

Top of 

washer 

to top of 

torque arm

ADJUSTING 

NUTS

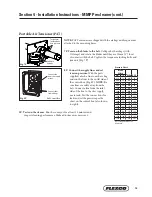
Pressure Chart

Blade  

Width

MPa PSI*

mm.

in.

450

18"

.034

5#

600

24"

.041

6#

800

32"

.055

8#

900

36"

.062

9#

1050

42"

.076

11#

1200

48"

.090

13#

1350

54"

.097

14#

1500

60"

.110

16#

1650

66"

.117

17#

1800

72"

.131

19#

1950

78"

.145

21#

2100

84"

.152

22#

2250

90"

.165

24#

2400

96"

.172

25#

2550

102"

.186

27#

2700

108"

.193

28#

2850

114"

.207

30#

* PSI setting is based on the  

belt width.

Содержание MMP Precleaner

Страница 1: ...www flexco com Installation Operation and Maintenance Manual MMP Precleaner...

Страница 2: ...ation Date Serial number information can be found on the Serial Number Label included in the Information Packet found in the cleaner carton This information will be helpful for any future inquiries or...

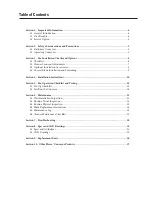
Страница 3: ...stallation and Tensioning 9 Section 4 Installation Instructions 10 Section 5 Pre Operation Checklist and Testing 14 5 1 Pre Op Checklist 14 5 2 Test Run the Conveyor 14 Section 6 Maintenance 15 6 1 Ne...

Страница 4: ...other Flexco locations and products Please read this manual thoroughly and pass it on to any others who will be directly responsible for installation operation and maintenance of this cleaner While w...

Страница 5: ...any takeups Clear the conveyor belt or clamp securely in place Use Personal Protective Equipment PPE Safety eyewear Hardhats Safety footwear Close quarters springs and heavy components create a works...

Страница 6: ...s are included Review the Tools Needed list on the top of the installation instructions Check the conveyor site Will the cleaner be installed on a chute Is the install on an open head pulley requiring...

Страница 7: ...n dimensions We can now determine two of the three required dimension which will allow us to find the third We know we cannot alter the C dimension so this will remain the same Also we are required to...

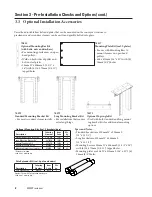
Страница 8: ...5 8 11 tapped holes 76537 Mounting Plate Kit incl 2 plates For use with Mounting Bars to mount cleaners on open head pulleys 406 x 813mm 16 x 32 with 4 16mm 5 8 holes Hardware Included Lead time 1 wor...

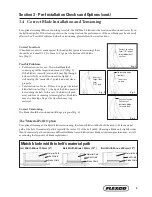
Страница 9: ...t contact Fig 3 the tip of the blade may not be touching the belt In this case the blade will push away and lose its shearing cleaning effect The blade may also develop a flap at the tip which may tra...

Страница 10: ...Needed X Y Chart for Pole Location A X Y C 400 204 305 367 425 218 305 375 450 231 305 383 475 244 305 390 500 259 305 400 525 274 305 410 550 288 305 419 575 300 305 428 600 315 305 438 625 328 305 4...

Страница 11: ...ed Fig 5 2 Lay out the dimensions on the chute wall Measure out the X dimension horizontally from the center of the pulley shaft and mark NOTE It may be easier to put a level on top of the pulley shaf...

Страница 12: ...orrect blade tension Refer to the chart on the pivot shaft bracket for the spring length required for the belt width Lightly pull the pivot arm toward the end of the torque arm slot nearest the pole a...

Страница 13: ...air tank Test the connections for leaks and set the pressure per the chart on the control box also shown to right 9P Test run the cleaner Run the conveyor for at least 15 minutes and inspect cleaning...

Страница 14: ...ssary Recheck that all fasteners are tightened properly Add pole caps Apply all supplied labels to the cleaner Check the blade location on the belt Be sure that all installation materials and tools ha...

Страница 15: ...are areas that are dirty If the blade is worn out and needs to be replaced If there is damage to the blade or other cleaner components If fugitive material is built up on the cleaner or in the transf...

Страница 16: ...an all fugitive material from the pole NOTE If blade is hard to remove use a screwdriver or hammer to loosen it and then remove PHYSICALLY LOCK OUT AND TAG THE CONVEYOR AT THE POWER SOURCE BEFORE YOU...

Страница 17: ...1 4 6 1 2 600 24 102 4 149 5 7 8 159 6 1 4 162 6 3 8 750 30 N A N A 143 5 5 8 156 6 1 8 162 6 3 8 900 36 N A N A 140 5 1 2 152 6 159 6 1 4 1050 42 N A N A 133 5 1 4 149 5 7 8 159 6 1 4 1200 48 N A N A...

Страница 18: ..._ Service Quote ___________________ Activity ______________________________________________________________________________________ _____________________ Date ___________________ Work done by ________...

Страница 19: ..._____ Right _________ Blade condition Good Grooved Smiled Not contacting belt Damaged Measurement of spring Required _________ Currently _________ Was Cleaner Adjusted Yes No Pole Condition Good Bent...

Страница 20: ...r damage to blade Mechanical splice damaging blade Repair skive or replace splice Belt damaged or ripped Repair or replace belt Cleaner not correctly located Verify C dimension relocate to correct dim...

Страница 21: ...428 600 315 305 438 625 328 305 448 650 341 305 457 675 353 305 467 700 366 305 476 725 380 305 487 775 392 305 497 775 403 305 506 825 417 305 517 825 432 305 528 850 444 305 539 875 457 305 549 900...

Страница 22: ...LE LENGTH C in mm ORDER NUMBER ITEM CODE 24 600 18 450 24 600 78 1950 MMP 624 76450 30 750 24 600 30 750 84 2100 MMP 630 76451 36 900 30 750 36 900 90 2250 MMP 636 76452 42 1050 36 900 42 1050 96 2400...

Страница 23: ...485 30 750 84 2100 MMP 630P 78707 MMPCP30 76459 TRB24 76486 36 900 90 2250 MMP 636P 78708 MMPCP36 76460 TRB30 76487 42 1050 96 2400 MMP 642P 78709 MMPCP42 76461 TRB36 76488 48 1200 102 2550 MMP 648P 7...

Страница 24: ...6a 7a 8 9 for blades 750 1200mm 30 48 QMT W 76075 9 9 QMT Spring Tensioner Gold incl 1 ea Items 5 6b 7b 8 9 for blades 1350 1950mm 54 78 QMT G 76483 10 5 10 Air Water Bag 1 ea AWTB 75905 1 7 11 Mounti...

Страница 25: ......

Страница 26: ......

Страница 27: ...y Reduction Technology to better protect the belt Slide Out Service gives direct access to all impact bars for change out Impact bar supports for longer bar life 4 models to custom fit to the applicat...

Страница 28: ...rldwide through superior service and innovation 236 Albert Amon Rd Meadowdale Ext 7 Germiston 1614 South Africa Tel 27 11 608 4180 Fax 27 11 454 5821 E mail flexco flexco co za Visit www flexco com fo...

Отзывы: