12
MMP Precleaner
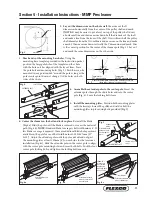
8S. Reassemble the spring assembly. Slide the spring, washer and
bushings onto the pivot arm and turn the two adjusting nuts
so about 6mm (1/4") of the pivot arm is exposed above the
nuts (Fig. 8).
7S. Install the QMT spring tensioner. Remove the adjusting nuts
and springs from the pivot rod. Insert the pivot arm through
the slot in the torque arm. Slide the torque arm onto the pole
end (be sure the rotation of the arm is correct to tension the
blade) and rotate it until the pivot shaft bracket lines up with the
desired bolt holes (Fig. 7). Remove bolts, nuts and washers from
mounting plate and reinstall through pivot shaft bracket and
mounting plate.
Fig. 7
Fig. 8
PIVOT ARM
TORQUE ARM
MOUNTING
PLATE
PIVOT SHAFT
BRACKET
POLE
ADJUSTING
NUTS
PIVOT ARM
BUSHINGS
SPRING
WASHER
9S. Tension the blade to the belt. Rotate the blade until it contacts
the belt. While holding the spring bushing flat on the torque
arm, rotate the torque arm until the pivot arm is against the end
of the slot nearest the pole. Tighten the locking bolts and jam
nuts on the torque arm (Fig. 9). NOTE: The torque arm should
be up against the mounting plate.
Fig. 9
Tighten locking
bolts and jam nuts
Pivot arm
against slot
end nearest
the pole
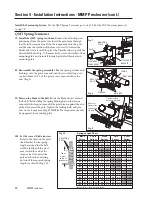
10S. Set the correct blade tension.
Refer to the chart on the pivot
shaft bracket for the spring
length required for the belt
width. Lightly pull the pivot
arm toward the end of the
torque arm slot nearest the
pole and turn the adjusting
nuts until the required spring
length is achieved (Fig. 10).
Install the Tensioning System.
For the QMT Spring Tensioner go to step 7S. For the PAT Tensioner proceed
to step 7P.
QMT Spring Tensioner
Section 4 - Installation Instructions - MMP Precleaner (cont.)
Spring Length Chart
Blade
Width
Purple
Springs
White
Springs
Gold
Springs
Silver
Springs
mm
in.
mm
in.
mm
in.
mm
in.
mm
in.
450
18"
117
4 5/8"
152
6"
159
6 1/4"
6 1/2"
600
24"
102
4"
149
5 7/8"
159
6 1/4"
162
6 3/8"
750
30"
N/A
N/A
143
5 5/8"
156
6 1/8"
162
6 3/8"
900
36"
N/A
N/A
140
5 1/2"
152
6"
159
6 1/4"
1050
42"
N/A
N/A
133
5 1/4"
149
5 7/8"
159
6 1/4"
1200
48"
N/A
N/A
130
5 1/8"
146
5 3/4"
155
6 1/8"
1350
54"
N/A
N/A
124
4 7/8"
143
5 5/8"
155
6 1/8"
1500
60"
N/A
N/A
121
4 3/4"
143
5 5/8"
155
6 1/8"
1650
66"
N/A
N/A
N/A
N/A
140
5 1/2"
152
6"
1800
72"
N/A
N/A
N/A
N/A
137
5 3/8"
152
6"
1950
78"
N/A
N/A
N/A
N/A
133
5 1/4"
149
5 7/8"
2100
84"
N/A
N/A
N/A
N/A
130
5 1/8"
149
5 7/8"
2150
90"
N/A
N/A
N/A
N/A
N/A
N/A
146
5 3/4"
2400
96"
N/A
N/A
N/A
N/A
N/A
N/A
143
5 5/8"
2550
102"
N/A
N/A
N/A
N/A
N/A
N/A
140
5 1/2"
2700
108"
N/A
N/A
N/A
N/A
N/A
N/A
140
5 1/2"
2850
114"
N/A
N/A
N/A
N/A
N/A
N/A
137
5 3/8"
Shading indicates preferred spring option.
Fig. 10
Top of
washer
to top of
torque arm
ADJUSTING
NUTS
Содержание MMP Precleaner
Страница 1: ...www flexco com Installation Operation and Maintenance Manual MMP Precleaner...
Страница 25: ......
Страница 26: ......


