


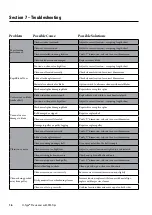

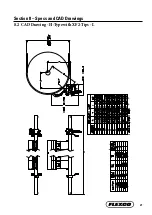
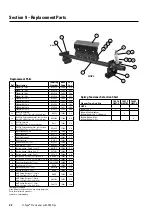


11
Flexco® belt cleaners are designed to operate with minimum maintenance. However, to maintain superior
performance some service is required. When the cleaner is installed a regular maintenance program should be set
up. This program will ensure that the cleaner operates at optimal efficiency and problems can be identified and fixed
before the cleaner stops working.
All safety procedures for inspection of equipment (stationary or operating) must be observed. The H-Type®
Precleaner operates at the discharge end of the conveyor and is in direct contact with the moving belt. Only visual
observations can be made while the belt is running. Service tasks can be done only with the conveyor stopped and by
observing the correct lockout/tagout procedures.
6.1 New Installation Inspection
After the new cleaner has run for a few days a visual inspection should be made to ensure the cleaner is
performing properly. Make adjustments as needed.
6.2 Routine Visual Inspection (every 2-4 weeks)
A visual inspection of the cleaner and belt can determine:
• If the spring length is the correct length for optimal tensioning.
• If the belt looks clean or if there are areas that are dirty.
• If the blade is worn out and needs to be replaced.
• If there is damage to the blade or other cleaner components.
• If fugitive material is built up on the cleaner or in the transfer area.
• If there is cover damage to the belt.
• If there is vibration or bouncing of the cleaner on the belt.
• If a snub pulley is used, a check should be made for material buildup on the pulley.
If any of the above conditions exist, a determination should be made on when the conveyor can be stopped
for cleaner maintenance.
6.3 Routine Physical Inspection (every 6-8 weeks)
When the conveyor is not in operation and properly locked and tagged out a physical inspection of the
cleaner to perform the following tasks:
• Clean material buildup off of the cleaner blade and pole.
• Closely inspect the blade for wear and any damage. Replace if needed.
• Check both blade pins for proper installation and condition. Replace if needed.
• Ensure full blade to belt contact.
• Inspect the cleaner pole for damage.
• Inspect all fasteners for tightness and wear. Tighten or replace as needed.
• Replace any worn or damaged components.
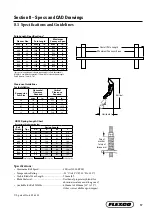
• Check the tension of the cleaner blade to the belt. Adjust the tension if necessary using the chart on the
cleaner or the one on Page 7.
• When maintenance tasks are completed, test run the conveyor to ensure the cleaner is performing properly.
Section 6 – Maintenance


