-18-
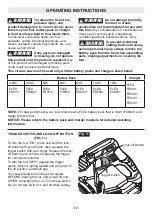
LED LIGHT (FIG. 12)
Your tool is equipped with a LED light, located
behind the upper guard. This provides additional
light on the saw blade and the surface of the
workpiece for operation in lower light areas.The
LED light will automatically turn on with a slight
squeeze on the trigger switch before the tool
starts running. It will turn off approximately 10
seconds after the trigger switch is released.
NOTE: When the tool and/or battery pack
become overloaded or too hot, the internal
sensors will turn the tool off and the LED light
will rapidly flash. Rest the tool for a while or
place the tool and battery pack separately under
air flow for cooling.
The LED light will flash more slowly to indicate
that the battery pack is at low-battery capacity.
Recharge the battery pack.
INTENDED USE
This tool is designed to perform all wood-cutting
applications: general cuts, cross cuts, rip cuts,
and plunge cuts. Only use with wood materials.
NOTICE: The tool is not designed for metal
or masonry cutting.
Dust and chips from those
materials will impact lower guard function.
WARNING
Do not use abrasive
wheels with circular saws.
Abrasive dust may cause lower guard to not
operate properly.
GENERAL CUTS
WARNING
Always be sure that
neither hand interferes
with the free movement of the lower guard.
WARNING
After completing a cut and
releasing the trigger, be
aware of the necessary time it takes for the
blade to come to a complete stop during
coast down. Do not allow the saw to brush
against your leg or side; since the lower
guard is retractable, it could catch on your
clothing and expose the blade. Be aware of
the necessary blade exposures that exist in
both the upper and lower guard areas.
Always hold the saw by the main handle with
one hand and the auxiliary handle with the
other. Maintain a firm grip with both hands
on the saw and position your arms to resist
kickback forces. Position your body to either
side of the blade, but not in line with the blade.
To resume cutting after cutting is interrupted,
press the lock-off button, squeeze the trigger,
and allow the blade to reach full speed, then
re-enter the cut slowly, and resume cutting.
When cutting across the grain, the fibers of
the wood have a tendency to tear and lift. You
can minimize this effect by advancing the saw
slowly. For a finished cut, a cross cut blade or
miter blade is recommended.
Fig. 12
LED Light


