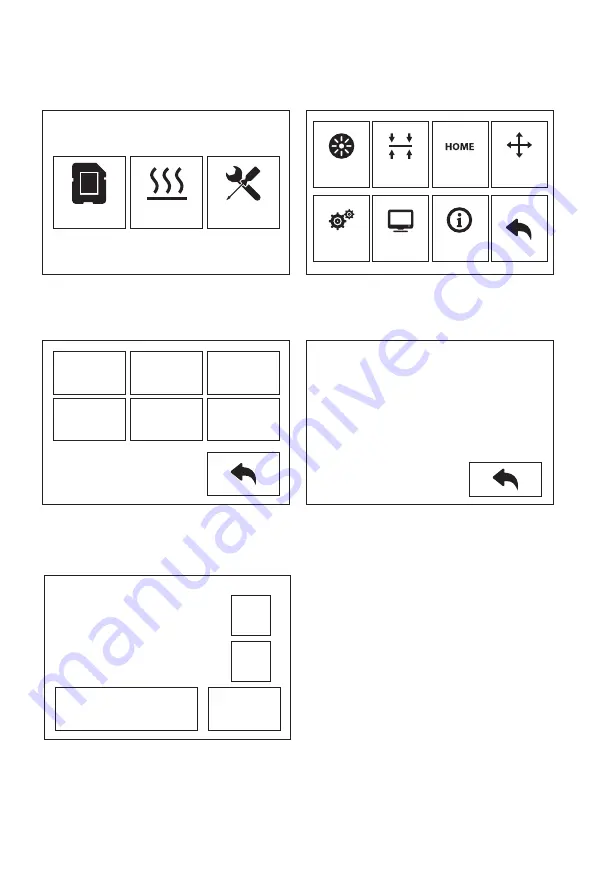
Flashforge Creator Pro 2 Скачать руководство пользователя страница 24

XYZ轴校准

1.

2.

点击【工具】-【设置】-【Z轴校准】。Creator Pro 2 采用补偿层机制,不手动调整左右喷头的
安装位置,而使用程序计算两个喷头的高度差。

Z轴校准,喷头与平台将先回到零位,选择任意喷头进行校准。当喷头与平台温度过高时,将会
等待喷头降温至50℃,以防止喷头烫伤贴纸。

3.

按照屏幕提示:在喷嘴与平台间插入调平卡,请点击 Z-, Z+调整合适的间距。调整幅度为滑动调
平纸,感受到稍有摩擦阻力,说明喷头与平台间距合适;当一个喷头调整完成后将会切换到另一
个喷头进行校准,操作步骤与原先的相同。

注意:Z轴校准过程中请勿旋转平台下方旋钮。

Z轴校准

打印

预热

工具

丝料

设置

调平

状态

回零

关于

手动

Z:0.08

Z-

Z+

确认

Z轴校准

初始化运动...

在喷嘴与平台间插入调平卡,请点击

Z-,Z+ 调整合适的间距

X

校准

Y

校准

Z

校准

专家模式

语言

恢复出厂

设置

23

Содержание Creator Pro 2

Страница 1: ...heating nozzle and heating build plate in operation Moving parts in printer may cause injury Do not wear gloves or other sources of entanglement in operation 1 2 WARNING Please refer to FlashForge o c...

Страница 2: ...nt adhesive tape around the nozzle it has thermal insulation and high temperature resistance characteristics 1 2 3 Open box and remove top foam piece Firmly grasp the two side handles of FlashForge Cr...

Страница 3: ...cover of the printer and take lament out of the lid 8 Hold both sides of the printing platform and slowly lift the platform from the bottom to facilitate the removal of the foam box below 10 Unpackin...

Страница 4: ...put 19 Spool holder 2 Platform support 5 Z axis guide rod 8 Slot 11 Cooling fan 14 Extruder bracket 17 Filament guidetube buckle 20 Power input 3 Leveling nut 6 Extruder cable bunch 9 Nozzle cooling f...

Страница 5: ...Tube Unclogging Pin Tool Grease Glue Stick Stamping Wrench Allen Wrench Top cover SD Card Spool Holder PTFE Tube Filament After sales Service Card Quick Start Guide Scraper Screw Driver Leveling Card...

Страница 6: ...al extruder on the extruder seat Take the M2 5 Allen Wrench from the tool bag and four M3 bolts from the accessory kit Adjust the extruder location to align the bolt holes Secure the extruder onto the...

Страница 7: ...t the end into the corresponding opening 2 Turn down the spool holder to make the holder bottom cleave to the printer back 3 Take a roll of lament then squeeze the spool holder top and mount the lamen...

Страница 8: ...to extend the guide tube to the inside of the spool to prevent the lament from being entangled and being wrapped outside the spool 7 Install top cover for printing ABS remove the top cover for printi...

Страница 9: ...s ejected from the nozzle it indicates that loading is completed 3 Tap unload the extruder starts to heat up After heating to the target temperature manually feed out a part of lament from the nozzle...

Страница 10: ...distance between extruder and platform Gently move the paper and feel the fraction If move the paper with gent fraction it is a suitable distance between extruder and platform Finished the rst place a...

Страница 11: ...nd insert the leveling card between the nozzle and the platform please click Z or Z to adjust the appropriate spacing The adjustment range is sliding leveling paper If you feel a little frictional res...

Страница 12: ...right extruders print a line one by one 3 According to the actual printed lines click X X to adjust the bias of the extruders and remove the printed lines tap the verify button the left and right ext...

Страница 13: ...ibration L 152 200 R 164 200 B 45 50 2 After heating left and right extruders print a line one by one 3 According to the actual printed lines click Y Y to adjust the bias of the extruders and remove t...

Страница 14: ...2 Insert the SD card to the side of machine After installing loading lament and calibrating it start your rst print Tap Print SD card choose the test le to print Print Test sys ashforge Preheat 25MB 1...

Страница 15: ...Creator Pro 2 1 2 1 2 3 4 14...

Страница 16: ...6 5 X 7 8 10 9 15...

Страница 17: ...16 1 4 7 X 10 13 16 USB 19 2 5 Z 8 11 14 17 20 3 6 9 12 15 SD 18 21 1 20 21 16 15 19 18 17 2 3 4 5 8 7 6 13 14 12 9 10 11...

Страница 18: ...3D USB SD 3D CREATORPRO2 PRO2 17...

Страница 19: ...1 M2 5 4 M3 1 2 3 4 18...

Страница 20: ...2 1 2 3 19...

Страница 21: ...1 2 20 ABS PLA 2 3 4 M3x8...

Страница 22: ...1 2 3 75 220 21...

Страница 23: ...1 2 3 22...

Страница 24: ...XYZ 1 2 Z Creator Pro 2 Z 50 3 Z Z Z Z Z 0 08 Z Z Z Z Z X Y Z 23...

Страница 25: ...1 2 X Z X X X 3 X X X X X L 152 200 R 164 200 B 45 50 X Y Z X X X X R L 0 00 X X R L X R L R L 24...

Страница 26: ...1 2 Y X Y Y Y Y 3 Y Y Y Y Y L 152 200 R 164 200 B 45 50 X Y Z Y Y Y 0 00 Y Y R L Y R L Y L R L R 25...

Страница 27: ...1 2 SD SD Test sys ashforge 25MB 1519MB 26...

Страница 28: ...orge com After Sales Service support ashforge com Zhejiang Flashforge 3D Technology Co Ltd 400 886 6023 www sz3dp com 518 Tel 86 579 82273989 Web www ashforge com Add 2 F No 518 Xianyuan Road Jinhua Z...

Отзывы: