background image

FL

AIR

MO ApS 

 Lundeborgvej 3 

 DK-9220 Aalborg 

 Denmark 

Phone: +45 53717220 Web: www.flairmo.dk - E-mail: [email protected] 


Important - read this first! 


Please read the following information and operating instructions 
included with this product before use. This information is for your safety 
and it is important that you follow these instructions. It will also help 
prevent damage to the product. Failure to operate the unit in 
accordance with the instructions or using unauthorized spare parts can 
cause damage to the unit and could cause serious injury. 

 
CAUTION: To reduce risk of electric shock 

• Only authorized service agents should carry out service. Removing 
parts or attempting repairs can create an electric shock. Refer all 
servicing to qualified service agents. 
• If this unit is supplied with a three-pin plug, connect with a properly 
earthed outlet only.


WARNING: To reduce risk of electrocution 

• Do not use this unit with electrical voltages other than stated on the 
rating plate. 
• Always unplug this unit immediately after use, and store in a dry place 
• Do not use this product in or near liquid or where it can fall or be 
pulled into water or other liquids. 
• Do not reach for this product if it has fallen into liquid Unplug 
immediately. 
• This unit is not weatherproof. Never operate outdoors in the rain or in 
a wet area.


DANGER: To reduce risk of explosion or fire 
 

• Do not use this product in or near explosive atmospheres or where 
aerosol products are being used. 
• Do not pump any other gases other than atmospheric air. 
• Do not pump combustible liquids or vapours with this product. 
• Do not use this unit near naked flames. 

 
CAUTION: To prevent injury 

• Compressed air can be dangerous; do not direct airflow at your body. 
• Always keep the compressor out of reach of children. 
• Never operate this product if it has a damaged power lead or plug, if 
it has been dropped or damaged, or if it has fallen into water. Return 
the product to a service centre for examination and repair. 
• Keep the electrical cable away from heat. 
• Never restrict fans. Ensure all openings are kept free of restriction. 
• Never insert fingers or any other objects into fans. 
• This unit is thermally protected and can automatically restart when 
the overload resets. 
• Wear safety glasses when servicing the compressor. 
• Use only in well ventilated areas.


• Do not use any items not recommended for use with compressed air. 
• The surface of the compressor can get hot. Do not touch compressor 
motor during operation. 
• Failure to observe the above safety precautions could result in severe 
bodily injury, including death in extreme cases. 

IMPORTANT: General directions for use 

• Protect compressor against rain, moisture, frost and dust. 
• The OF300 series is constructed and approved for a max. pressure 
as indicated under Technical data 
• Do not operate compressor at ambient temperatures exceeding 
40°C/104°F or falling below 0°C/32°F. 
• If the supply lead on the compressor is defective, an authorized 
FLAIRMO distributor or other qualified personnel must carry out the 
repair. 


Warranty 

Provided that the operational instructions have been carried out, 
your FLAIRMO compressor is guaranteed against faulty material or 
workmanship for 2 years. 
The guarantee does not cover damage caused by violence, misuse, 
incorrect repairs or use of unoriginal spare parts. 
Costs of transportation of parts/equipment are not covered by the 
guarantee. 
In Scandinavia it is NL-92 Terms & Conditions that applies. 
FLAIRMO ApS reserves the right to change technical 
specifications/constructions. 

Contents of box (motor only) 

Your new compressor/vacuum pump should be delivered in 
a clean and undamaged box. If not, contact your distributor 
immediately. The box should contain the following: 
 

Installation (motor only) 

Your FLAIRMO motor is very easy to operate. Observe the 
following simple instructions and you will get many years’ 
service from your motor. 
• Visually inspect unit for shipping damage, contact your 
supplier immediately if you think the unit may have been 
damaged. 

Warning! 
To avoid the risk of electric shock, do not install the 
compressor in areas where it may get in contact with 
water or other liquids. In which case protection is required. 

• Remove the plastic protection from the outlets. 
• Use only pressure pipes tolerating 
a constant temperature of min. 1500C. Ensure that the 
pressure pipes have a sufficient internal diameter to avoid 
pressure loss in the system. Check for leaks. 
• Mount the supplied feet on the compressor  
• It is important that the compressor is mounted vertically to avoid 
damage to the rubber feet. If the compressor is to be mounted in 
another position, please contact FLAIRMO for further information. 
• Sufficient cooling from the surroundings is important. Place the motor 
in a dustfree, dry and cool, yet frostfree, room. Do not install in a closed 
cupboard, unless adequate openings for ventilation are available on top 
and bottom (minimum 500 cm²/77.5 in² each). If the motor is placed 
under a table, a minimum of 10 cm/3 inch free height must be available 
above the motor (fig. 3), or an opening of Ø30cm/11.8 inches, 
corresponding to the top of the motor, may be cut in the table.  
Ensure that the motor stands firmly on the floor. 
• The intake air may be supplied from another place (for  
instance outside).  
Nipple and hose should then be mounted in the thread on the top of the 
intake filter, and led to the external air source. 
Ensure that hoses for the intake are sufficient to avoid  
performance loss.


Electrical installation (motor only) 

Warning! 
Incorrect electrical connection may result in electric 
shock. The electrical connection must be carried out 
in accordance with local electrical regulations and by 
qualified electrical engineers. 
Note! 
Earthing of all AC models must be ensured during 
installation. The capacitor must be earthed, as failure to do 
so may cause electric shock when touched. Plug the motor 
into an earthed socket of nominal voltage and ensure that 
fusing is adequate, see Technical Specifications 
 
AC models 

• For electrical connection, refer to page 7 
• Check motor plate for frequency, voltage and capacitor and 
ensure that it corresponds to the voltage and frequency 
used for the motor. The voltage stated on the motor plate: 
120/240V (/) means that the motor can operate at 120V or 
240V, but this requires recoupling of the internal wiring from 
the electrical motor (see the electrical diagrams). 220-230V 
(-) means that the motor may operate within the range of 
220V to 230V without recoupling of the internal wiring. 

 
DC models 

• For electrical connection, refer to page 7 
• During installation of the DC motor, check the motor plate 
for the direction of rotation as it is important that the "+" and 
"-" poles are connected in a correct way (fig. 5). Otherwise, 

Information 

Please note that you can find the pictures and 
figures we are referring to on page 6-9. 


Содержание OFCS-A100.25

Страница 1: ...O ApS Lundeborgvej 3 DK 9220 Aalborg Denmark Phone 45 53717220 Web www flairmo dk E mail info flairmo dk Operator and service manual Compressor models FLAIRMO A38 4 A38 4W A38 24 A62 4 A62 24 A100 25 A200 25 ...

Страница 2: ...chnical information ______________________________________________________ Reservedele Reservdelslista Spare Parts ______________________________________________________ Tegninger Billeder Bilder illustrationer Drawings Pictures ______________________________________________________ Notater Noter Notes ______________________________________________________ ...

Страница 3: ...tien omfatter ikke skader som skyldes vold misbrug fejlagtige reparationer eller uoriginale reservedele Transportomkostninger er ikke omfattet af garantien For Skandinavien gælder iøvrigt NL 92 Salgs og Leveringsbetingelser FLAIRMO ApS forbeholder sig retten til ændringer i tekniske specifikationer konstruktion Kassens indhold kun motordelen Deres nye kompressor vakuumpumpe er leveret i en ren og ...

Страница 4: ...p vakuumpumpen ved at dreje venstre skrue start stop vakuum mod uret 3 Åbn for indsugningen på beholderen for at igangsætte den automatiske start på vakuumpumpen 4 Luk for indsugningen på beholderen for at igangsætte det automatiske stop ved det ønskede vakuum 5 Fortsæt ovenstående procedure 1 4 indtil vakuumpumpen stopper ved det ønskede vakuum Eksempel Hvis det ønskede stopvakuum f eks er 450 mb...

Страница 5: ...r beholderen er under tryk x Check oppumpningstider kompressor Oppumpningstiden kan give en indikation af kompressorens tilstand under forudsætning af at der ikke er lækager i anlægget hvor trykluften kan sive ud Testen udføres på følgende måde 1 Tøm beholderen for komprimeret luft manometeret viser 0 bar 2 Luk for afgangen på beholderen og check at drænhanen er lukket 3 Start kompressoren og kont...

Страница 6: ... rätten till ändringar i tekniska specifikationer konstruktioner Innehåll i emballagelåda endast motor Din nya kompressor vakuumpump ska levereras i en ren och oskadad emballagelåda Om ej kontakta din leverantör omedelbart Emballagelådan ska innehålla följande Installation endast motor Er FLAIRMO kompressor är mycket lätt att använda Följer Ni våra instruktioner kommer Ni att ha många års glädje a...

Страница 7: ...lls vakuumpumpen stannar vid önskat vakuum Exempel Om det önskade vakuumstoppet är t ex 300 mbar startar vakuumpumpen ej före ett vakuum på ca 450 mbar Differensen på 150 mbar motsvarar inställningen på differensskalan 450 mbar motsvarar 0 45 på vakuum mätaren Felsökning och reparation alla Viktigt Bryt strömmen före varje ingrepp i kompressorn Töm behållaren på luft före varje ingrepp i kompresso...

Страница 8: ...örutsättning att det ej är läckage i anläggningen där tryckluften kan läcka ut Testet utförs enligt följande beskrivning 1 Töm behållaren på komprimerad luft manometern visar 0 bar 2 Stäng avtappningskranen och kontrollera att dräneringskranen är stängd 3 Starta kompressorn och kontrollera tiden tills den stannar igen via pressostaten Observera att tanktrycket är på 8 bar 120 psi då avvikelser kan...

Страница 9: ...ts of transportation of parts equipment are not covered by the guarantee In Scandinavia it is NL 92 Terms Conditions that applies FLAIRMO ApS reserves the right to change technical specifications constructions Contents of box motor only Your new compressor vacuum pump should be delivered in a clean and undamaged box If not contact your distributor immediately The box should contain the following I...

Страница 10: ...is to operate until the vacuum required is reached see vacuum gauge 2 Switch off the vacuum pump by turning the left screw counter clockwise 3 Open the air inlet on the receiver in order to ensure automatic start of the vacuum pump 4 Close the air inlet in order to ensure automatic stop of the vacuum pump at vacuum required 5 Continue the process above 1 4 until the vacuum pump stops at vacuum req...

Страница 11: ...the safety valve by gently pulling the ring with pressure in the receiver x Check the pumping time Comp The pumping time indicates the condition of the compressor provided that there are no leaks in the system where the compressed air may leak Test the compressor as follows 1 Empty the air receiver of compressed air the pressure gauge shows 0 bar 2 Close the outlet on the air receiver and check th...

Страница 12: ...70 36 OFCS A62 24 230V 50Hz 0 58 0 44 73 l min 36 l min 24 L 59 S1 100 400x400x620 24 OFCS A62 4 230V 50Hz 0 58 0 44 73 l min 36 l min 4 L 59 S1 100 330x300x250 15 OFCS A38 24 230V 50Hz 0 4 0 3 38 l min 20 l min 24 L 57 S1 100 400x400x620 20 OFCS 38 4W 230V 50Hz 0 4 0 3 38 l min 20 l min 4 L 57 S1 100 280x230x360 12 OFCS A38 4 230V 50Hz 0 4 0 3 38 l min 20 l min 4 L 57 S1 100 330x300x250 12 Flairm...

Страница 13: ...AIRMO ApS Lundeborgvej 3 DK 9220 Aalborg Denmark Phone 45 53717220 Web www flairmo dk E mail info flairmo dk El diagram Electrical diagram Én faset AC Single phase AC Tre faset AC Three phase AC 12 24V DC ...

Страница 14: ...AIRMO ApS Lundeborgvej 3 DK 9220 Aalborg Denmark Phone 45 53717220 Web www flairmo dk E mail info flairmo dk Tegninger Billeder Bilder illustrationer Drawings Pictures Fig 1 Fig 2 Fig 3 Fig 4 Fig 5 Fig 6 ...

Страница 15: ...compressor and a replacement filter element with gaskets pnr 17131153 for the outlet filter Intake filter Outlet filter Dismount the top of the filter housing Push Turn Pull Replace the white filter element Dismount the filter bowl by turning it counterclockwise Pull the bowl straight down Ensure that the O ring comes out along with the bowl DO NOT remove the white auto drain part at the bottom of...

Страница 16: ...or leaks and check the pumping time x Clean unit or wipe with a soft damp cloth If necessary use paraffin on rag to remove sticky adhesions Dust and dirt prevent cooling x Check intake filter Clean or replace if necessary Min annually or every 2000 hours whichever comes first x Check the O ring in the non return valve and replace if necessary Note Empty receiver of air before dismounting x Check f...

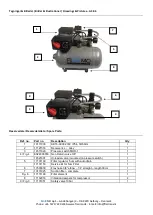
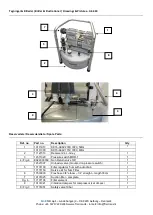
Страница 17: ...0Hz 1 2 11121516 Receiver 4 L Grey 1 3 14511029 Pressure switch MDR 1 1 4 Fig 4 E024000359 Non Return valve 3 8 1 14521007 Unloader valve mounted on pressure switch 1 5 17131100 Filter regulator 5 um with auto drain 1 17131153 Service kit for 5um Filter 1 6 17503030 Flex hose 3 8 elbow 1 4 straight length 33cm 1 7 10131025 Suction filter complete 1 Fig 6 17131198 Filter element 1 8 17132016 Vibrat...

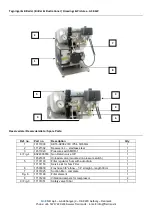
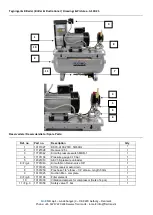
Страница 18: ... 2 11121502 Receiver 4 L stainless steel 1 3 14511029 Pressure switch MDR 1 1 4 Fig 4 E024000359 Non Return valve 3 8 1 14521007 Unloader valve mounted on pressure switch 1 5 17131100 Filter regulator 5 um with auto drain 1 17131153 Service kit for 5um Filter 1 6 17503030 Flex hose 3 8 elbow 1 4 straight length 33cm 1 7 10131025 Suction filter complete 1 Fig 6 17131198 Filter element 1 8 17131200 ...

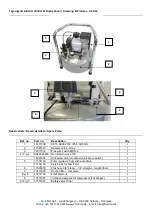
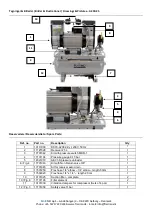
Страница 19: ... 2 11121513 Receiver 24 L Grey 1 3 14511012 Pressure switch MDR 2 1 4 Fig 4 E024000359 Non Return valve 3 8 1 14521007 Unloader valve mounted on pressure switch 1 5 17131100 Filter regulator 5 um with auto drain 1 17131153 Service kit for 5um Filter 1 6 17503030 Flex hose 3 8 elbow 1 4 straight length 33cm 1 7 10131025 Suction filter complete 1 Fig 6 17131198 Filter element 1 8 10131021 Vibration ...

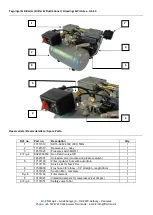
Страница 20: ...11121513 Receiver 4 L Grey 1 3 14511029 Pressure switch MDR 1 1 4 Fig 4 E024000359 Non Return valve 3 8 1 14521007 Unloader valve mounted on pressure switch 1 5 17131100 Filter regulator 5 um with auto drain 1 17131153 Service kit for 5um Filter 1 6 17503030 Flex hose 3 8 elbow 1 4 straight length 33cm 1 7 10131025 Suction filter complete 1 Fig 6 17131198 Filter element 1 8 10131021 Vibration damp...

Страница 21: ...115V IP20 60Hz 2 11121513 Receiver 24 L Grey 1 3 14511029 Pressure switch MDR 1 1 4 Fig 4 E024000359 Non Return valve 3 8 1 14521007 Unloader valve mounted on pressure switch 1 5 17131100 Filter regulator 5 um with auto drain 1 17131153 Service kit for 5um Filter 1 6 17503030 Flex hose 3 8 elbow 1 4 straight length 33cm 1 7 10131025 Suction filter complete 1 Fig 6 17131198 Filter element 1 8 10131...

Страница 22: ...2 11121528 Receiver 25 L 1 3 17701042 Kit with pressure switch MDR 1 1 4 17131104 Pressure gauge 0 10 bar 1 5 14521010 AEV1 S pressure unloader 1 6 Fig 4 17701043 Kit with Non Return valve 3 8 1 7 17701045 Kit for receiver auto drain 1 8 17501250 Flex hose 1 4 elbow 1 4 elbow length 50cm 1 9 10131025 Suction filter complete 1 9 Fig 6 17131198 Filter element 1 10 10131039 Vibration dampers for comp...

Страница 23: ...L 1 3 17701042 Kit with pressure switch MDR 1 1 4 17131104 Pressure gauge 0 10 bar 1 5 14521010 AEV1 S pressure unloader 1 6 Fig 4 17701043 Kit with Non Return valve 3 8 1 7 17701045 Kit for receiver auto drain 1 8 17501250 Flex hose 1 4 elbow 1 4 elbow length 50cm 1 9 17504020 Flex hose 1 4 x 1 4 length 20 cm 1 10 10131025 Suction filter complete 2 10 Fig 6 17131198 Filter element 2 11 10131039 V...

Страница 24: ...FLAIRMO ApS Lundeborgvej 3 DK 9220 Aalborg Denmark Phone 45 53717220 Web www flairmo dk E mail info flairmo dk Manual no 40101016_r02 ...

Отзывы: