


15
10
11
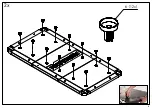
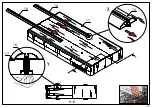
De plaatsing van het scharnier is zeer belangrijk!
VIER controlepunten:
A. De sticker waarop staat Bottom moet daadwerkelijk ONDER liggen.
B. Dus op nummer 11 en nummer 12
C. Het scharnier moet exact geplaatst worden zoals getoond wordt op de tekeningen.
D. Kijk goed naar de ronding van het ijzeren plaatje.
Heeft u vragen? Bel +31 26 20762114 of mail: [email protected]
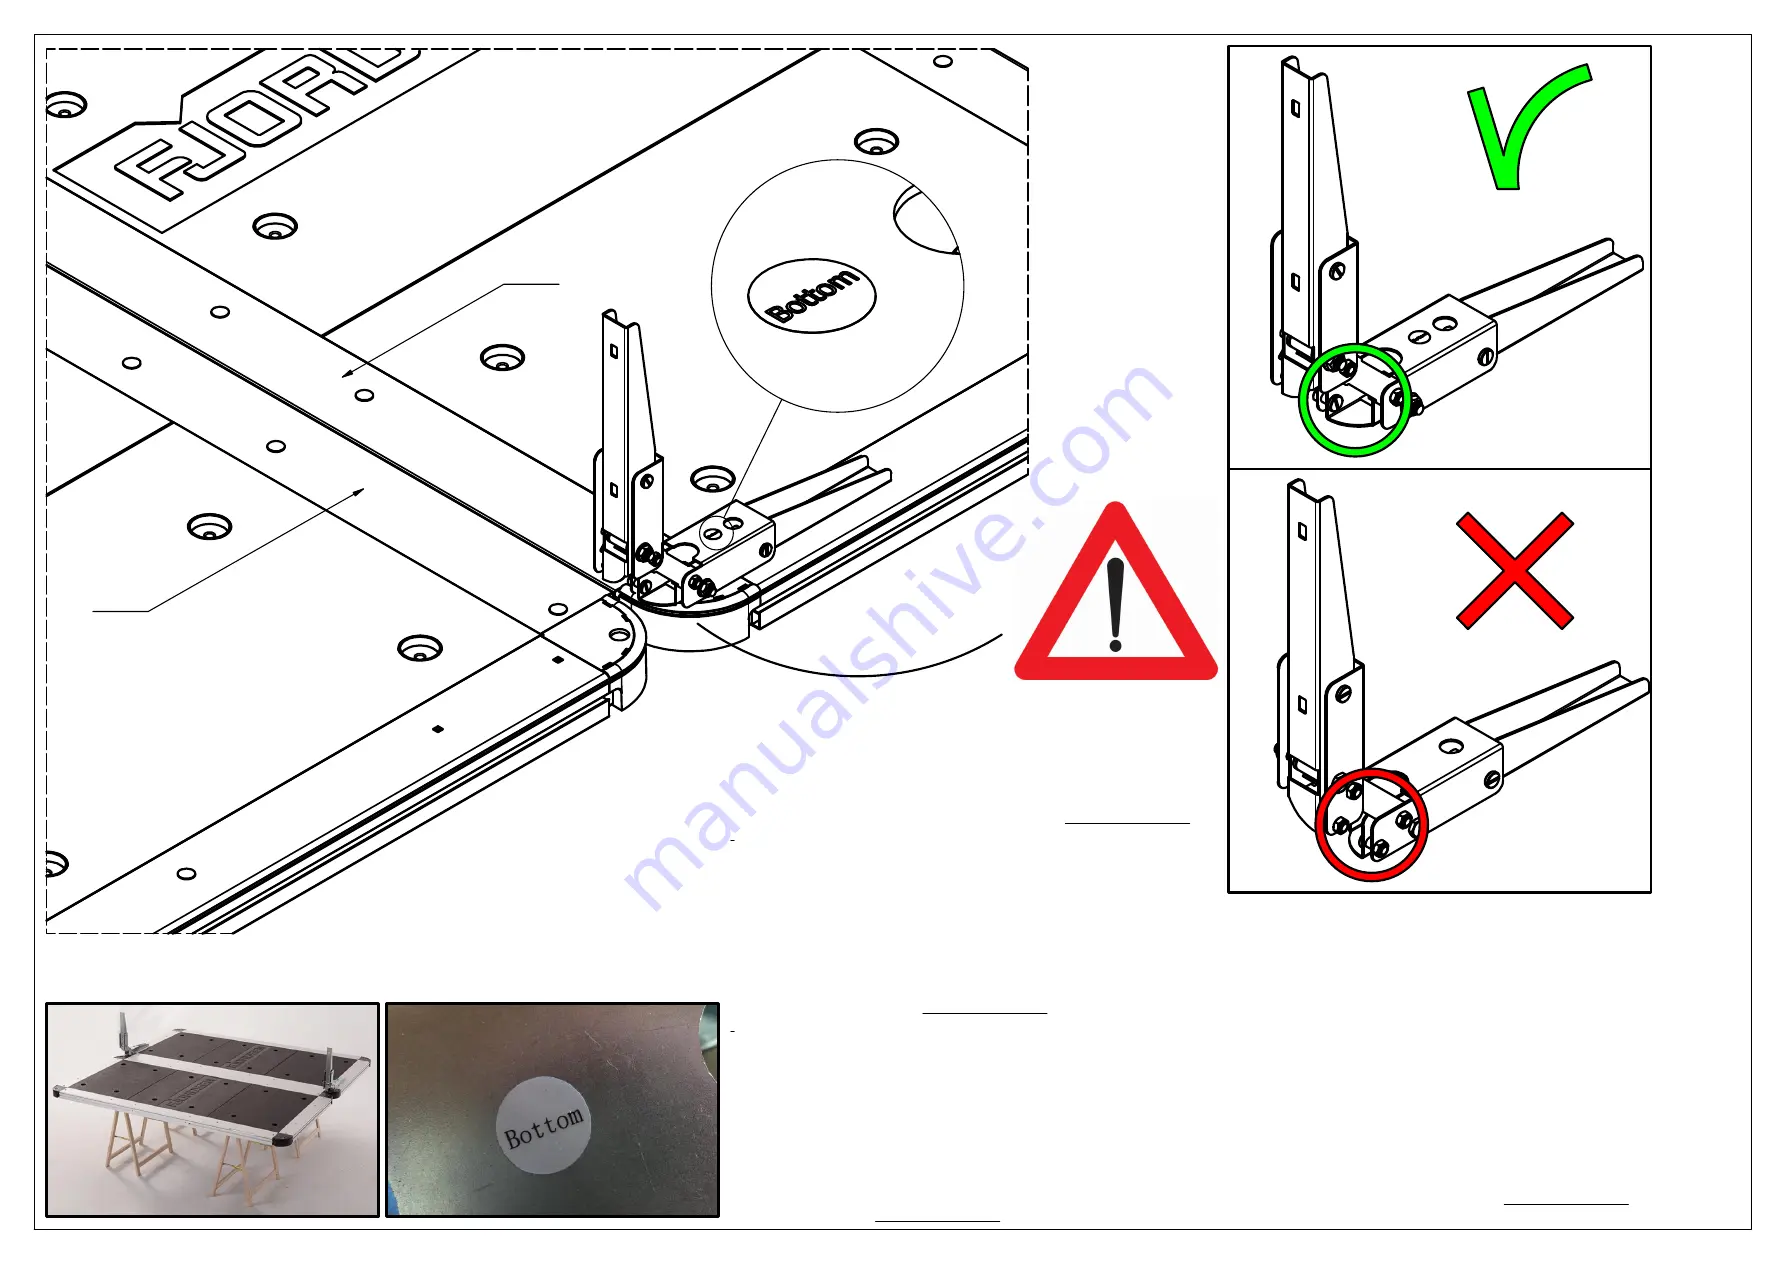
The placement of the hinge is very important!
FOUR checkpoints:
A. The sticker that says "Bottom" must actually be UNDER.
B. So at number 11 and number 12
C. The hinge must be placed exactly as shown in the drawings.
D. Look closely at the roundness of the iron plate.
Do you have questions? Call +31 26 20762114 or mail: [email protected]
Die Platzierung des Scharniers ist sehr wichtig!
VIER Kontrollpunkte:
A. Der Aufkleber mit der Aufschrift "Bottom" muss tats chlich UNTER sein.
B. Also bei Nummer 11 und Nummer 12
C. Das Scharnier muss genau wie in den Zeichnungen gezeigt platziert werden.
D. Sehen Sie sich die Rundheit der Eisenplatte genau an.
Haben Sie Fragen? Rufen Sie +31 26 20762114 an
oder senden Sie eine E-Mail an [email protected]
Le placement de la charni re est tr s important!
QUATRE points de contr le:
A. L'autocollant qui dit "Bottom" doit tre EN DESSOUS.
B. Donc au num ro 11 et au num ro 12
C. La charni re doit tre plac e exactement comme indiqu sur les dessins.
D. Regardez attentivement la rondeur de la plaque de fer.
Avez-vous des questions? Appelez le +31 26 20762114
ou envoyez un e-mail [email protected]
Содержание Bolt set
Страница 1: ...Assembly manual Montageanleitung Manuel de montage Montagehandleiding...
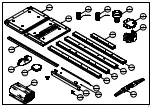
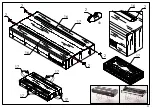
Страница 4: ...1 2x 3 24x 7 12x 8 36x 2 40x 6 24x 4 24x 4 24x 4 24x 1 8x 5 48x Bolt set...
Страница 5: ...2 18 4x 19 8x 22 4x 23 8x 21 8x Mounting kit...
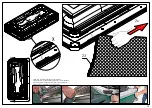
Страница 7: ...4 7 2x 8 7...
Страница 8: ...5 6 12x 2x...
Страница 9: ...6 5 12x Grey 2x...
Страница 10: ...7 4 12x Black 2x...
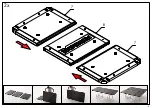
Страница 11: ...8 9 11 12 10 9 10 11 12...
Страница 12: ...9 15A 15B 15B 2x 9 9 15A 10...
Страница 13: ...10 13 13 13 13 Click 1A 8x 1B...
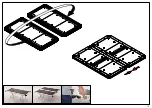
Страница 14: ...11 13 13 13 13 12 11 10 9...
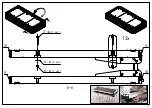
Страница 15: ...A A 8x B B 40x 12 B B 1 Bolt set 5 Bolt set 4 Bolt set A A 5 Bolt set 4 Bolt set 2 Bolt set...
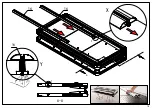
Страница 16: ...A A 8x B B 40x 13 A B B A...
Страница 17: ...14...
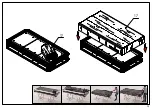
Страница 19: ...16 2 Bolt set 5 Bolt set 4 Bolt set 2x 2x 14 14 11 12 10 9...
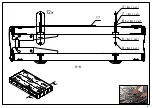
Страница 20: ...A A 17 12x A A 3 Bolt set 6 Bolt set 4 Bolt set 12 9 11 10...
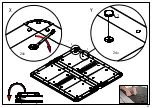
Страница 21: ...X Y X Y 18 16 A A A A 16 16...
Страница 22: ...19 2 4x 2 16 16 16 2 2 2 2...
Страница 23: ...20 17 17...
Страница 24: ...A A 21 A A 3 Bolt set 8 3x Bolt set 6 Bolt set 4 Bolt set 12x 17 7 Bolt set...
Страница 25: ...X Y X Y 22 16 16 A A A A 17 16 17 16...
Страница 26: ...23 2 4x 16 16 2 2 2 2 16 2 17 17 17 17 17 17...
Страница 27: ...X Y X Y 24 24x 24x 3...
Страница 29: ...26...
Страница 30: ...27 4x 4x 4x 22 4x 18 4x 19 8x 23 8x 21 8x...


