background image

BASIC INSTALLATION INFORMATION 

Your new portable spa must be placed on a uniformly firm, flat, and level surface. 

A concrete pad 100mm thick is recommended. Your spa may need to be fenced 

with the fencing meeting relevant building and council standards. Gates must be 
self-closing and self-latching. If your spa is located near sprinklers, adjust or cap 

them so as not to hit the siding of the spa. 

If the spa is to be installed on a deck, the decking must be constructed to building 

standards and should be capable of supporting the expected load of the spa 

when filled. If decking is to be constructed around the sides of the spa the owner 
must remember to make provision and access for the side panels of the spa 

cabinet to be removed in case of the need for future servicing. 

Initial start up procedure 

1. 10 & 15 amp spas are supplied with a power cord but must be connected

to a weatherproof 10-1 SA outlet. 32 amp  60 amp spas must be hardwired

directly to your house supply. All electrical connections must be performed by

a licensed electrician and must confirm to all national, state and local electrical

codes in effect at time of install.

2. DO NOT turn power ON to the spa until it is filled with water.

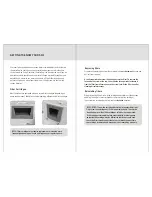
3. Remove the cabinet door panel on the electronic keypad side of the spa and

check that the pump(s) and heater barrel unions are tightened (NOTE: It is

possible for these connections to become loose during transportation).

Also check that all T-handled gate vales are pulled UP in the open position.

4. Ensure that the external drain valve is firmly tightened and the jets are in the

open position.

5.

Remove the filters from the spa and fill the spa using a garden hose by

inserting the hose down into the filter pipe. This will flood the pipe work

during filling to help prevent air locks. If you have 2 x filters, alternate the

hose into each filter for the first 5 minutes.

6. Spas should be filled until the water level is at least 50mm above the

skimmer (a water fill level is marked on the side of the filter area).

Maximum water depth in any part of the spa should not exceed 1100mm.

Maximum water depth in any seat should not exceed 600mm.

7. Once spa has been filled with water to the correct level, plug the power cord

into the power point and switch the power ON. If the spa is hardwired, switch

the spa ON at the isolation switch.

8.

The filtration pump will start immediately after the power is turned on.

ENSURE THAT YOU SEE WATER CIRCULATING. 

If water is not visibly moving,

switch the spa OFF, wait 30 seconds and try again, if you still do not have

water flowing, turn the power off and refer to the troubleshooting section at

the back of this manual for fixing an air lock.

9.

Once you have the water circulating, adjust the water temperature to the

desired level and set the time (please refer to separate instructions provided
for the control panel).

10. 

Add and adjust your chemicals to the spa water following the chemical start

up procedure supplied to you by your spa dealer.

11. 

Ensure that the hard cover is placed on the spa & locked as this will greatly

reduce heat up time.

Содержание Fisher Five+

Страница 1: ... MANUAL fisherspas AUSTRALIA Phone 1800 833 977 www fisherspas com au P O BOX 2040 GATESHEAD N S W 2290 AUSTRALIA NEW ZEALAND Phone 0800 108 004 www fisherspas co nz P O BOX 2564 STOKE NELSON 7041 NEW ZEALAND ...

Страница 2: ...n your own backyard We want you to enjoy your Spa Many hours of research have gone into the design of your spa to ensure the ultimate in hydrotherapy and relaxation Only the highest quality components have been used to ensure years of trouble free operation Your comfort and enjoyment has been designed into your Spa from the start Please take the time to read through this Owners Manual In it you wi...

Страница 3: ...a contact separation in all poles that provide full disconnection under overvoltage category Ill conditions 7 The appliance should be supplied through a residual current device RCD having a rated residual operating current not exceeding 30mA 8 If the supply cord is damaged it must be replaced by the manufacturer its service agent or similarly qualified persons in order to avoid a hazard 9 The appl...

Страница 4: ......

Страница 5: ...at allT handled gate vales are pulled UP in the open position 4 Ensure that the external drain valve is firmly tightened and the jets are in the open position 5 Remove the filters from the spa and fill the spa using a garden hose by inserting the hose down into the filter pipe This will flood the pipe work during filling to help prevent air locks If you have 2 x filters alternate the hose into eac...

Страница 6: ...you have purchased a heat pump with your spa you will need to follow the guidelines and diagram in this document Before installing your heat pump consult the SpaNet Installation Guide to ensure that it follows all of the manufacturers recommendations Failure to install your heat pump correctly could void your warranty ...

Страница 7: ...RED BY THE SPASWARRANTY 2 Check valves are open T handled valves enable the water fiow to be closed to allow removal of spa equipment for servicing without the need to empty the spa water TheT handles must be pulled UP to be OPEN and allow water fiow and they should be secured open with clips Barrel Unions Valves Open 3 Check drain valve is closed and firmly tightened Please refer aside illustrati...

Страница 8: ...imply unscrew the cartridge in an anti clockwisedirection and pull out from spa pool A tool is required to unscrew the face and access the filter To remove the face undo the screw at the top then slide the face upwards to release it from the filter frame Ensure you use the screw to re fit the filter face after cleaning for safety reasons Reinstalling filters When reinstalling filters first hold th...

Страница 9: ......

Страница 10: ...ine level of the water It is important to maintain the correct pH level as iteffects the action of other chemicals The pH is measured on a scale of 1 to 14 Seven is neutral below seven is acidic and above seven isalkaline Incorrect pH levels can cause poor sanitiser efficiency eye and skin irritations corrosion ofmetal fittings cloudy water and formation of scale on the pool walls and fittings The...

Страница 11: ...quirement of your spas warranty to check the pumps every four 4 months for signs of leaking or corrosion Any sign of leaking or calcium build up at the bottom of the pump between the plastic wet end and metal part of the motor indicates that the seals of your pumps are worn and need replacing It is recommended that you contact your local spa dealer to arrange a service of your pump before the moto...

Страница 12: ......

Страница 13: ...l pad manual check timer settings consult spa dealer for assistance 3 Check heating mode in control pad menu is set to normal NORM 4 Turn air blower off Heating is inefficient when the blower is running 5 Check set temperature point and raise if needed 6 Fit hardcover to spa and ensure it is fitted correctly 1 Clean and soak filters 2 Check water balance and sanitiser levels Refer to chemical inst...

Отзывы: