background image

FEATURES

TIMER/CLOCK

œ

VCR Plus+

®

 programming system

œ

Selectable standard/daylight saving time 

œ

1-year/8-event program timer with daily/weekly settings

œ

Smart Time Record function

œ

Smart Speed Record function

œ

Remaining tape duration display

œ

Quick timer recording (QTR)

œ

Off timer (up to 6 hours)

AUDIO/VIDEO

œ

VHS Hi-Fi stereo audio recording and playback

œ

MTS stereo/second audio program (SAP) recording and
playback

œ

Digital picture control

SPECIAL PLAYBACK/SEARCH

œ

Ad JUMP

®

œ

Recording contents on-screen list (Rec. List Super)

œ

Double-Azimuth 4-head video recording/playback system for
clean special playback:

Forward/reverse search, double-speed playback, clean still
image, frame advance, variable-speed slow motion

œ

High-speed fast forward/rewind

œ

Zero search

œ

Index search

AUTOMATIC FUNCTIONS

œ

Automatic clock setting and adjustment

œ

Automatic head cleaner

œ

Endless playback

œ

Automatic digital tracking

œ

Automatic channel programming

œ

Full auto playback functions: power-on, rewind, eject, record
auto cancel, power-off eject

GENERAL

œ

Multilanguage, multicolor on-screen menu

œ

Multibrand universal remote control with Moonlight

®

 buttons

œ

Vibration-suppressing mid-mount design

œ

Child lock

œ

Front/rear audio/video inputs

ACCESSORIES

Make sure that all the accessories listed below have been
included with your VCR.

Power cord

Multibrand universal

remote control

75-ohm coaxial cable

Two AA batteries (1.5 volt)

Quick Start Guide

Remote control code label

CONTENTS

Precautions . . . . . . . . . . . . . . . . . . . . . . . . . . . . . . . . . . .  1
Features . . . . . . . . . . . . . . . . . . . . . . . . . . . . . . . . . . . . .  2
Accessories. . . . . . . . . . . . . . . . . . . . . . . . . . . . . . . . . . .  2

DESCRIPTION

VHS video cassette tapes . . . . . . . . . . . . . . . . . . . .  3
Locations of controls and indicators . . . . . . . . . . . . .  4
Multibrand universal remote control . . . . . . . . . . . . .  7

CONNECTIONS

Basic antenna/cable connections . . . . . . . . . . . . . .  10
Alternative cable TV connections . . . . . . . . . . . . . .  11
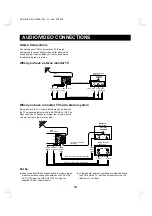
Audio/video connections . . . . . . . . . . . . . . . . . . . .  13

BASIC OPERATION

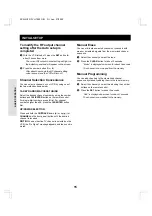
Initial setup . . . . . . . . . . . . . . . . . . . . . . . . . . . . . . .  14
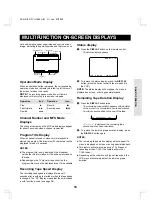
Multifunction on-screen displays . . . . . . . . . . . . . .  16
On-screen menu. . . . . . . . . . . . . . . . . . . . . . . . . . .  17
Setting the clock . . . . . . . . . . . . . . . . . . . . . . . . . . .  19
Changing the menu language . . . . . . . . . . . . . . . .  21
Programming channels . . . . . . . . . . . . . . . . . . . . .  21
Viewing TV only . . . . . . . . . . . . . . . . . . . . . . . . . . .  22
Playing a rental tape. . . . . . . . . . . . . . . . . . . . . . . .  22
Normal playback. . . . . . . . . . . . . . . . . . . . . . . . . . .  23
Tracking control . . . . . . . . . . . . . . . . . . . . . . . . . . .  24
Recording . . . . . . . . . . . . . . . . . . . . . . . . . . . . . . . .  25
Rec. List super . . . . . . . . . . . . . . . . . . . . . . . . . . . .  27

ADVANCED USE

VHS Hi-Fi audio and MTS broadcasts . . . . . . . . . .  29
Audio output mode . . . . . . . . . . . . . . . . . . . . . . . . .  30
Special playback . . . . . . . . . . . . . . . . . . . . . . . . . .  31
Zero search . . . . . . . . . . . . . . . . . . . . . . . . . . . . . .  32
Index search . . . . . . . . . . . . . . . . . . . . . . . . . . . . . .  32
VCR Plus+

®

 programming system . . . . . . . . . . . . .  33

Program timer recording. . . . . . . . . . . . . . . . . . . . .  35
Quick timer recording (QTR) . . . . . . . . . . . . . . . . .  39
Child lock . . . . . . . . . . . . . . . . . . . . . . . . . . . . . . . .  40
Ad JUMP

®

. . . . . . . . . . . . . . . . . . . . . . . . . . . . . . . .  40

Copying a tape . . . . . . . . . . . . . . . . . . . . . . . . . . . .  41

Maintenance . . . . . . . . . . . . . . . . . . . . . . . . . . . . . . . . .  41
Troubleshooting guide . . . . . . . . . . . . . . . . . . . . . . . . .  42
Specifications . . . . . . . . . . . . . . . . . . . . . . . . . . . . . . . .  43

Quick Start Guide

xxxx xxx xxx xxxx xxx xxx xxx xxx x

xxxxx xxxx xxxx x xx xxxxx  xxx xxx

xxxx

xxxx xxx xxx xxxx xxx xxx xxx xxx x

xxxxx xxxx xxxx x xx xxxxx  xxx xxx

xxxx  xxx xxx

xxxx xxx xxx xxxx xxx xxx xxx xxx x

xxxxx xxxx xxxx x xx xxxxx  xxx xxx

xxxx xx  xxxxxxxxx xxx

xxxx xxx xxx xxxx xxx xxx xxx xxx x

xxxxx xxxx xxxx x xx xxxxx  xxx xxx

xxxx

Guía rápida

xxxx xxx xxx xxxx xxx xxx xxx xxx x

xxxxx xxxx xxxx x xx xxxxx  xxx xxx

xxxx

xxxx xxx xxx xxxx xxx xxx xxx xxx x

xxxxx xxxx xxxx x xx xxxxx  xxx xxx

xxxx  xxx xxx

xxxx xxx xxx xxxx xxx xxx xxx xxx x

xxxxx xxxx xxxx x xx xxxxx  xxx xxx

xxxx xx  xxxxxxxxx xxx

xxxx xxx xxx xxxx xxx xxx xxx xxx x

xxxxx xxxx xxxx x xx xxxxx  xxx xxx

xxxx

XXXX: XXXXXXXX

XXXX: XXXXXXXX

XXXX: XXXXXXXX

XXXX: XXXXXXXX

SC4H/UF2 (FVH-T690 GB)  Fri. Jan., 07/2000

2

Содержание FVH-T690

Страница 1: ...the PRECAUTIONS on page 1 Keep the manual in a safe place for future reference NOTE Locate serial number shown on rear panel of unit and record it here CA As an ENERGY STAR Partner FISHER has determin...

Страница 2: ...Do not place the unit on a carpet because this will block the ventilation holes Install the VCR in a horizontal position only Avoid locations subject to strong vibrations Avoid moving the VCR between...

Страница 3: ...es 2 Accessories 2 DESCRIPTION VHS video cassette tapes 3 Locations of controls and indicators 4 Multibrand universal remote control 7 CONNECTIONS Basic antenna cable connections 10 Alternative cable...

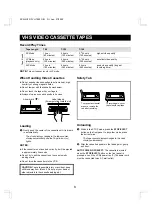
Страница 4: ...nd the Tape In icon o lights NOTES If the cassette is not inserted correctly it will be ejected in approximately 3 seconds Do not try to pull the cassette out once automatic loading starts Do not forc...

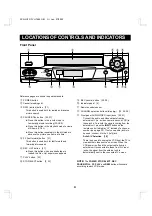
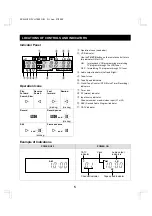
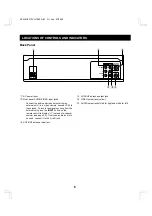
Страница 5: ...nsor H CHANNEL selection buttons l and j 15 24 39 I Front panel AUDIO VIDEO input jacks 25 41 Connect the audio and video outputs from an external unit i e a video camera second VCR to these jacks To...

Страница 6: ...ng TV programs through TV tuner 3 Audio output indicators Left and Right 4 Tape In icon 5 Tape Speed indicators 6 Clock Tape Counter QTR Quick Timer Recording indicators 7 Timer icon 8 ST stereo indic...

Страница 7: ...om the external unit press the INPUT button on the remote control to display L1 instead of a channel number see page 25 If only one audio jack is to be used connect it to the L left jack 3 VHF UHF ant...

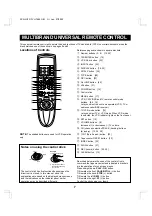
Страница 8: ...9 O 0 Zero Search button 32 P Tape counter RESET button 32 Q INDEX button 32 R SLOW button 31 S REC record button 25 39 T CLEAR button 15 1 2 3 4 5 6 7 8 0 9 VCR 100 ENTER SET TV VCR VOLUME CH TRACK I...

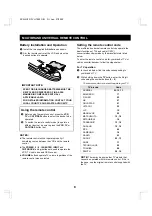
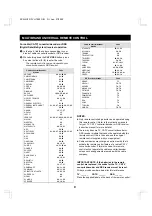
Страница 9: ...e by the manufacturers listed below To enter the remote control code for your brand of TV or cable converter decoder follow the steps below For TV operation 1 In the chart below find the code correspo...

Страница 10: ...21 Cable converter decoder brands Code STARGATE 05 11 22 SYLVANIA 38 39 TEKNIKA 30 TELECAPTION 26 TELEVIEW 20 22 39 TEXSCAN 38 39 TOCOM 01 07 10 11 UNIKA 00 11 29 UNIVERSAL 00 24 27 29 VIDEOWAY 02 03...

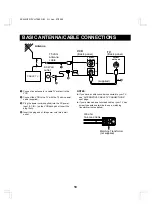
Страница 11: ...into a wall outlet NOTES If you have a cable converter connected to your TV see ALTERNATIVE CABLE TV CONNECTIONS next page If your antenna has a twin lead cable or your TV has screw type antenna termi...

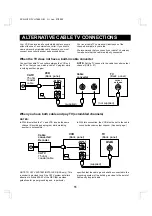
Страница 12: ...d channels NOTES With this method the TV and VCR receive the same channel Recording one program while watching another is not possible With this connection the VCR must be set to the cable converter d...

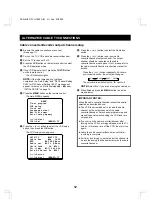
Страница 13: ...MENU TV 8 Press the or button to select the Cable box option 9 Press the or button to set your cable converter decoder output channel The output channel should be indicated on the cable converter deco...

Страница 14: ...e supplied 75 ohm coaxial cable If video and or audio connections are made between the VCR and the TV set the source selector on the television to A V input OUT VIDEO VHF UHF FROM ANT TO TV OUT IN VCR...

Страница 15: ...ing a TV program To change the RF output channel setting press the number button 3 or 4 5 Press the OK button to save the RF output channel setting The RF 03 or RF 04 display on the indicator panel wi...

Страница 16: ...UP DOWN SELECTION Press and hold the CH TRACK down l or up j or CHANNEL on the front panel button until the desired channel is received NOTE When an inactive TV channel is selected on the VCR the No S...

Страница 17: ...pe speed is changed The SS display means that the smart speed record function is used see page 26 Status display 1 Press the DISPLAY button on the remote control The status display appears 2 To remove...

Страница 18: ...uper Auto tuning memory Select Operations indications OK Set MENU TV The menu items are color coded as shown below Menu title On magenta background Option selected Highlighted in green Operations indi...

Страница 19: ...hown in square brackets CATV TV 21 Indicate whether you subscribe to cable TV or use antenna Cable box 12 step 9 If you use a cable converter decoder cable box set the output channel MTS 29 Select the...

Страница 20: ...t the wrong clock time follow the steps under Automatic Clock Adjustment Automatic Clock Adjustment 1 Press the MENU button The main MENU appears 2 Press the or button to select the Clock set option t...

Страница 21: ...ancel OK Set NOTES When entering the year press the two number buttons that correspond to the last two digits of the year i e 00 for 2000 05 for 2005 or 25 for 2025 If you press the wrong button press...

Страница 22: ...utton on the remote control until the indicator panel shows a channel number Channel Programming 1 Follow the steps in Before starting above 2 Press the MENU button The main MENU appears 3 Press the o...

Страница 23: ...e end of the tape the VCR stops then rewinds The cassette is ejected after rewinding Playback of Copyguarded Tapes Some prerecorded tapes employ a copyguard system that may cause intermittent distorti...

Страница 24: ...e DPC button to set the picture control Auto Automatic picture control Manual Manual picture control Every time the DPC button is pressed the setting will change Auto Manual Auto When Manual is select...

Страница 25: ...2 Press and hold the CH TRACK l or j button or CHANNEL on the front panel during playback to eliminate the noise streaks from the picture The automatic tracking control mode is canceled To return to a...

Страница 26: ...tinues 7 Press the STOP button or STOP EJECT on the front panel when you want to stop recording The Record indicator goes off Rec List Super Feature The Rec List Super feature lets you keep track of a...

Страница 27: ...ing a 150 minute program onto a T 120 120 minute tape The recording will be done in SP mode for almost 105 minutes and in SLP mode for the last 45 minutes During Smart Speed Recording the current reco...

Страница 28: ...rt Type 01 5 06 9 00 Movie 22 5 15 6 30 04 5 21 7 30 Sport L1 5 27 7 30 Game 05 6 01 SPORTS DIGEST L1 6 02 6 30 Child Select OK Play 5 Press the STOP button if the desired recording is listed 6 Press...

Страница 29: ...information it will automatically be entered Then when using the Rec List super function the title will be displayed up to 15 characters The program type is not set Other settings When using the Rec...

Страница 30: ...rd a stereo or SAP broadcast set the MTS mode as follows 1 Follow the Before starting steps on page 18 Make sure the input source is set to Tuner A channel number is shown in the indicator panel 2 Pre...

Страница 31: ...e or button to select the Audio out option then press the or button to select the desired mode as indicated by the z ST STEREO The left channel sound is heard from the left speaker and the right chann...

Страница 32: ...e end rewind it and then replay and rewind over and over until you stop it 1 In the stop or playback mode press and hold the PLAY button on the front panel then while holding it down press the REW but...

Страница 33: ...to the beginning of the current program or skip to the beginning of the next program and start playback EXAMPLE To skip to the next program 1 Press the INDEX button in the play or stop mode f Index Se...

Страница 34: ...mber EXAMPLE To enter PlusCode number 4930 to program a recording at the SLP recording speed Press 4 9 3 0 NOTE If you enter the wrong number by mistake press the button to cancel then enter the corre...

Страница 35: ...ber appears J Press the VCR Plus button The VCR power turns off and the timer is set to the recording standby mode The Timer icon n appears VCR Plus PROGRAMMING SYSTEM NOTES If the programmed recordin...

Страница 36: ...NU button The main MENU appears 3 Press the OK button The Timer program menu appears Ch Date Start End M DD H MM H MM SP 4 Press the number buttons 0 9 to set the timer program EXAMPLE To record a pro...

Страница 37: ...ype and Smart Time Rec setting menu by pressing the TYPE button on the remote control and then follow steps 7 through G on page 36 Not all TV stations transmit rating information signals NOTES If more...

Страница 38: ...gram type cannot be set using this method Once a program timer recording has been set it cannot be erased using the buttons on the VCR front panel Checking the Program Timer 1 Turn on the power TV and...

Страница 39: ...ton instead of selecting a channel number Timer recording is not possible through the front AUDIO VIDEO input jacks 12 00 PM noon 12 00 AM midnight If the end of the tape is reached during timer recor...

Страница 40: ...minute increments Auto Setting If an XDS encoded broadcast is being recorded AUTO appears at step 1 above and blinks for 10 seconds in the display The VCR timer receives the end time information from...

Страница 41: ...tive the message Blocked will appear on the TV screen NOTES Even when the child lock function is activated timer recording and other functions can still operate normally Since the child lock function...

Страница 42: ...pause mode 8 Press PLAY on VCR 1 9 When the tape in VCR 1 has reached the desired point press release PAUSE STILL on VCR 2 Recording begins F Press STOP or STOP EJECT on the front panel on both VCRs...

Страница 43: ...e vinyl tape over the safety tab hole in the cassette The channel selected on the VCR does not correspond to the cable converter decoder output channel Select the correct channel CH 02 07 The picture...

Страница 44: ...mer 1 year 8 event programmable Terminals Antenna input VHF UHF F type Antenna output VHF UHF F type Video input output RCA jack Audio input output RCA jack Electrical Specifications Video output leve...

Отзывы: