


EH Valves (NPS 8 through 14)
Instruction Manual
April 2009
10
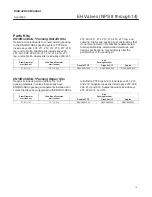
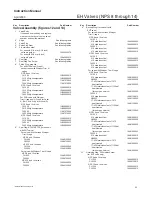
Table 7. Seat Ring and Seat Ring Cap Screw Lubricants and Recommended Torque for Seat Ring Cap Screws
LUBRICANT
VALVE
SIZE,
NPS
VALVE
RATING
RECOMMENDED TORQUE
Spiral Wound
Gasket Construction
O-Ring Construction or
Constructions for
Sour Gas Service
N
S
m
lbf
S
ft
N
S
m
lbf
S
ft
Lithium Grease or
Anti-Seize
Lubricant
8, 10
CL1500
61
45
41
30
CL2500
95
70
61
45
12, 14
CL1500
95
70
61
45
CL2500
95
70
61
45
Dry Film
Lubricant
8, 10
CL1500
47
35
34
25
CL2500
75
55
47
35
12, 14
CL1500
75
55
47
35
CL2500
75
55
47
35
16. Mount the actuator on the valve body assembly,
and reconnect the actuator and valve plug stem
according to the Actuator Mounting procedure. After
the control valve is returned to service, retighten the
hex nuts (key 14, figure 12 or 13) to the torque
recommended in table 6.
Trim Removal
WARNING
Refer to the WARNING at the
beginning of the Maintenance section
in this instruction manual.
For Bore seal construction, see the appropriate Bore
seal sections in this instruction manual.
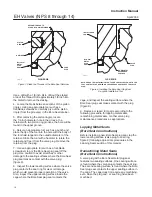
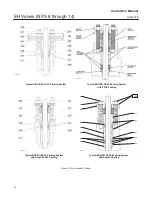
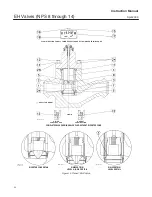
Key numbers referenced in this procedure are
shown in figure 12 for the EHD valve and figure 13
for the EHT valve except where indicated.
1. Remove the actuator and bonnet by following
steps 1 through 9 of the Replacing Packing
procedure.
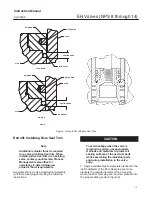
2. To remove the seat ring (key 6), remove the cap
screws (key 7). Install eyebolts or similar devices in
the 5/8 inch 11-UNC tapped holes (9/16 inch
12-UNC for an NPS 8 or 10 CL1500 valve). Use the
eyebolts to carefully lift the seat ring out of the valve
body. If the seat ring is to be reused, exercise care
to protect the gasket surfaces on the bottom of the
seat ring.
3. Remove the spiral wound seat ring gasket or
O-ring (key 12).
4. Refer to the following appropriate valve plug
maintenance procedure or to the Lapping Seats
procedure.
EHD and EHT Valve Plug Maintenance
Key numbers used in this procedure are shown in
figure 12 for the EHD valve and in figure 13 for the
EHT valve.
1. With the valve plug (key 3) removed per the Trim
Removal procedure, proceed as appropriate:
For the EHD valve,
the piston rings (key 8) are each
in two sections; remove the sections from the
grooves in the valve plug.
For all EHT valves,
work the retaining ring (key 10)
off the valve plug with a screwdriver. Carefully slide
the backup ring and seal ring (keys 9 and 8) off the
valve plug. Additionally, for the EHT valve with
Whisper Trim Level D cage, remove the two sections
of the piston ring (key 30, figure 13).
2. To replace the valve plug stem (key 4), drive out
the pin (key 5) and unscrew the stem from the valve
plug (key 3).
CAUTION
Never reuse an old stem with a new
valve plug. Using an old stem with a
new plug requires drilling a new pin
hole in the stem. This weakens the
stem and may cause the stem to fail in
service. If a new valve plug is required,
always order a valve plug, stem, and
pin as an assembly. Specify the
correct part number of each of the
three parts but state that the parts are
being ordered as an assembly.
A used valve plug may be reused with
a new stem.
3. Thread the new stem into the valve plug until the
stem wedges tightly at the end of the thread. Using