background image

Lit. No. 49599, Rev. 05 

April 1, 2018

29250, 29350, 97000, 97000-1, 97100, 97100-1

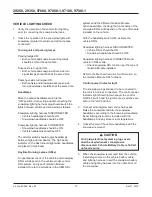
6.  Turn the control ON and completely angle the 

blade to the left and right several times. Raise and 
lower the snowplow several times. Activate the 
control FLOAT function and manually collapse the 
lift ram all the way. Turn the control OFF.

7. Remove 

the 

fi

 ll plug and check the 

fl

 uid level. 

With the lift ram fully retracted, the 

fl

 uid level 

should reach the 

fi

 ll hole. If additional 

fl

 uid is 

needed, 

fi

 ll the reservoir with FISHER

®

 EZ Flow 

Hydraulic Fluid rated to –40°F (–40°C), or 
other 

fl

 uid conforming to Military Speci

fi

 cation 

MIL-H-5606 A, such as Mobil Aero HFA or Shell 
AeroShell

®

 Fluid 4.

NOTE: Remove 

fi

 ll plug slowly to relieve any 

pressure in reservoir.

8.  Replace and tighten the 

fi

 ll plug.

HYDRAULIC UNIT

The MC Series snowplow hydraulic system comes 
from the factory pre-assembled, partially 

fi

 lled, and 

fully tested.

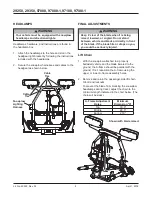
1.  Attach the snowplow to the vehicle according to 

the instructions on the headgear.

2.  Remove the cover of the hydraulic unit.

3.  Remove and discard the factory-installed pipe 

plug from the breather port. Install the 90° elbow 
into the port, with the elbow pointing up.

4.  Install the breather into the elbow.

5.  Replace the cover.

 WARNING

Keep 8' clear of the blade when it is being 
raised, lowered, or angled. Do not stand 
between the vehicle and blade or directly in 
front of the blade. If the blade hits or drops on 
you, you could be seriously injured.

 CAUTION

Do not mix different types of hydraulic 

fl

 uid. 

Some 

fl

 uids are not compatible and may 

cause performance problems and product 
damage.

FLUID CAPACITY

• Insta-Act

®

 Unit Reservoir 

1-3/4 quarts

•  Insta-Act System Total 

2-3/8 to 2-3/4 quarts

AeroShell

®

 is a registered trademark (

®

) of Shell Oil Company.

Drain Plug

Fill Plug

Breather

90° Elbow

 WARNING

To prevent accidental movement of the blade, 
always turn the control OFF whenever the 
snowplow is not in use. The power indicator 
light will turn OFF.

Содержание 29250

Страница 1: ...c vehicle application recommendations before installation The eMatch selection system has specific vehicle and snowplow requirements MC Series Snowplows Installation Instructions Fisher Engineering Ap...

Страница 2: ...tes a potentially hazardous situation that if not avoided may result in minor or moderate injury It may also be used to alert against unsafe practices WARNING CAUTION INSTRUCTION LABELS Become familia...

Страница 3: ...ires WARNING Hydraulic fluid under pressure can cause skin injection injury If you are injured by hydraulic fluid get medical attention immediately SAFETY PRECAUTIONS Improper installation and operati...

Страница 4: ...796 1117 M33 x 3 50 M36 x 4 00 2101 2701 1468 1952 325 M16 x 2 00 231 167 M18 x 2 50 318 222 Recommended Fastener Torque Chart Size Size Torque ft lb Grade 5 Grade 8 Metric Fasteners Class 8 8 and 10...

Страница 5: ...ins and discard the shipping brackets 5 Align the holes in the headgear assembly with the middle hole in the A frame Attach the A frame to the headgear assembly with two 1 1 4 clevis pins and 1 4 x 2...

Страница 6: ...ating position lower the jack leg to support the headgear Release the jack lock to hold the jack in position 6 Remove the protective packaging from the angle rams 1 1 4 x 6 7 8 Pivot Pin 1 4 x 2 Cotte...

Страница 7: ...ally filled and fully tested 1 Attach the snowplow to the vehicle according to the instructions on the headgear 2 Remove the cover of the hydraulic unit 3 Remove and discard the factory installed pipe...

Страница 8: ...d to a properly ballasted vehicle and the blade lowered to the ground the A frame should be parallel with the ground If not reposition the A frame using the upper or lower A frame assembly holes 2 Rem...

Страница 9: ...ations in vehicle frame height it may be necessary to adjust the spring location to ensure optimal performance First link oriented in direction of lift If you encounter mounting or dismounting difficu...

Страница 10: ...ehicle DRL system and type of Isolation Module installed Due to the variations in the OEM DRL systems and the different Isolation Module options available checking the functionality of the snowplow DR...

Страница 11: ...pleted snowplow will be delivered immediately the Owner s Manual should be reviewed with and given to the purchaser according to the snowplow checklist If the snowplow is completed prior to delivery t...

Страница 12: ...ineering or the vehicle manufacturer may require or recommend optional equipment for snow removal Do not exceed vehicle ratings with a snowplow Fisher Engineering offers a limited warranty for all sno...

Отзывы: