background image

6-2

Isotemp Basic

Fisher Scientific

Section 6

Specifications

IE1786V (8958)

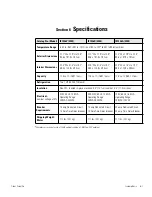
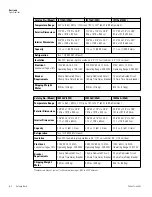
-50C to -86C (-58F to -123F) in an 18C to 32C* (64.4F to 89.6F) ambient

33.3”W x 77.9”H x 38,9”
84.6 x 197.9 x 94.0cm

23.0”W x 51.5”H x 25.3”
58.4 x 130.8 x 64.3cm

17.3 cu. ft. (489.9 liters)

Two 1 HP (2545 BTUH each)

Non-CFC, foamed-in-place urethane: 5.0” (12.7 cm) cabinet; 4.5” (11.4 cm) door

230V, 50 Hz, 12.0FLA
Operating Range: 208-240V

15 amp Dedicated Circuit,
15 Amp Time Delay Breaker

830 lbs. (376 kg)

IE1786D (8957)

33.3”W x 77.9”H x 38.9”
84.6 x 197.9 x 94.0cm

23.0”W x 51.5”H x 25.3”
58.4 x 130.8 x 64.3cm

17.3 cu. ft. (489.9 liters)

208-230V, 60 Hz, 12.0FLA
Operating Range: 208-240V

15 amp Dedicated Circuit,
15 Amp Time Delay Breaker

830 lbs. (376 kg)

IE1786A (8956)

33.3”W x 77.9”H x 38.9”
84.6 x 197.9 x 94.0cm

23.0”W x 51.5”H x 25.3”
58.4 x 130.8 x 64.3cm

17.3 cu. ft. (489.9 liters)

120V, 60 Hz, 16.0 FLA
Operating Range: 108-130V

20 amp Dedicated Circuit,
20 amp Time Delay Breaker

830 lbs. (376 kg)

Catalog No. (Model)

Temperature Range

Exterior Dimensions

Interior Dimensions

Capacity

Refrigeration

Insulation

Electrical - 

nominal voltage ±10%

Breaker

Requirements

Shipping Weight:
Motor

*

Compressors may not cycle off with cabinet running at -86C in a 32C ambient.

IE2386 A (8964)

-50C to -86C (-58F to -123F) in an 18C to 32C* (64.4F to 89.6F) ambient

40.8”W x 77.9”H x 38.9”
103.6 x 197.9 x 94.0cm

30.6”W x 51.5”H x 25.3”
77.7 x 130.8 x 64.3cm

23.0 cu. ft. (651.3 liters)

Two 1 HP (2545 BTUH each)

Non-CFC, foamed-in-place urethane: 5.0” (12.7 cm) cabinet; 4.5” (11.4 cm) door

120V, 60 Hz, 16.0 FLA
Operating Range: 108-130V

20 amp Dedicated Circuit,
20 amp Time Delay Breaker

900 lbs. (408 kg)

IE2386D (8963)

40.8”W x 77.9”H x 38.9”
103.6 x 197.9 x 94.0cm

30.6”W x 51.5”H x 25.3”
77.7 x 130.8 x 64.3cm

23.0 cu. ft. (651.3 liters)

208-230V, 60 Hz, 12.0FLA
Operating Range: 208-240V

15 amp Dedicated Circuit,
15 Amp Time Delay Breaker

900 lbs. (408 kg)

IE2386V (8959)

40.8”W x 77.9”H x 38.9”
103.6 x 197.9 x 94.0cm

30.6”W x 51.5”H x 25.3”
77.7 x 130.8 x 64.3cm

23.0 cu. ft. (651.3 liters)

230V, 50 Hz, 12.0FLA
Operating Range: 208-240V

15 amp Dedicated Circuit,
15 Amp Time Delay Breaker

900 lbs. (408 kg)

Catalog No. (Model)

Temperature Range

Exterior Dimensions

Interior Dimensions

Capacity

Refrigeration

Insulation

Electrical- 

nominal voltage ±10%

Breaker

Requirements

Shipping Weight:
Motor

Содержание Isotemp Basic -86C

Страница 1: ...Isotemp Basic 86C Freezers Installation and Operation Manual 7028953 Rev 1 2013 Fisher Scientific Inc All rights reserved Printed in U S A Isotemp ...

Страница 2: ...ty 122005 Key 2 380520 Neoprene Cap 2 510016 1 4 20 x 5 1 2 Bolt 2 195763 Retaining Clip 1 370563 Remote Alarm Connector 1 Important installer and user information A redundant temperature sensing device has been included in this ULT freezer This device is a type T thermocouple For convenient access the thermocouple Figure 1 3 terminates in an interconnect jack Figure 1 5 behind the base front cove...

Страница 3: ...ncidental arising out of or related to the use of this manual The 86C Freezers see page i for specific list of models described in this manual are high performance units which can be used for research and in situations that directly support medical applications When these products are used to support a medical application it is an accessory to a medical device and is therefore considered as a medi...

Страница 4: ...he equipment that has been put on the market after 13 August 2005 This product is required to comply with the European Union s Waste Electrical Electronic Equipment WEEE Directive 2002 96 EC It is marked with the WEEE symbol Fisher Scientific has contracted with one or more recycling disposal companies in each EU Member State European Country and this product should be disposed of or recycled thro...

Страница 5: ...tation on our Extended Maintenance Program for our products Whatever products you need or use we will be happy to discuss your applications If you are experiencing technical problems working together we will help you locate the problem and chances are correct it yourself over the telephone without a service call When more extensive service is necessary we will assist you with direct factory traine...

Страница 6: ... 6 Set the Operating Temperature 1 7 Set the High Temperature Alarm 1 7 Set the Low Temperature Alarm 1 8 Run Mode 1 8 Calibrate 2 1 Calibrate the Control Probe 2 1 Alarms 3 1 High Stage System Failure 3 1 Probe Failure Alarm 3 2 Maintenance 4 1 Clean the Air Filter 4 1 Clean the Condenser 4 2 Clean Water cooled Condenser 4 2 Defrost the Chamber 4 3 Prepare the Unit for Storage 4 3 Clean the Door ...

Страница 7: ... and Maintenance 5 5 BUS Control Panel 5 5 Configure the Optional BUS 5 5 Set the Optional BUS Set Point 5 6 Test BUS Operation 5 6 Clean the Vent Stack 5 6 Disconnect the Fitting Assembly Transfer Hose 5 7 Chart Recorder 5 7 Install the Chart Paper 5 7 Change the Recorder Temperature Range 5 7 Calibrate the Chart Recorder 5 8 Specifications 6 1 Warranty Appendix Declarations of Conformity Table o...

Страница 8: ... 1 2 Remote alarm contacts Power Inlet for power cord connection Optional BUS connections for probe and solenoid Power Switch mains disconnect Isotemp Basic 1 1 Fisher Scientific Section 1 Installation and Start Up Figure 1 1 Front View Optional Back up System Connections Power Switch mains disconnect Power Inlet Remote Alarm Contacts Wall Bumper pre tapped holes Figure 1 2 Rear View ...

Страница 9: ...S battery Freezer filter location Shelf Bracket Sealant Caution This is a critical seal Seal must be maintained Optional Recorder Probe Datalogger Probe Control RTD Redundant Type T Thermocouple Probe Optional Miscellaneous Accessories Probe Figure 1 3 Chamber Probe Vacuum Relief Port Figure 1 4 Vacuum Relief and Probe Cover Location Probe Cover O Battery power switch To remove filter Thermocouple...

Страница 10: ...ion of the cabinet Silence Silences the audible alarm Alarm Panel indicates the current alarm condition Up and Down Arrows Increases or decreases values toggles between choices Enter Stores the value into memory This Isotemp freezer has five basic modes which allow freezer setup and operation Press the Mode key to scroll through the mode selections Up Arrow Increases or toggles the parameter value...

Страница 11: ...ion set the front caster brakes Caution The freezer must not be moved with the product load inside s Caution For proper ventilation and airflow minimum clearance of 5 at the rear and top and clearance of 8 on the side of the freezer is required Allow adequate space on freezer front for door opening s Locate the freezer on a firm level surface in an area with an ambient temperature between 18 C and...

Страница 12: ...s a NO normally open output a NC normally closed output and COM common The contacts will trip on a power outage high temperature alarm or low temperature alarm They aill also trip on high stage control probe or microboard failure Figure 1 8 shows the remote contacts in alarm state Insert the power cord into the power inlet module Place the retaining bracket P N 195763 over the connector Tighten re...

Страница 13: ...charge at initial start up A Low Battery alarm may occur until the batteries are fully charged Should a power failure occur during the initial start up period the electronics will have limited operation s With the freezer properly installed and connected to power system set points can be entered The following set points can be entered in Settings mode control temperature high temperature alarm set...

Страница 14: ...ng when the freezer chamber temperature has reached or exceeded the high temperature alarm set point To set the high temperature alarm set point 1 Press the Mode key until the Set High Alarm indicator lights 2 Press the up or down arrow key until the desired high temperature alarm set point is displayed 3 Press Enter to save the setting 4 Press the Mode key until the Run indicator lights for Run m...

Страница 15: ...o control keys are pressed the freezer will automatically return to RUN mode after 5 minutes Note The low alarm set point must be set at least 5 C from the control set point s Run mode is the default mode for the freezer This mode will display the cabinet temperature on the temperature display under normal operating conditions In addition Run mode allows display of the high stage heat exchange tem...

Страница 16: ...d inside the lower door Figure 1 5 Compare the control temperature set point to the temperature of the measuring device 1 Press the Mode key until the Calibrate indicator lights 2 Press up down arrow to match the display to calibrated instrument 3 Press Enter to store calibration 4 Press the Mode key to return to Run mode Temperature Stabilization Periods Startup Allow 12 hours for the temperature...

Страница 17: ......

Страница 18: ...condition occurs and then returns to normal the freezer automatically clears the alarm condition All alarm delays and ringback times are 30 seconds The automatic battery test runs immediately on initial start up then every 8 hours thereafter Description Delay Ringback Relay Power Failure 1 min 15 min Yes High Temperature Alarm 1 min 15 min Yes Low Temperature Alarm 1 min 15 min Yes Probe Failure 1...

Страница 19: ...y are operating properly Should an error be detected the Probe Failure alarm will occur as shown in the table above If an error is detected with the control probe the high and low stage compressors will run continuously As a result the cabinet temperature will decrease until it reaches the lowest temperature that the refrigeration system can maintain If an error is detected with the heat exchanger...

Страница 20: ...op the startup sequence for this condi tion ErA1 No pulses zero crossings detected to determine frequency 50 60 Hz ErC1 Frequency detected is below 50 Hz Erd1 Frequency detected is above 60 Hz Possible noise spikes on supply voltage ErE1 Unit is 230V and the voltage detected is below the low limit 180VRMS ErF1 Unit is 230V and the voltage detected is above the high limit 260VRMS Erg1 Unit is 115V ...

Страница 21: ...micro board In the event that the system couldn t rectify the issue the following sequence of events will occur 1 Remote alarm contacts will become active 2 Buzzer will annunciate audibly and will have a ringback of 15 minutes 3 Seven segment display will show Er07 4 The system will have 10 minute staging between the high stage compressor and the low stage compressor activation 5 The system will g...

Страница 22: ...he door See Figure 4 1 Grasp the middle of the filter material behind the grille and gently pull out to remove 3 Wash the filter material using water and a mild detergent 4 Dry by pressing between two towels 5 Install the filter back into the grille and close the door Depending upon environmental conditions the filter may need to be cleaned or replaced more frequently If the filter becomes torn or...

Страница 23: ...aution Do not use liquids that are corrosive to stainless steel or the brazing material copper or nickel s CIP Clean In Place Procedure 1 Disconnect the unit from the water supply 2 Drain the unit 3 Rinse with fresh water and drain the unit again 4 Fill with fresh water 5 Add cleaning agent solution and concentration dependent on deposits or build up 6 Circulate cleaning solution if feasible 7 Dra...

Страница 24: ...d dry with a soft cloth 8 Plug unit in and turn power switch on 9 Turn the battery power switch to Standby mode 10 Allow the freezer to operate empty overnight before reloading the product Defrost the unit as described previously This prepares the unit for storage Turn off the battery power switch O Turn off the freezer power switch Disconnect power to the battery s and to the freezer Using a soft...

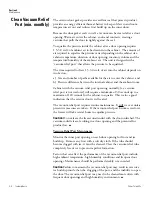
Страница 25: ...mum of 30 seconds up to a maximim of 120 seconds for the cabinet to equalize This is also a good indication that the exterior door is well sealed The vacuum relief port requires routine maintenance It will ice over unless preventive measures are taken If the vacuum relief port becomes iced over the freezer will take several hours to equalize pressure Caution Do not leave the freezer unattended wit...

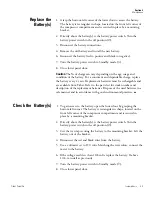
Страница 26: ...k number and description of the replacement batteries Dispose of the used batteries in a safe manner and in accordance with good environmental practices s 1 To gain access to the battery open the lower door by grasping the bottom left corner The battery is rectangular in shape located on the front left corner of the compressor compartment and is secured in place by a mounting bracket 2 Directly ab...

Страница 27: ...tion on Preventive Maintenance or Extended Warranties please contact us at the number below Cleaning and calibration adjustment intervals are dependent upon use environmental conditions and accuracy required Tips Fill an upright by starting at the bottom near the probe and add racks to one shelf at a time Allow freezer to recover to set point between shelves Fill a chest by starting at the left si...

Страница 28: ...air filter Clean or replace as needed þ 4X 1 4 Check alarm back up battery þ Replace Check condenser fan motor for unusual motor noise or vibration þ 2 Verify and document calibration at the minimum annually þ 4 Clean condenser compartment and wipe off condenser þ Qualified service technicians only Dispose of properly according to all state and federal regulations To minimize ice build up inside o...

Страница 29: ......

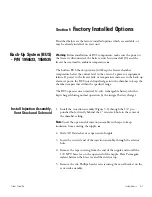
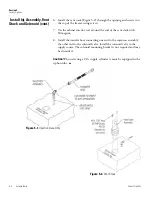
Страница 30: ...fied range The BUS operates on an internal 12 volt rechargeable battery which is kept charged during normal operation by the integral battery charger 1 Install the injection assembly Figure 5 1 through the 1 2 pre punched hole directly behind the 2 vent stack hole in the center of the chamber ceiling Note Cover the open end of injection assembly with tape to keep insulation from entering the nippl...

Страница 31: ...stack with Permagum 8 Install the transfer hose connecting one end to the injection assembly the other end to the solenoid valve Install the solenoid valve to the supply source The solenoid mounting bracket is not required and may be discarded Caution When selecting a CO2 supply cylinder it must be equipped with a siphon tube s Install Inj Assembly Vent Stack and Solenoid cont Figure 5 1 Injection...

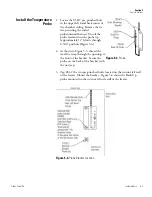
Страница 32: ...e 5 3 thread the small tie wrap through the openings in the front of the bracket Secure the probe on the back of the bracket with the tie wrap 3 Tap 8 32 the two pre punched holes located on the interior left wall of the freezer Mount the bracket Figure 5 4 shows the Back Up probe mounted on the interior left side wall of the freezer Isotemp Basic 5 3 Fisher Scientific Section 5 Factory Options In...

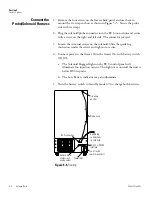
Страница 33: ...o the freezer Turn the freezer On with battery switch Off O a The Solenoid Engaged light on the BUS control panel will illuminate no injection occurs This light stays on until the unit is below BUS setpoint b The Low Battery indicator may also illuminate 5 Turn the battery switch to Standby mode to charge both batteries 5 4 Isotemp Basic Fisher Scientific Section 5 Factory Options Connect the Prob...

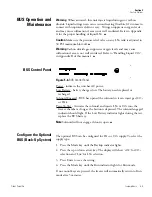
Страница 34: ...he solenoid so it can inject gas CO2 or LN2 Press To Test Activates the solenoid and injects LN2 or CO2 into the freezer chamber as long as the button is depressed The solenoid engaged indicator should light If the Low Battery indicator lights during the test replace the BUS battery Note Solenoid will not engage if door is open s The optional BUS can be configured for LN2 or CO2 supply To select t...

Страница 35: ...re alarm set point see Section 1 If the back up system is installed with CO2 then 65 C is the coldest BUS set point that can be used if the cabinet set point is 75 C or colder s After the freezer has stabilized and both batteries are fully charged the BUS can be tested to verify proper operation 1 Disconnect the AC power to the freezer by turning the power switch off 2 As the freezer warms up veri...

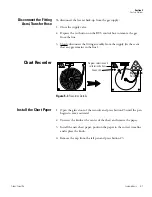
Страница 36: ...on 3 until the pen begins to move outward 2 Unscrew the knob at the center of the chart and remove the paper 3 Install the new chart paper position the paper to the correct time line and replace the knob 4 Remove the cap from the felt pen and press button 3 Isotemp Basic 5 7 Fisher Scientific Section 5 Factory Options 1 2 3 Program selection and calibration buttons Green LED 1 2 3 Figure 5 7 Recor...

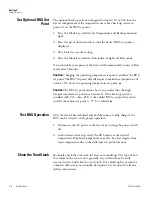
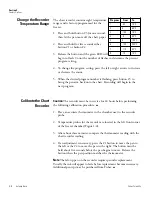
Страница 37: ...rate thermometer in the chamber next to the recorder probe 2 Temperature probes for the recorder are located in the left front corner of the freezer chamber Figure 1 4 3 After about three minutes compare the thermometer reading with the chart recorder reading 4 If an adjustment is necessary press the 1 button to move the pen to the left or the 2 to move the pen to the right The button must be held...

Страница 38: ...x 197 9 x 78 7cm 23 0 W x 51 5 H x 19 3 58 4 x 130 8 x 49 0cm 13 0 cu ft 368 1 liters 208 230V 60 Hz 12 0FLA Operating Range 208VAC 240VAC 15 amp Dedicated Circuit 15 Amp Time Delay Breaker 711 lbs 323 kg IE1386V 8953 33 3 W x 77 9 H x 32 9 84 6 x 197 9 x 78 7cm 23 0 W x 51 5 H x 19 3 58 4 x 130 8 x 49 0cm 13 0 cu ft 368 1 liters 230V 50 Hz 12 0FLA Operating Range 208VAC 240VAC 15 amp Dedicated Ci...

Страница 39: ...eration Insulation Electrical nominal voltage 10 Breaker Requirements Shipping Weight Motor Compressors may not cycle off with cabinet running at 86C in a 32C ambient IE2386 A 8964 50C to 86C 58F to 123F in an 18C to 32C 64 4F to 89 6F ambient 40 8 W x 77 9 H x 38 9 103 6 x 197 9 x 94 0cm 30 6 W x 51 5 H x 25 3 77 7 x 130 8 x 64 3cm 23 0 cu ft 651 3 liters Two 1 HP 2545 BTUH each Non CFC foamed in...

Страница 40: ... inventory This unit is not intended for use in a Class II medical application as defined by Title 21 of the Federal Code of Regulations 1 Installation category overvoltage category defines the level of transient overvoltage which the instrument is designed to withstand safely It depends on the nature of the electricity supply and its overvoltage protection means For example in CAT II which is the...

Страница 41: ......

Страница 42: ...or and foamed in place door parts only Please contact your sales representative or Thermo for additional information Replacement or repair of component parts or equipment under this warranty shall not extend the warranty to either the equipment or to the component part beyond the original two year warranty period The Technical Services Department must give prior approval for the return of any comp...

Страница 43: ...amed in place cabinet design carries a unit production lifetime warranty foamed in place cabinet evaporator and foamed in place door parts only Please contact your sales representative or Thermo for addi tional information Replacement or repair of component parts or equipment under this warranty shall not extend the warranty to either the equip ment or to the component part beyond the original two...

Страница 44: ...hoes Trousers which should be cuffless if possible should be worn outside the shoes The safe handling and use of liquid nitrogen in cryogenic refrigerators and dewar flasks is largely a matter of knowing the potential hazards and using common sense procedures based on that knowledge There are two important properties of liquid nitrogen that present potential hazards 1 It is extremely cold At atmos...

Страница 45: ... their accessories Do not overfill containers Filling above the bottom of the necktube or specified maximum level can result in overflow and spillage of liquid when the necktube core or cover is placed in the opening Never use hollow rods or tubes as dipsticks When a warm tube is inserted into liquid nitrogen liquid will spout from the top of the tube due to gasifica tion and rapid expansion of li...

Страница 46: ...dy vapor that appears when liquid CO2 is exposed to the air is condensed moisture not the gas itself The issuing gas is invisible s Never dispose of liquid CO2 in confined areas or places where others may enter Disposal of liquid CO2 should be done outdoors in a safe place Pour the liquid slowly on gravel or bare earth where it can evaporate without causing damage Do not pour the liquid on pavemen...

Страница 47: ...A 4 Isotemp Basic Thermo Scientific ...

Страница 48: ...Fisher Scientific 300 Industry Drive Pittsburgh PA 15275 USA www fishersci com ...

Отзывы: