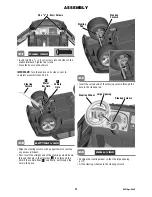
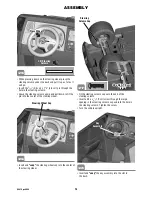
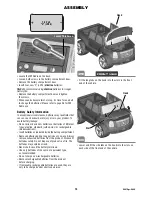
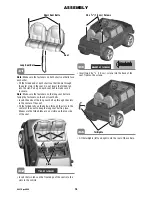
Fisher-Price Cadillac Escalade Скачать руководство пользователя страница 27

27

X3419pr-0920

PROBLEMS AND SOLUTIONS GUIDE

PROBLEM

POSSIBLE CAUSE

SOLUTION

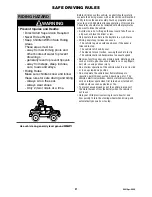
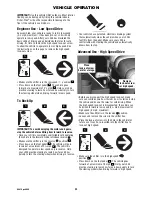
Vehicle runs in low speed, 
but does not run in 
high speed

Please Note: The vehicle 
is designed to operate 
in low speed only in 
reverse 

.

High speed lock-out not disconnected

The vehicle was pre-set to run only in low speed. To 
allow the vehicle to run in low and high speed, you must 
disconnect the High Speed Lock-Out. Follow the instructions 
on page 26 to remove the High Speed Lock-Out screw.

When the foot pedal is 
pressed one rear 
wheel spins

Operation of vehicle in low speed

It is possible that only one rear wheel may spin when both 
only rear wheels are raised off the ground and the vehicle is 
in low speed. This does not necessarily indicate a problem. 
Check for proper operation of the drive system by raising the 
rear wheels off the ground and pressing the foot pedal. 
If only one rear wheel spins, carefully press your hand on 
the spinning wheel to slow it down. The other rear wheel 
should begin to spin. If the other rear wheel does not begin 
to spin, there may be a problem with the vehicle. Contact 
your local Power Wheels

®

 authorized service center for 

diagnosis and repair.

Sometimes the vehicle 
doesn’t run, but other 
times it does

Loose wire or connector

Check all wires around the motors and all connectors to 
make sure they are tight.

Motor or electrical switch damage

Contact your local Power Wheels

®

 authorized service center 

for diagnosis and repair.

When the foot pedal is 
pressed, the vehicle won’t 
run without a push

Loose wire or connector

Check all wires around the motors and all connectors to 
make sure they are tight.

“Dead Spot” on motor

Contact your local Power Wheels

®

 authorized service center 

for diagnosis and repair.

Battery’s thermal fuse 
constantly "trips", but the 
vehicle is not overloaded 
nor the driving conditions 
too severe

Damaged battery

Contact your local Power Wheels

®

 authorized service center 

for diagnosis and repair.

Child is switching between FORWARD 
and REVERSE without stopping

Teach your child to stop the vehicle before switching direction.

Loud clacking or grinding 
noise from a motor-gearbox

Broken gears

Contact your local Power Wheels

®

 authorized service center 

for diagnosis and repair.

Charger gets warm 
during use

It is normal for some chargers to get 
warm during use and is not reason for 
concern. Some chargers do not get 
warm during use.

No action required.

If your charger does not get warm during use, it does not 
mean that it is not working properly.

Battery makes a sizzling 
or gurgling noise 
when charging

It is normal for some batteries to make 
noise and swell slightly while charging 
and is not reason for concern.

No action required.

If your battery does not make noise or swell slightly during 
charging, it does not mean that it is not accepting the charge.
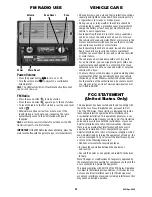
FM Radio does 
not function

Power is off

Power automatically turns off after about one hour of 
non-use. Press the power button 

 to turn it back on.

Batteries are weak or dead

Replace all four batteries with four, new "C" (LR14) 

alkaline

 batteries.

FM Radio station changes 
automatically

Poor reception

You may fi nd better reception of a particular station in 
a different location.

Power was turned off and the radio 
reset back to the fi rst station

Use the scan button to reset to your favorite station.

Содержание Cadillac Escalade

Страница 1: ...rgeable Battery with Built in Thermal Fuse Rechargeable Battery with Built in Thermal Fuse and Power Wheels and Power Wheels 12 Volt Charger with Type 12 Volt Charger with Type 12V Connector both included 12V Connector both included Requires four C LR14 Requires four C LR14 alkaline alkaline batteries batteries not included for FM Radio operation not included for FM Radio operation Owner s Manual ...

Страница 2: ...ing in serious injury and could also ruin the electrical system Use of the wrong type battery or charger could cause a fire or explosion resulting in serious injury Use of Power Wheels components in products other than Power Wheels vehicles could cause overheating fire or explosion The battery must be handled by adults only The battery is heavy and contains sulfuric acid electrolyte Dropping the b...

Страница 3: ...ting safety device which automatically trips and shuts down operation of the vehicle if the vehicle is overloaded or the driving conditions too severe Once a fuse has tripped remove your foot from the pedal and wait approximately 25 seconds before operating the vehicle again To avoid repeated automatic shut downs avoid severe driving conditions If a thermal fuse in a battery continually trips unde...

Страница 4: ...to the store Please identify all parts before assembly and save all packaging material until assembly is complete to ensure that no parts are discarded Note Some parts of this product have been packed with a protective foam cover After removing the foam cover you may notice a cloudy film on the parts Wipe these parts with a clean dry soft cloth to remove this residue PARTS Steering Column Truck Be...

Страница 5: ...embly Tool Key Assembly 12 Volt Battery 12 Volt Charger Fasteners Shown Actual Size For your convenience we included extra fasteners Note Tighten and loosen all screws with a Phillips screwdriver Do not over tighten the screws 7 16 1 1 cm Washer 2 8 x 3 4 1 9 cm Screw 34 3 8 0 95 cm 16 Lock Nut 2 1 4 x 11 4 0 6 cm x 3 1 cm Screw 2 5 32 0 4 cm x 11 2 3 8 cm Pin 1 Steering Wheel 2 Wheel Covers 2 Fro...

Страница 6: ...X3419pr 0920 6 PARTS PICTURE Note Some parts shown are assembled on both sides of the vehicle ...

Страница 7: ...he battery Read the safety instructions on the battery Examine the battery charger and their connectors for excessive wear or damage each time you charge the battery If damage or excessive wear is detected do not use the charger or the battery until you have replaced the worn or damaged part WARNING CAUTION Charger Connector Plug the charger connector into the battery Plug the charger into a stand...

Страница 8: ...xle Repeat this procedure to assemble the other 7 16 1 1 cm washer and bushing to the other front axle 7 16 1 1 cm Washer Front Axle Bushing RIGHT SIDE VIEW Note Protective caps have been added to the threaded metal parts to prevent damage during shipping Please remove and throw the caps away 1 Hint There is a right and a left front wheel Place the right wheel marked R on the passenger side of the...

Страница 9: ...other 3 8 0 95 cm 16 lock nut 3 8 0 95 cm 16 Lock Nut Assembly Tool Align the slot in a hubcap with the rib in the wheel cover Snap a hubcap into the center of each wheel cover Wheel Cover Hubcap 4 5 Fit the front end onto the vehicle Insert the tabs on the back edge of the front end into the slots in the vehicle Front End Insert two 8 x 3 4 1 9 cm screws through the front end and into the vehicle...

Страница 10: ...nto the bumper and tighten Snap the headlights into the headlight lenses Hint There is a left and right headlight and headlight lens Apply the labels to the headlights Before applying the labels wipe the surface of the vehicle with a clean dry cloth to remove any dust or oils Place the labels exactly as shown in the illustration For best results avoid repositioning a label once it has been applied...

Страница 11: ... the holes near the front end of the vehicle Hint There is a left and right door They are designed to be assembled one way 15 Insert one 8 x 3 4 1 9 cm screw into the top edge of each headlight Tighten the screws 14 8 x 3 4 1 9 cm Screws Fit the headlights left and right onto the bumper Hint Headlights only fit one way If they do not seem to fit try the other side Headlights 13 Doors ...

Страница 12: ...4 1 9 cm screws into the base of the windshield dash Tighten the screws Position the motor harness connector towards the front of the vehicle and into the battery compartment Motor Harness Connector Front BACK VIEW 18 19 20 8 x 3 4 1 9 cm Screws Insert three 8 x 3 4 1 9 cm screws into each plate and tighten 17 8 x 3 4 1 9 cm Screws 8 x 3 4 1 9 cm Screws ...

Страница 13: ...s lubricant First insert the straight end of the steering column down through the hole in the metal bar A then through the hole in the vehicle floor B and finally out through the hole in the dash Steering Column Metal Bar Hole BOTTOM VIEW A B Vehicle Hole IMPORTANT Turn the vehicle on its side or over to complete assembly steps 23 28 Position the steering wheel so that the large opening is UP Fit ...

Страница 14: ... 32 0 4 cm x 11 2 3 8 cm pin through the hole in the steering column Grasp the steering column again and pull down to fit the pin into the center of the steering wheel Press Wheel Press Wheel Lift Steering Column Press Wheel Steering Column Cap Fit the steering column cap onto the end of the steering column Insert a 8 x 3 4 1 9 cm screw through the large opening in the steering column cap and into...

Страница 15: ...s recommended Do not charge non rechargeable batteries Remove rechargeable batteries from the product before charging If removable rechargeable batteries are used they are only to be charged under adult supervision 1 5V x 4 C LR14 Locate the FM Radio on the dash Loosen both screws in the battery compartment door Remove the battery compartment door Insert four new C LR14 alkaline batteries Hint We ...

Страница 16: ...the fasteners on the long seat belt are facing the fasteners on the short seat belts Insert the ends of the long seat belt up through the slots in the center of the seat Fit the folded tabs on the belt up through the slots in the center of the seat to keep the long seat belt in place Make sure the folded tabs are on visible on the top side of the seat Short Seat Belts Long Seat Belt Seat Insert tw...

Страница 17: ...e way Make sure the tabs on the top of the taillights fit into the bottom of each wing Wings Taillight Tabs Insert two 8 x 3 4 1 9 cm screws into each wing Tighten the screws Place the truck bed over the back end of the vehicle Truck Bed Insert three 8 x 3 4 1 9 cm screws into the top of the truck bed Tighten the screws 35 37 36 38 8 x 3 4 1 9 cm Screws 8 x 3 4 1 9 cm Screws ...

Страница 18: ...t or oils Place the labels exactly as shown in the illustrations For best results avoid repositioning a label once it has been applied to the vehicle After applying a label rub the label firmly with a clean dry cloth to make sure the label is adhered to your vehicle Start at the center of a label and smooth towards the outer edges to remove air bubbles DECORATION 30 35 25 19 34 18 17 31 33 19 26 3...

Страница 19: ...19 X3419pr 0920 DECORATION 41 5 4 28 28 38 42 RIGHT SIDE 40 6 4 28 28 39 42 LEFT SIDE 11 12 13 14 32 DASH VIEW ...

Страница 20: ...before charging Charge the battery before storing the vehicle and at least once per month even if the vehicle has not been used Charge the battery after each use regardless of how long the vehicle was used Leaving the battery in a discharged condition will ruin it Always remove an exhausted battery from the vehicle Battery leakage and corrosion can damage the vehicle Do not store the battery in te...

Страница 21: ...allow operation of the vehicle when it is on its side or in an upside down position Do not operate the vehicle near flammable vapors gasoline paint thinner acetone liquid wax etc The vehicle s electrical switches like most electrical switches emit an internal spark when first turned on or turned off which could cause an explosion or fire To prevent unsupervised use of the vehicle disconnect the mo...

Страница 22: ...ng the motors and gears stop the vehicle before shifting from forward to reverse Once your child is completely comfortable with operating the vehicle in the forward mode introduce reverse Make sure the shifter is in the reverse position 1 Press down on the foot pedal 2 The vehicle will go in reverse at a maximum of 21 2 mph 3 The vehicle is designed to operate in low speed only in reverse Help you...

Страница 23: ...shiny finish you can wipe plastic parts with a non wax furniture polish applied to a soft cloth Do not use automotive wax Do not use soap and water or spray the vehicle with a hose To ensure that your vehicle stays in good operating order we recommend that you periodically have your vehicle checked by a Power Wheels authorized service center For the location of the authorized service center neares...

Страница 24: ...ON OR LIMITATION SO THIS LIMITATION MAY NOT APPLY TO YOU Should you need service or assistance with your vehicle during the warranty period do not return the vehicle to the store Power Wheels has provided a nationwide network of authorized service centers If there is not an authorized service center in your area please visit us on line at www powerwheels com or call Consumer Relations for informat...

Страница 25: ... which can cause the wheels to stop spinning while power is still being supplied to the motors If a thermal fuse continually trips contact your local Power Wheels authorized service center Loose wires or loose connectors Check all wires and connectors Make sure the motor harness connector is tightly plugged into the battery and that there are no loose wires around the motors Dead battery If your b...

Страница 26: ...the vehicle by exceeding the 130 lbs maximum weight capacity or by towing anything behind the vehicle Do not drive up hills or run into fixed objects which can cause the wheels to stop spinning while power is still being supplied to the motors If a thermal fuse continually trips contact your local Power Wheels authorized service center Vehicle runs sluggishly Undercharged battery Charge the batter...

Страница 27: ...all wires around the motors and all connectors to make sure they are tight Dead Spot on motor Contact your local Power Wheels authorized service center for diagnosis and repair Battery s thermal fuse constantly trips but the vehicle is not overloaded nor the driving conditions too severe Damaged battery Contact your local Power Wheels authorized service center for diagnosis and repair Child is swi...

Страница 28: ...cated PRINTED IN MEXICO X3419pr 0920 Before first time use you must charge the battery 18 hours Charge the battery immediately after each use Charge the battery once a month even if the vehicle is not used or stored Do not return your vehicle to the store Cadillac the Wreath Crest Emblem Escalade all related Emblems and vehicle body designs are General Motors Trademarks used under license to Fishe...

Отзывы: