background image

13

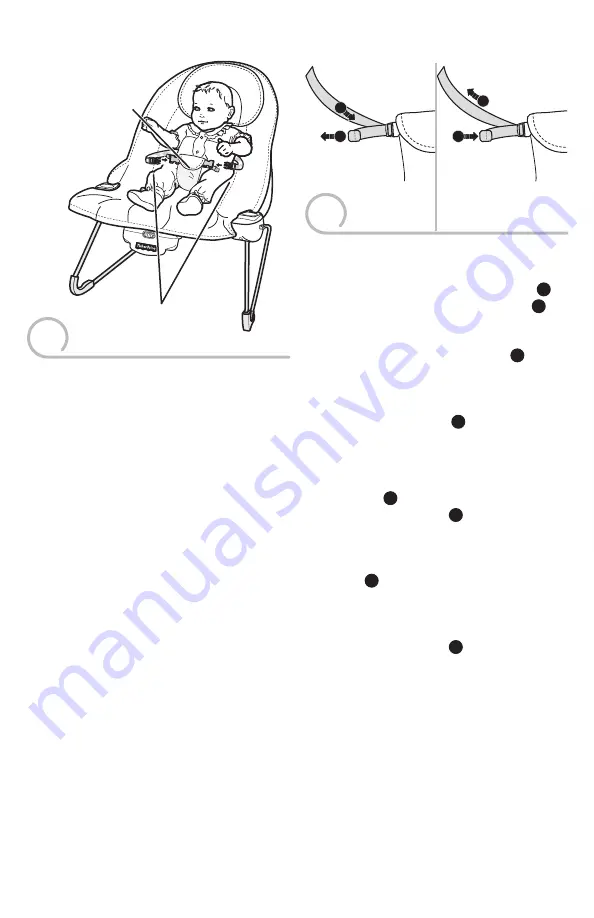
Securing Your Infant

•  Place your child in the seat. Position the 

restraint pad between your child’s legs.

•  Fasten the restraint belts to the restraint 

pad. 

Make sure you hear a “click” on 

both sides.

•  Check to be sure the restraint system is 

securely attached by pulling it away from 
your child. The restraint system should 
remain attached.

•  Tighten each waist belt so that the restraint 

system is snug against your child. Please 
refer to the next section for instructions to 
tighten the waist belts.

Sistema de sujeción

•  Sentar al niño en la silla. Colocar la 

almohadilla de sujeción entre las piernas 
del niño.

•  Ajustar los cinturones de seguridad en la 

almohadilla de sujeción. 

Asegurarse de 

oír un clic en ambos lados.

•  Asegurarse de que el sistema de sujeción 

esté bien asegurado, jalándolo en 
dirección opuesta al niño. El sistema de 
sujeción debe permanecer conectado.

•  Apretar cada cinturón de modo que el 

sistema de sujeción quede bien ajustado 
al niño/a. Consultar la siguiente sección 
para mayores detalles sobre cómo apretar 
los cinturones.

Setup and Use    Preparación y uso

Restraint Belts
Cinturones de seguridad

Restraint Pad
Almohadilla de sujeción

1

To tighten the restraint belts:

•  Feed the anchored end of the restraint belt 

up through the buckle to form a loop 

A

Pull the free end of the restraint belt 

B

.

To loosen the restraint belts:

•  Feed the free end of the restraint belt up 

through the buckle to form a loop 

A

Enlarge the loop by pulling on the end of the 
loop toward the buckle. Pull the anchored 
end of the restraint belt to shorten the free 
end of the restraint belt 

B

.

Para apretar los cinturones de seguridad:

•  Introducir el extremo fijo del cinturón 

de seguridad en la hebilla para formar 
un espacio 

A

. Jalar el extremo libre del 

cinturón de seguridad 

B

.

Para aflojar los cinturones de seguridad:

•  Introducir el extremo libre del cinturón 

de seguridad en la hebilla para formar un 
espacio 

A

. Agrandar el espacio jalando el 

extremo libre del cinturón hacia la hebilla. 
Jalar el extremo fijo del cinturón de 
seguridad para acortar el extremo libre del 
cinturón de seguridad 

B

.

TIGHTEN

APRETAR

LOOSEN

AFLOJAR

A

B

B

A

2

Содержание BFB08

Страница 1: ...up unassisted Product features and decorations may vary from photographs IMPORTANTE Guardar estas instrucciones para futura referencia ya que contienen informaci n de importancia acerca de este produc...

Страница 2: ...go C P 11520 M xico D F R F C MME 920701 NB3 Tels 59 05 51 00 Ext 5206 01 800 463 59 89 CHILE Mattel Chile S A Avenida Am rico Vespucio 501 B Quilicura Santiago Tel 1230 020 6213 VENEZUELA Servicio al...

Страница 3: ...able to sit up unassisted ADVERTENCIA Para evitar lesiones graves o la muerte Peligro de ca das No usar en superficies elevadas ya que el movimiento del ni o puede causar que el producto se resbale o...

Страница 4: ...en exceso IMPORTANT Please remove all parts from the package and identify them before assembly Some parts may be packed in the pad IMPORTANTE Sacar todas las piezas del empaque e identificarlas previ...

Страница 5: ...nes sueltas piezas faltantes o bordes filosos NO usar el producto si falta o est rota alguna pieza P ngase en contacto con la oficina Mattel m s pr xima a su localidad para obtener piezas de repuesto...

Страница 6: ...la p gina 9 para mayores detalles sobre c mo instalar las pilas Colocar el reposapi s de modo que la unidad relajante est en posici n vertical Ajustar el reposapi s en los extremos de los tubos de la...

Страница 7: ...arse de que est bien fijo en los tubos de base derecho e izquierdo Assembly Montaje 7 Position the pad above the frame Fit the upper pocket on the back of the pad onto the seat back tube Colocar la al...

Страница 8: ...en el orificio grande del frente de la almohadilla 9 Choose a stage to soothe 0 3 months or entertain 3 months See page 14 for more information about stages of use Insert and snap the ends of the toy...

Страница 9: ...tment Replace the battery compartment door and tighten the screw Pull and fit the pad seat bottom pocket around the soothing unit and footrest IMPORTANT Low battery power causes the soothing unit to o...

Страница 10: ...sidad o dejen de funcionar es hora de sustituir las pilas 3 1 5V x 3 AA LR6 Battery Installation Colocaci n de las pilas ICES 003 This Class B digital apparatus complies with Canadian ICES 003 Operati...

Страница 11: ...rechargeable batteries from the product before charging If removable rechargeable batteries are used they are only to be charged under adult supervision En circunstancias excepcionales las pilas puede...

Страница 12: ...child unattended Never use for a child able to sit up unassisted ADVERTENCIA Para evitar lesiones graves o la muerte Peligro de ca das No usar en superficies elevadas ya que el movimiento del ni o pu...

Страница 13: ...siguiente secci n para mayores detalles sobre c mo apretar los cinturones Setup and Use Preparaci n y uso Restraint Belts Cinturones de seguridad Restraint Pad Almohadilla de sujeci n 1 To tighten th...

Страница 14: ...hile the song is playing When you are finished slide the power volume switch OFF Unidad relajante Poner el interruptor de encendido en Vibraciones o Apagado Barra de juguetes Escoger una etapa de uso...

Страница 15: ...e gentle cycle Do not use bleach Tumble dry separately on low heat and remove promptly The frame toy bar and toy may be wiped clean using a mild cleaning solution and damp cloth Do not immerse the toy...

Страница 16: ...received including interference that may cause undesired operation Nota FCC V lido s lo en los Estados Unidos Este equipo fue probado y cumple con los l mites de un dispositivo digital de Clase B seg...

Отзывы: